Eat Skinny: Chobani Black Cherry Cheesecake
 PIN IT!
Guys, I did something a little unorthodox this morning.

As in, I made a cheesecake WITHOUT any cheese. Yep, no cream cheese, or ricotta. Not even a dash of mascarpone. This cheesecake? It’s a phony. A big fat FAKE.

But you know what? It’s the creamiest, most delicious, most orgasmic “cheese”cake I’ve ever eaten. Yep, beats out the caramelized banana, the vegan pumpkin and even the sinless lemon. It’s so incredible I can hardly stand it.

And it’s made with YOGURT. Now, it’s weird that I love this because I really [GASP] don’t LOVE yogurt. I mean, I’ll eat it but it’s just not my go-to. Not even the greek yogurt everyone raves about! I don’t know, something about the creamy, thick and dairy texture just doesn’t sit well with me. However, when I bake with it, it’s mind-blowing.

I mean, LOOK AT THIS DESSERT. Makes me a yogurt believer, through and through. And, I even tasted a little of the Chobani before I made it and, guys, I loved it! Maybe I was just eating the wrong kind of yogurt because this stuff tastes like happiness. I was even a little sad to see it go into the cheesecake.

That was, ya know, until I ate a piece. Then I was fine with it because I’m not sure if I’ve mentioned this, but THIS CHEESECAKE IS THE BEST THING EVER.

Y’all, make it for Easter. Your family will be SO impressed. And you won’t have to wear your eating pants either because it’s skinny. Chobani, I think this is the beginning of a beautiful friendship.
Recipe adapted from Eat Live Run.
Chobani Black Cherry Cheesecake

CLICK HERE FOR THE PRINTABLE VERSION OF THIS RECIPE!
Serves 12
Prep time: 10 minutes
Cook time: 35 minutes
Ingredients:
- Light graham cracker crust (I used store bought)
- 2 cups Chobani black cherry Greek yogurt (I used non-fat)
- 2/3 cup sugar
- 2 eggs, lightly beaten
- Pinch of salt
- 2 teaspoons vanilla extract
- 3 tablespoons corn starch
Directions:
- Preheat oven to 350 degrees F.
- In a large bowl, mix yogurt, eggs and sugar together with a wooden spoon until creamy. Add vanilla, salt and corn starch and mix until there are no clumps.
- Pour mixture into the crust, filling just to the top (being sure not to overflow the tip of the crust).
- Bake for 35 minutes or until the edges of the filling are firm and the crust is golden brown. The middle will still be a bit jiggly. Immediately chill for at least 3 hours to let the rest of the filling set.
- Serve with additional cherries, whipped cream or on it’s own!
Nutritional information per slice:
Calories: 179
Fat: 3.2 grams
Carbohydrates: 30.5 grams
Protein: 6.3 grams
Fiber: 2 grams
Weight Watchers Points Plus Points: 5
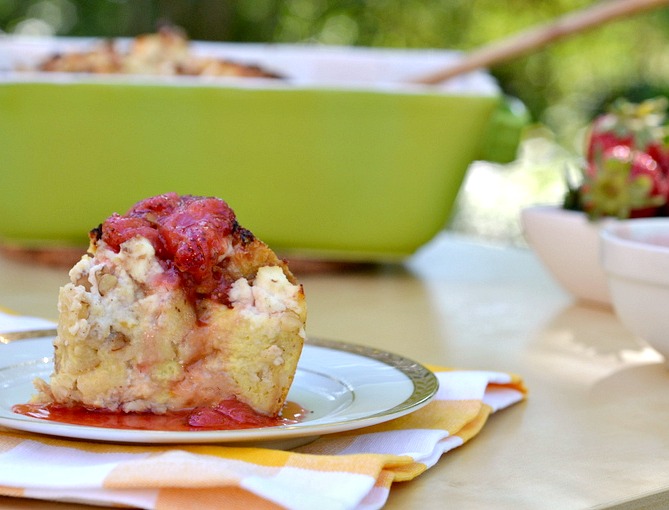
Eat Skinny: Baked French Toast Casserole with Ricotta & Strawberry Syrup
Happy Tuesday friends! I apologize for the lack of post yesterday but I was SO busy with work. I had about 6 articles to finish and 5 recipes to make, photo and edit! Let’s just say it was a doozey of a day! I hope you all had a great start to your week though! Now, to make up for my absence yesterday, I made something extra awesome today. Yep. And, as you can clearly read from the title, it’s got ricotta. AND strawberries. AND FRENCH TOAST!

As I was perusing my recipe database yesterday (for website revision purposes), I stumbled across these darling French toasts and thought “what a cute idea for Easter brunch.” Then, went on my merry way to scour the fridge for daily inspiration and saw these plump, juicy strawberries.

I took them out with no real direction in mind until I saw a loaf of crispy French bread. Light bulb went off and I thought “A-HA! Strawberry french toast!”

Now, strawberry french toast is awesome, but I wanted something even more decadent, even more delicious. So, I perused my fridge again and found a lovely container of fat- free farm fresh ricotta.

Then, my weird mind went to visions of CHEESY French toast with chunky, fresh strawberry syrup and that trumps regular French toast any day.

So, that’s how this happened.

Plus, E, who never, EVER requests anything (weird, I know) asked if I could please make French toast casserole again. Let’s just hope there is some leftover when he gets home from work.
Baked French Toast with Ricotta & Strawberry Syrup

Serves 8
Prep time: 15 minutes
Cook time: 40 – 45 minutes
Ingredients:
- 1 loaf of crispy French bread (1 – 2 days old is best)
- 7 large eggs
- 2 cups light cream
- 1 cup skim milk
- dash of salt
- 2 tablespoons brown sugar
- 1 tablespoon pumpkin pie spice
- 1 teaspoon vanilla
- 2/3 cup fat-free ricotta
- 1/4 cup chopped walnuts
- 3 tablespoons brown sugar
- 3/4 cup mashed strawberries
- 1/2 cup sugar
- 1/2 cup water
Directions:
- Liberally coat a 3 quart baking dish with non-stick cooking spray. Cut french bread into slices (about 1/4 inch think). Then cut into bite size squares or pieces. Layer bread in the greased pan (create about 2 – 3 layers) until all the bread has been used.
- In a large mixing bowl, whisk together the eggs, cream, milk, vanilla, sugar, salt and pumpkin pie spice. Pour mixture over the bread and evenly coat it. Sprinkle with additional pumpkin pie spice and cover with foil or plastic wrap. Chill overnight.
- Once mixture has chilled, remove from fridge. Preheat oven to 350 degrees F. Spread ricotta over the top of the mixture. Sprinkle chopped walnuts and brown sugar over the ricotta.
- Bake for 40 – 45 minutes, or until the mixture is custardy and the cheese is slightly browned.
- While French toast cools, prepare syrup by bringing the sugar and water to a rapid boil, stirring constantly. Add in mashed strawberries, reduce heat and let simmer for about 10 minutes, or until mixture is thick.

- Pour over French toast and enjoy!
Nutritional information 1/2 cup serving (with 2 tablespoons syrup):
Calories: 325
Fat: 9 grams
Carbohydrates: 40 grams
Protein: 10 grams
Fiber: 2 grams
Weight Watchers Points: 7
Eat Skinny: Skillet Asparagus Tart with Lemon & Parmesan
Hi friends! I’m still taking sponsors, so please check out this post for stats, more information and pricing. I’d LOVE to have you!
HAPPY Friday lovelies! I apologize in advance if this post seems like it was written by someone on drugs b/c my NyQuil is still not fully worn off. Wednesday night I started feeling a little funny and yesterday I woke up with a huge face (swollen), scratchy throat and just all around unpleasent demeanor. It’s slightly better now but I’m still feeling…not 100%. Which, guess what, IS NOT okay since I have a jam packed weekend! For starters, my good friend and I are brunching and going to the zoo tomorrow! Then, on Sunday, E and I are going ZIP-LINING in Rockville!

That’ll be me on Sunday, except I’ll be screaming bloody murder the whole way down since I’m terrified of heights! However, if I die, I can at least die with a delicious meal in my belly because I plan on making this delicious meal again this weekend.

Skillet asparagus tart with lemon and parmesan. Yep. I know your first question, um, why the heck did you make a TART in a skillet? Valid question. The reason for this is because the dish, to me, is much more savory and hearty than traditional tarts (like this dainty strawberry dessert). I guess you could call it a manly tart.

Part of this rambling has to do with my cold medicine induced state, while the other is really how my absurd brain works. Either way, preparing this deliciously chessy, eggy and zesty tart in a non-stick skillet not only made clean-up an absolute breeze, but it was so easy to actually remove the tart without any stickage.

See, no stick!

This makes a perfect lazy weekend weekend meal as well as the perfect addition to your Easter brunch! Move over quiche and frittata, there’s a new tart in town and it’s not to be reckoned with. I mean, it has asparagus and lemon, two flavors that are unbeatable.


Okay, I’m actually saying these words outloud with an English accent and my dog is looking at me like I have 16 heads. I think I should retreat to my bedroom and emerge once I stop seeing these little blue leprachauns.
Recipe adapted from Good Housekeeping.
Skillet Asparagus Tart with Lemon & Parmesan

Serves about 8
Prep time: 15 – 20 minutes
Cook time: 30 minutes
Ingredients:
For the biscuit crust:
- 3/4 cup whole wheat flour
- 1 cup all-purpose flour
- 1 teaspoon baking powder
- 6 tablespoons cold butter, cut into cubes
- 8 tablespoons ice cold water
- Liberal dashes of salt and pepper
For the filling:
- 1 pound of asparagus, ends trimmed off
- 3 eggs
- 1 cup skim milk
- 1/3 cup light cream
- 1 tablespoon lemon juice
- 1 tablespoon lemon zest
- Salt
- 2/3 cup Parmesan cheese
- Chopped basil leaves
Directions:
- Preheat oven to 425 degrees F. Spray a non-stick 10 inch skillet with non-stick cooking spray. Set aside.
- In a large bowl, mix flours, baking powder and salt and pepper together. Using a pastry blender or knives, cut butter into the flour mixture until the mixture appears coarse and sandy. Add ice-water to the mixture until moist clumps form and dough can be held together when you form it into a ball. On a lightly floured surface with a floured rolling pin, roll dough out to about 13 inches. Carefully move crust over the skillet and press it down to the bottom and up the sides. Remove any overhang.
- Bake crust for about 15 minutes, or until lightly browned. Set aside.
- In another 10 inch skillet, add about 1 inch of water and bring to a boil. Add asparagus and cook for 5 minutes, or until just tender. Rinse off and let cool slightly. Once cooled, cut into 5 inch spears and set aside.
- Prepare the filling by whisking the eggs, milk, cream, lemon juice, lemon zest and salt until fully mixed.
- Place the asparagus on top of the crust so the leafy top is in the middle. Arrange so you form a circle. Carefully pour egg mixture over the asparagus to cover it. Sprinkle top with Parmesan cheese and basil leaves.
- Bake for 20 – 25 minutes, or until tart is firm but a little jiggly in the middle. Let sit to firm up and serve!
Nutritional information per slice:
Calories: 230
Fat: 7 grams
Carbohydrates: 25 grams
Fiber: 1 gram
Protein: 9 grams
Weight Watchers Points: 5
Sponsor, Sponsor!
Hi lovely, beautiful fans and friends! I hope your Thursday is off to an amazing start! I’m SO excited to announce, firmly, officially and happily, that I’m now taking sponsors for my brand NEW website, which is launching at the end of April!
![]() I’ve been working with the extremely talented Carolynn of Two Brunettes and I’m just dying to show you the entire site!
I’ve been working with the extremely talented Carolynn of Two Brunettes and I’m just dying to show you the entire site!
So, the question you are all asking, what do you get if you sponsor? Here are just a few of the things you can expect as a sponsor of The Realistic Nutritionist:
- More traffic to your amazing blog!
- Opportunity to work with amazing companies like Robert Mondavi, Rise Bar and GoodBelly [to name a few] on giveaways and reviews for your readers.
- Featured posts on my blog, with recipes, link backs and introductions!
- A blog badge made by me to feature on here and your own site!
- Access to my rapidly growing Facebook fans, Twitter followers, Stumble Upon readers and Pinterest followers!
- Exclusive deals, giveaways and content not available to anyone else!
If you’re a numbers person, check out the stats:
- 4500+ views daily, that’s over 100,000 views a month!
- 1800 + counting Facebook fans
- 1350 + counting Twitter followers
- Over 1200 friends on Foodbuzz
- 1000+ combined followers on Pinterest
- and over 350 connections on Stumble Upon
Plus, these numbers are constantly increasing. For example, in December of 2011 (4 short months ago), I was averaging 750 views a day, and now I’m close to 5,000! Want to join in the fun? Check out pricing and more below!
*Early bird pricing ends April 30th, so be sure to act soon!
Early bird pricing:
Featured:
")
[actual size of ad]
- $40 per month.
- 3 spots available, so act fast!
- Size is 200 x 275.
- Will rotate at the very top (above the fold) on the right hand size. Will get a SOLO introduction post and a SOLO giveaway!
Large:

[actual size of ad]
- $30 per month or 3 months for $60.
- Size is 220 x 225.
- Will appear on the right side and will have a shared introduction post and giveaway.
Small:

[actual size of ad]
- $25 per month or 3 months for $45.
- Size is 200 x 125.
- Will appear on the right side and will have a shared giveaway post.
If you’re interested, please email me at realistic.nutritionist@gmail.com. Thanks!
 Claire
Tags:blog traffic, featured, how to increase traffic, increasing blog traffic, rates, sponsor
WIAW + New Dessert Recipes!
Happy Wednesday friends! How are y’all doing today? I’m somewhat shocked it’s already Wednesday since I’m fairly certain it was just Monday. Like, yesterday. Time needs to slow down! So, before I dive right into what I [shamefully] ate yesterday, I want to share a few delicious desserts I’ve been working on for She Knows that I know y’all are just going to LOVE [and want to make immediately]. [PS. They aren’t all healthy]

The beautiful blueberry lemon ice cream I linked to yesterday but just HAD to share again. I mean, look at it! Creamy, tart and with a hint of lemon zest. MMM. Find the RECIPE HERE.

Love sweet and salty? You’re going to DIE for these dark chocolate pistachio cookies. They are rich, chewy and have just the right amount of crunch and saltiness from the nuts. They are like, insane crazy good. Find the RECIPE HERE.

Mini black cherry cheesecakes. Yep, that’s really all I can say because I ate 15 of them this weekend. I’m not mad about it nor do I regret it. These creamy, tart little desserts are HEAVENLY. Find the RECIPE HERE.
Now, onto what I ate yesterday, which is shameful and a bit embarrassing. I blame that TOTM. If you don’t understand that acronym, go back to high school PE.

Breakfast

A piece of this delicious blueberry muffin cake. However, in my defense for eating cake for breakfast, it’s got the same ingredients as a muffin and is substantially lightened up! So there naysayers!
Plus gallons of coffee. Literally, gallons of it.
Lunch

Egg salad with a bit of broccoli slaw! So good! Plus, whenever I eat egg salad, it reminds me picnics which always make me smile. To keep calories and fat in check, I lightened up the traditional recipe with Greek yogurt! Will link to the recipe early next week!
Then, come snack time, things went a little downhill.
Snacks

A vat of Easter candy. An entire GIANT vat. I had to buy the candy for a pretty Easter centerpiece for work and thought “oh it’s fine if I keep it around, I won’t eat it!” Sigh. Why must I be so naive. Because of my binge on candy, I knew dinner had to be SUPAHHH healthy.
Dinner

I made a delicious one-pot vegan stir-fry! I followed the base recipe for my famous szechaun chicken and instead of chicken, added some legumes and protein powder for added protein. Guys, it’s just as good as the meaty original! Will link to the recipe next week when it’s live!
Surprisingly, even after a huge helping of this, I was still hungry. So, instead of diving into the Easter candy again, I had some peanuts.

Not nearly as good but hey, it’s a step in the right, healthy direction.
Speaking of healthy, tomorrow I’m comin’ atcha with a weight loss post. Yep. Something unrelated to food. I hope you’ll still read/like me. Happy Wednesday!
Claire
Tags:best chocolate chip cookie recipe, Easter brunch recipes, Easter Recipes, featured, gluten-free recipes, ice cream recipes, low-fat ice cream recipes, vegan recipes, what i ate wednesday, WIAW


