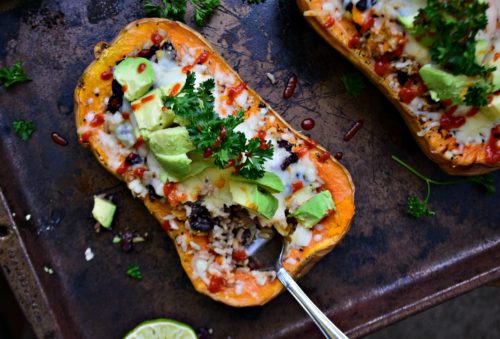
Thanksgiving Prep: Mexican Rice Stuffed Butternut Squash
 PIN IT!
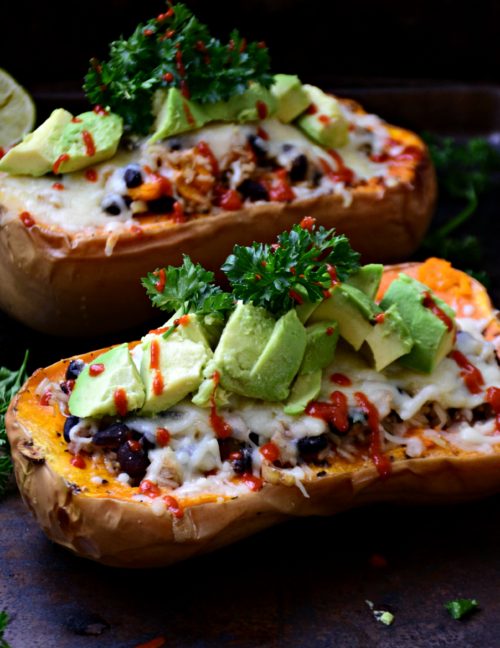
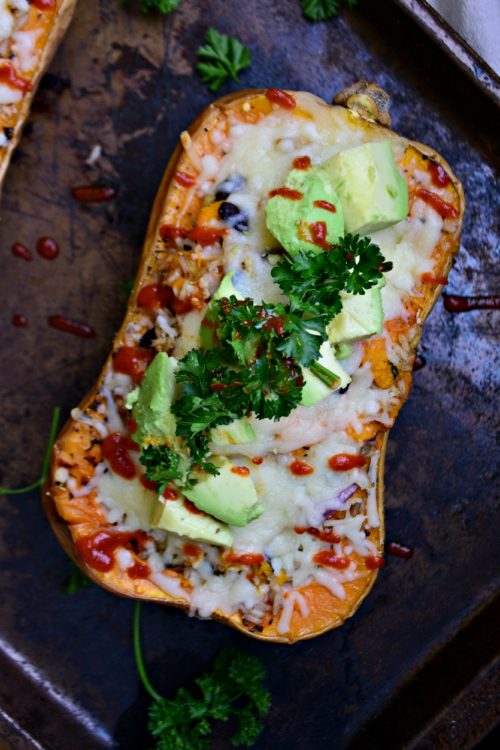
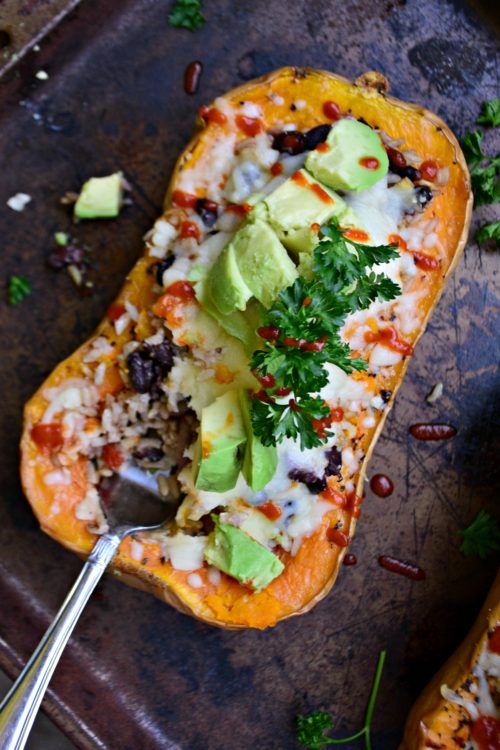
This Mexican rice stuffed butternut squash makes the ultimate Thanksgiving side dish! Plus, it’s beautiful to boot!
About this squash:
Stuffed squash is the new sweet potato casserole. At least in my book, only because I don’t like sweet potato casserole. At all. It’s squish mashed potatoes with cinnamon and topped with marshmallows. Marshmallows have one place they need to be, and that’s delicately smashed between two graham crackers and a giant piece of Hershey’s chocolate.
I’ll tell you one place they don’t belong, ANYWHERE NEAR THANKSGIVING. I have some pretty aggressive feelings on sweet potato casserole, and I refuse to apologize for them. Moving on, though, let’s talk about this Mexican stuffed squash for a hot second. Stuffed squash is one side dish that’s guaranteed to please. For one, it’s beautiful. The vibrancy of the colors make it almost as pretty as a bouquet of of flowers. Except instead of dying, this squash gets devoured. Horray!
About Thanksgiving and life:
This Thanksgiving is a little different than last years, because instead of going back to Cleveland to spend it with my family, I’m going to Chicago to spend it with my boyfriend’s family. Yep, we’re officially THAT official, although we might have hit that mark when we decided to put an offer in on a condo downtown.
BUT, in my head, spending the holidays with a new boyfriend is kind of a big step. I’ve met his family plenty of times, and absolutely love them (we’re even Facebook friends). There’s just something, though, about spending the holidays when them. It’s intimate, a cherished time of year often reserved just for close friends and your close family members. Joining as the new girlfriend to the eldest son is a little bit daunting, to say the least.
So, friends and fans, what would YOU bring to Thanksgiving dinner when you’re the new girlfriend? His mom and sisters are gluten-free, and I know they’re going to have desserts down pat. A side dish, maybe? Something simple, like this squash or these carrots? Or would you opt for something sexier? I’m a little nervous, which means I’ll bring a bottle of wine (that I’ll chug out of nerves), four side dishes and at least 3 bouquets of flowers. Seems normal, right?
Mexican Rice Stuffed Butternut Squash
CLICK HERE FOR THE PRINTABLE VERSION OF THIS RECIPE!
Serves about 4.
Prep time: 40 minutes
Cook time: 15 minutes
Total time: About an hour
Ingredients:
- 1 medium butternut squash (about 2 pounds)
- 1 tablespoon butter
- 1 cup uncooked cooked rice (I used brown)
- 2 cup vegetable broth
- 15 ounce can of black beans, drained
- 2 large tomatos, chopped
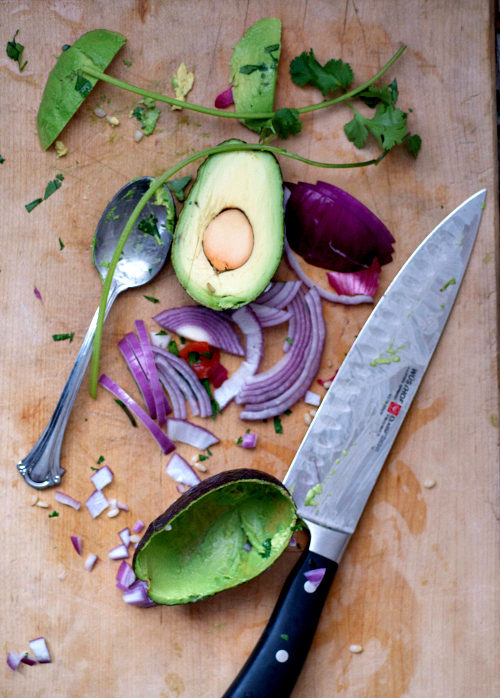
- 1 jalapeno pepper, seeded and chopped
- 1/2 red onion, chopped
- 3 cloves garlic, minced
- 1/2 cup shredded cheddar
- 1/2 cup shredded mozzarella
- 1 large avocado, seeded and chopped
- Fresh parsley or cilantro
Directions:
- Preheat the oven to 400°F. Slice the squash in half and clean out the seeds. Separate the butter in half and place chunks over each half. Roast for about 40 – 45 minutes, or until fork tender. when squash is soft, use a spoon and remove the flesh. Either mash or cut into bite-size pieces.
- When the squash is roasting, make the rice by mixing the rice and two cups of vegetable broth in a medium size saucepan. Bring to a rapid boil and then reduce to a simmer. Cover and let cook for about 15 – 20 minutes, or until rice is fully cooked.
- Fluffy the rice with a fork and mix with the butternut squash, black beans, tomatoes, jalapeno pepper, red onion, garlic and 1/2 cup cheddar. Add salt and pepper to taste.
- Spoon the rice mixture into the squash halves and divide evenly. Sprinkle with mozzarella cheese and bake until everything is heated and cheese is melted, about 8 – 12 minutes. Garnish with avocado and chopped greenery.
Nutritional information per serving (about 1/2 squash):
Calories: 250
Fat: 9.2 grams
Carbohydrates: 12 grams
Fiber: 3 grams
Protein: 8.5 grams
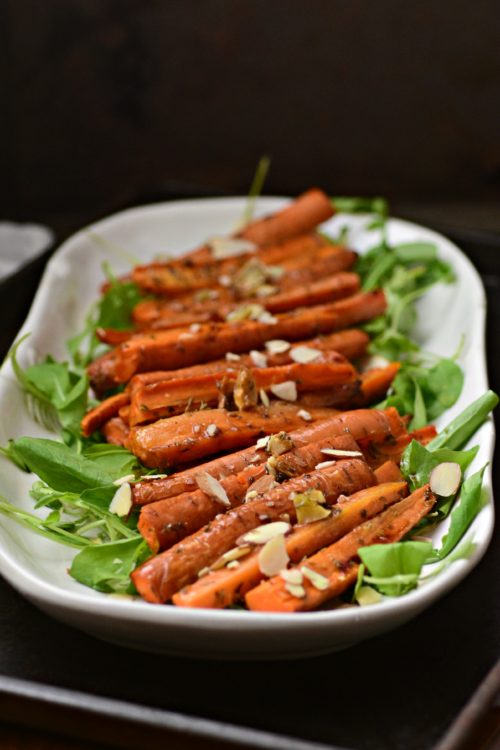
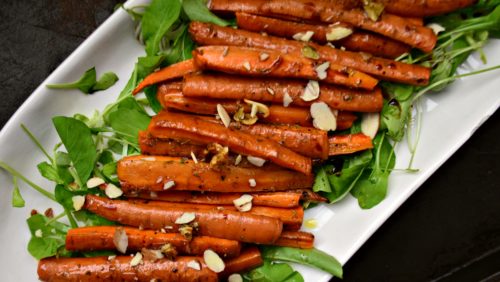
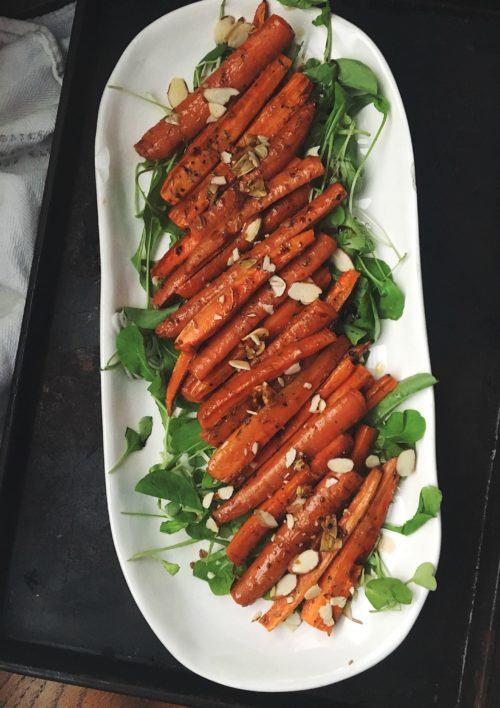
Thanksgiving Prep: Easy Balsamic & Garlic Roasted Carrots
These easy garlic roasted carrots are the perfect Thanksgiving side dish!
About these carrots:
Can you get an easier dish than these garlic and balsamic roasted carrots? No, you can’t. They’re so easy, it’s almost embarrassing I’m posting a recipe for them. But I’m a food blogger and that’s what food bloggers DO during the holidays. With a week away to the stuffyourfaceuntilyourpantsdontfit holiday, you’re probably looking for recipes that are easy to make and relatively healthy, right? I mean, I know I am and I’m not even cooking the entire meal. My favorite part about these carrots is the garlic. 5 cloves, you guys. 5 delicious cloves are minced and sprinkled over these beauties. You may not be able to kiss your loved ones after noshing on these carrots, but at least your kitchen will smell aromatic and absolutely delicious. Plus, who kisses anyone on Thanksgiving anyway? Your mouth is busy doing other things, like eating ten pounds of mashed potatoes and an entire turkey.
About life:
Can we talk about how I failed at Paleo 3 days after starting it?

Diets have never been my strong suit, which is entirely why I keep going up and down within the same number on the scale and can’t seem to make it budge in the direction I want it to. It seems to always move UP instead of down, despite my best efforts to eat healthfully and workout 5x a week. But, there’s one thing I’m trying to learn and apply to my 2018 – that a number doesn’t matter as long as you’re happy and healthy. Of course, you want to have some idea as to how much you actually weigh, but the number shouldn’t be your only driver to your health.
It’s a hard lesson for me, as a girl who still weighs herself everyday and does feel down when the number doesn’t align with the one I have in my head. We all have that number, the oh so desirable “goal weight.” The number where we say to ourselves “When I’m this number, I’ll be happy,” or “When I finally hit XXX, I’ll fall in love.” Funny enough, that’s not how life works. Because that kind of thinking only means one thing, you’ll never be happy with your weight, even at that magical number. Trust me, I’ve hit my goal a few times in my life and when I hit it, I only wanted to lose more. I replaced the number I hit with another one, an even more unrealistic number. Was I happy? No. I picked and purged just as much as I did 10 pounds heavier.
So this year, and especially this holiday season, I’m going to try NOT to think about the numbers. I’m going to try just to focus on keeping up with the healthy habits I’ve already adapted and find other ones that’ll continue to bring me strength and happiness. for me, that’s my workouts, my studies and eating a healthy, balanced vegetarian diet. What is it to you?
Easy Balsamic & Garlic Roasted Carrots
CLICK HERE FOR THE PRINTABLE VERSION OF THIS RECIPE!
Serves about 6.
Prep time: >10 minutes
Cook time: About 20 minutes
Total time: 30 minutes
Ingredients:
- 12 large carrots
- 5 large cloves garlic
- 1/4 cup olive oil
- 1/4 cup chopped fresh herbs (I used thyme, rosemary and parsley)
- Dash of salt
- Dash of pepper
- 2 – 3 tablespoons high quality balsamic vinegar
Directions:
- Preheat oven to 400 degrees F. Line a 9 x 13 baking dish with parchment paper and set aside.
- Chop the ends off the carrots. Cut into 1 1/2 inch slices or julianne. Chop the garlic.
- Layer the carrots onto the parchment paper. Drizzle liberally with the olive oil. Sprinkle the carrots with garlic, herbs, salt and papper.
- Roast for about 20 minutes, stopping to toss 10 minutes in, or until fork tender. Drizzle with balsamic and serve hot.
Nutritional information per serving:
Calories: 150
Fat: 7.2 grams
Carbohydrates: 12 grams
Fiber: 4 grams
Protein: 1 gram
Protein Packed Green Smoothie Bowl
This might sound sacrilegious as a healthy food blogger, but I’m never excited to have a smoothie for breakfast. Now, that may seem surprising, given how many smoothie recipes I actually have on this blog. But if we’re being honest, smoothies just aren’t as exciting as french toast, a big stack of pancakes , a big bowl of huevos rancheros or literally anything with bacon or maple sausage. They’ve become an easy go-to for busy mornings of after the gym, and little thought is put into it.

Which is depressing and sad and precisely why I decided to give them a makeover with the help of Braun‘s brand new Pure Mix Blender. Braun is back in North American kitchens with a brand new line of beautifully designed products to help you amp up your favorite recipes and turn them into something new and totally unexpected.

My mission, if you’ll call it that, was to recreate a recipe that just doesn’t excite or enthrall anymore, and I almost immediately knew I had to make a smoothie. I’ve been trying to perpetually get into shape, and have been resorting to healthy, low-sugar smoothies to do this. But, as I said before, they became monotonous – I’d had handfuls of the same ingredients, mix and drink – without little to no enjoyment.

So, to perk up my sad smoothies, I decided to give one of my favorite recipes a little bit of a facelift.
I put down the straw and the cup and opted for a spoon and a bowl instead. Now, I’m not new to the smoothie bowl phenomenon – but I have to say, it’s one of the easiest and prettiest ways to perk up an everyday smoothie. For me, my favorite part is the textural contrast. Where I got bored just sipping a smoothie, the addition of crunchy granola on top gives this bowl the perfect textural contrast.

Even though it’s the same smoothie I’ve been drinking for weeks, the swap for a bowl and the addition of beautiful sliced fruits, homemade fruit bars, chia seeds and granola transforms the way I consume it. No more mindless slurping, I truly enjoy each and every bite – and it feels more like a breakfast, one you could sit down and eat (even on the weekends) with as much as excitement as you would with a big stack of pancakes.
[insert video]
Now, I can’t say everyone will share that same excitement, but for me, the smoothie bowl facelift was exactly what I needed to end the mundane smoothie sips and bring joy back to breakfast.
It is the most important meal of the day, after all. Shouldn’t you enjoy it?
Protein Packed Green Smoothie Bowl

Serves about 2.
Prep time: >8 minutes
Blend time: 2 – 3 minutes
Total time: About 11 minutes
Ingredients:
For the smoothie base:
- 1 cup fresh kale
- 1/2 cup low-fat, no sugar added strawberry yogurt (Greek or regular)
- 2 tablespoons peanut butter
- 2 tablespoons chia seeds
- 1 nectarine, sliced
- 1 cup frozen strawberries (I used frozen strawberry puree**)
- 1 1/2 cup low-fat milk
- 1/2 cup water or sugar-free juice
- 1 tablespoon sugar-free strawberry jam
For the bowl toppings:
- Granola
- Sliced nectarine
- Sliced apple
- Strawberries or frozen puree cubes
- Chia seeds
**Simply blend 2 cups strawberries until pureed and pour into ice cube trays. Freeze until solid.
Directions:
- Place all of the ingredients (for the smoothie base only) into a blender (I used Braun’s new PureMix Blender).
- Blend on medium speed for about 2 minutes, or until smooth and creamy. Add additional ingredients (like fruit) to taste, or additional milk for desired consistency.
- Pour the smoothies into two bowls. Add the toppings to the tops of the smoothie (in any fashion you’d like) and dig in!
Nutritional information per bowl:
Calories: 425
Fat: 13.2 grams
Carbohydrates: 55 grams
Fiber: 4.5 grams
Protein: 18 grams
Weight Watchers Points: 11
This is a sponsored conversation written by me on behalf of Braun. The opinions and text are all mine.
 Claire
Tags:best smoothie bowl recipes, blender, braun, easy smoothie bowl, healthy bowl, smoothie bowl, sponsored post
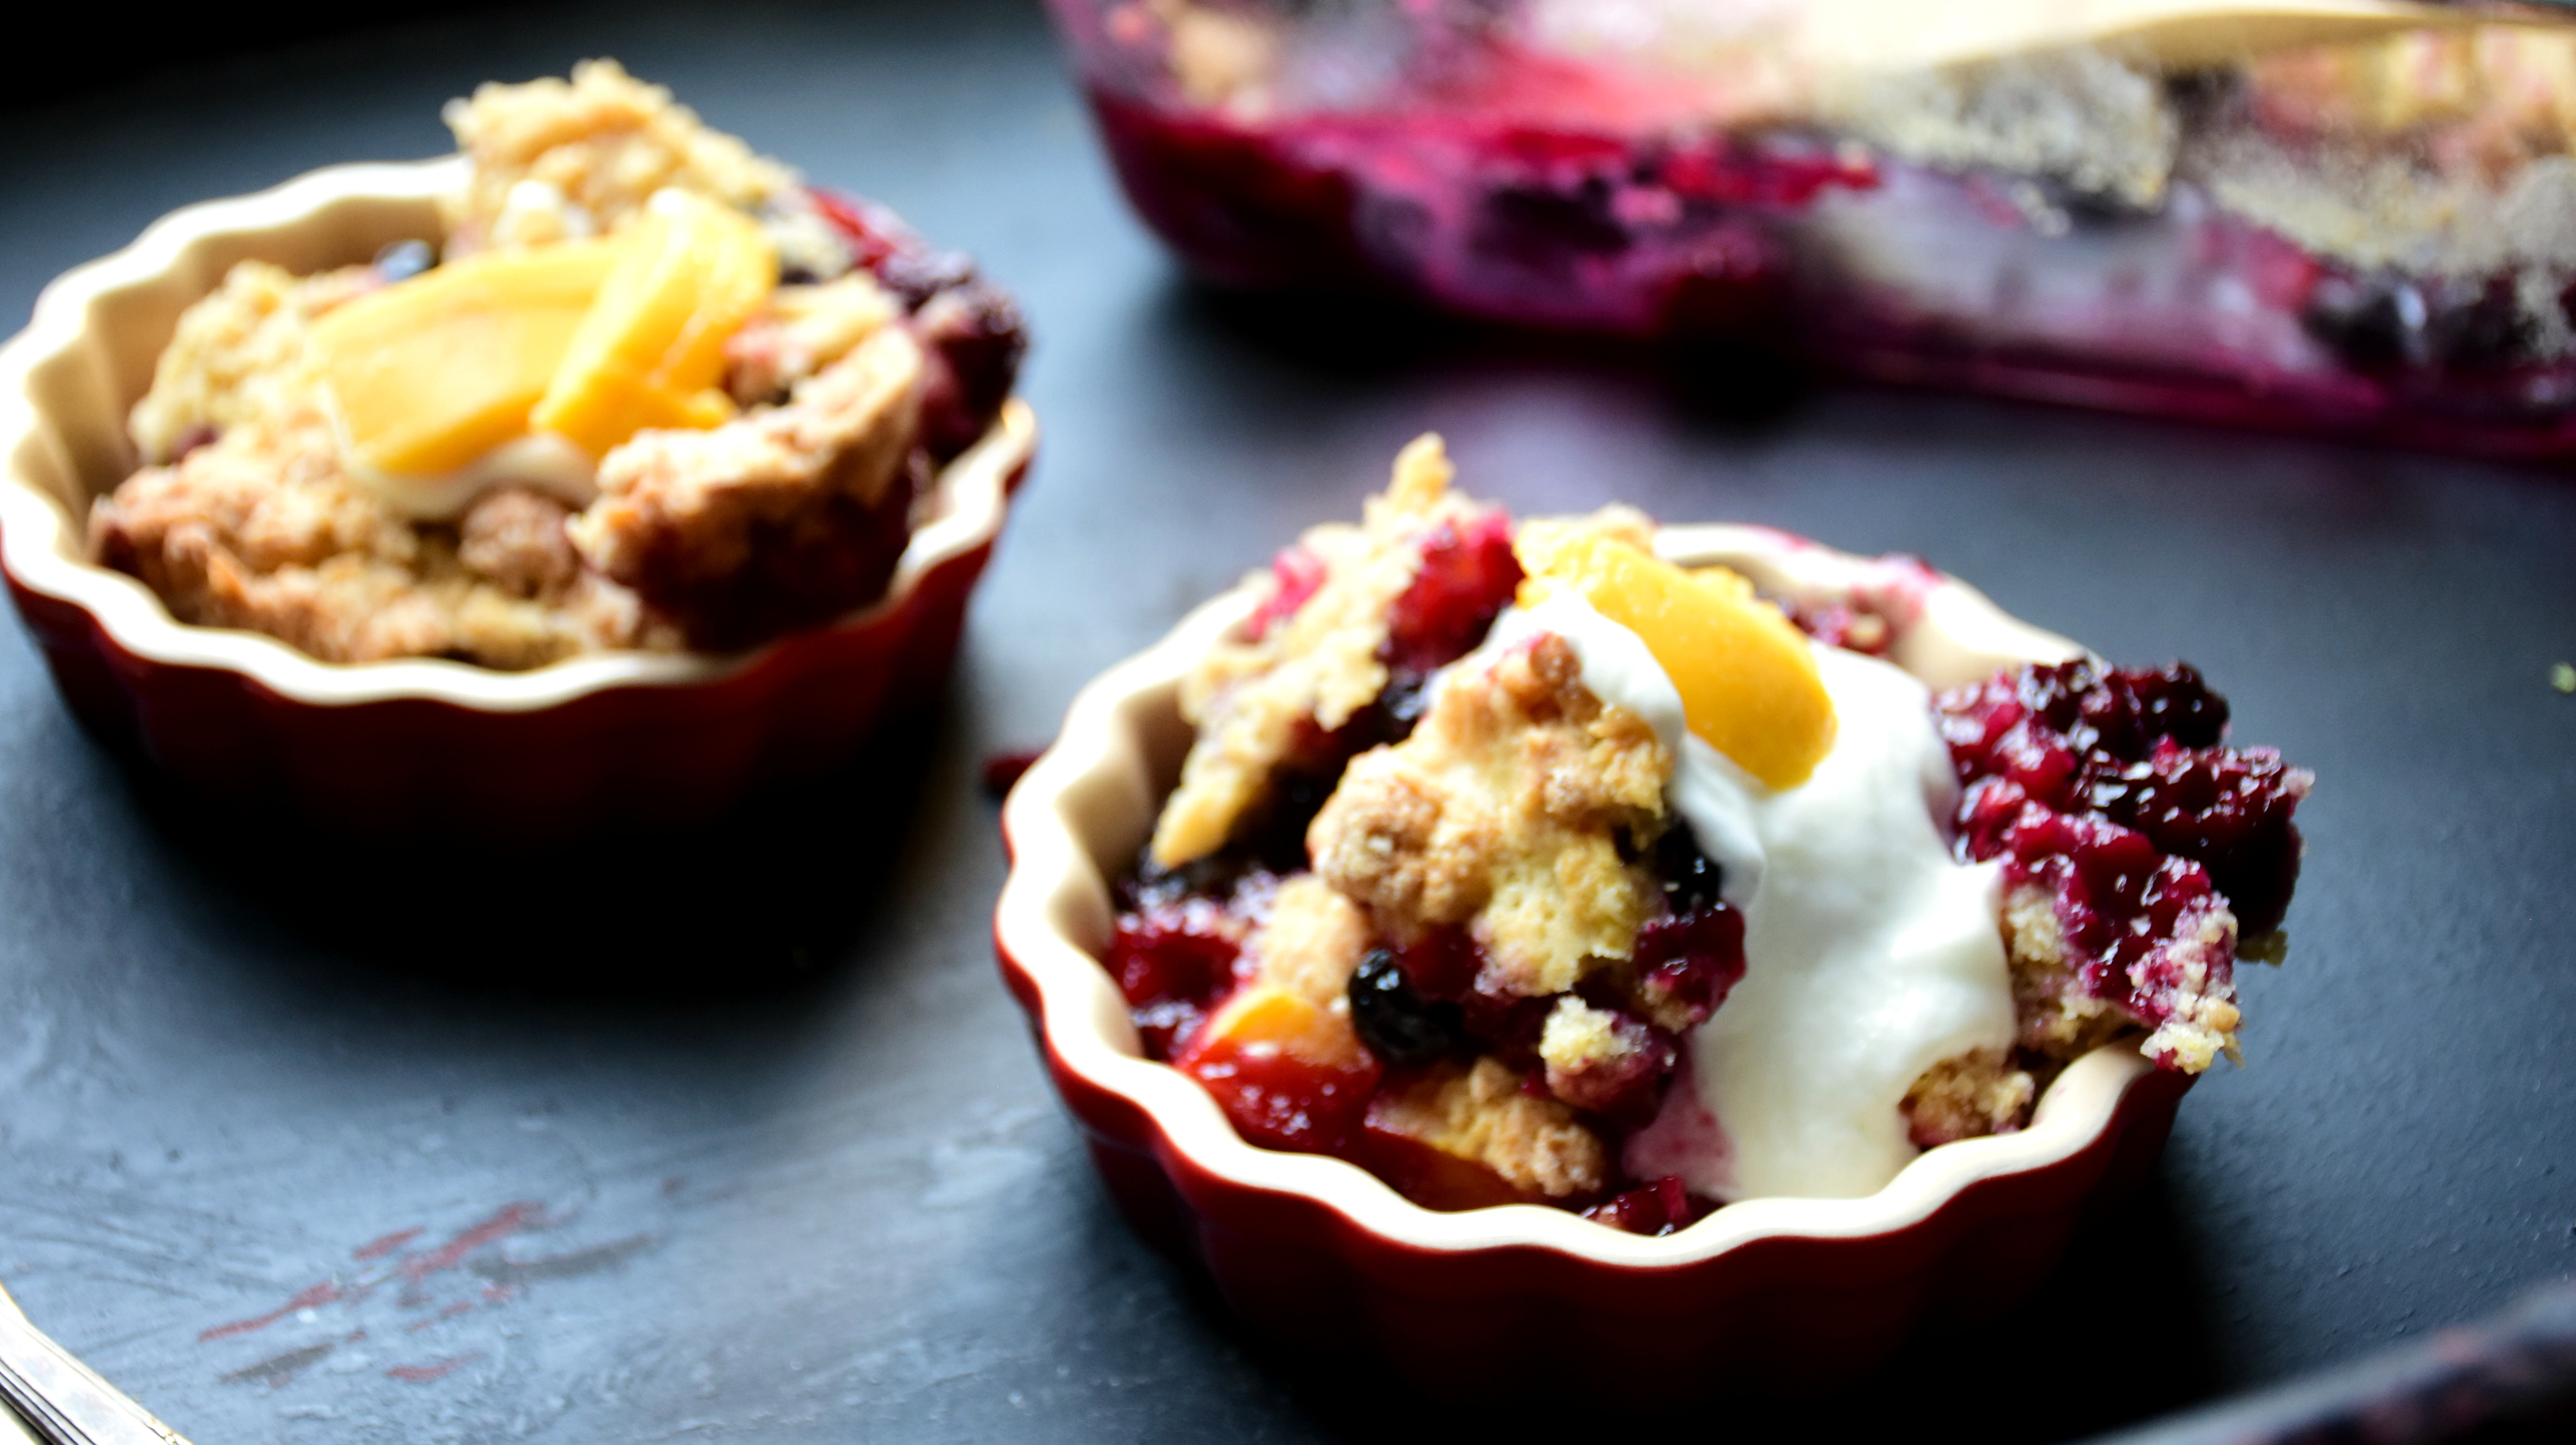
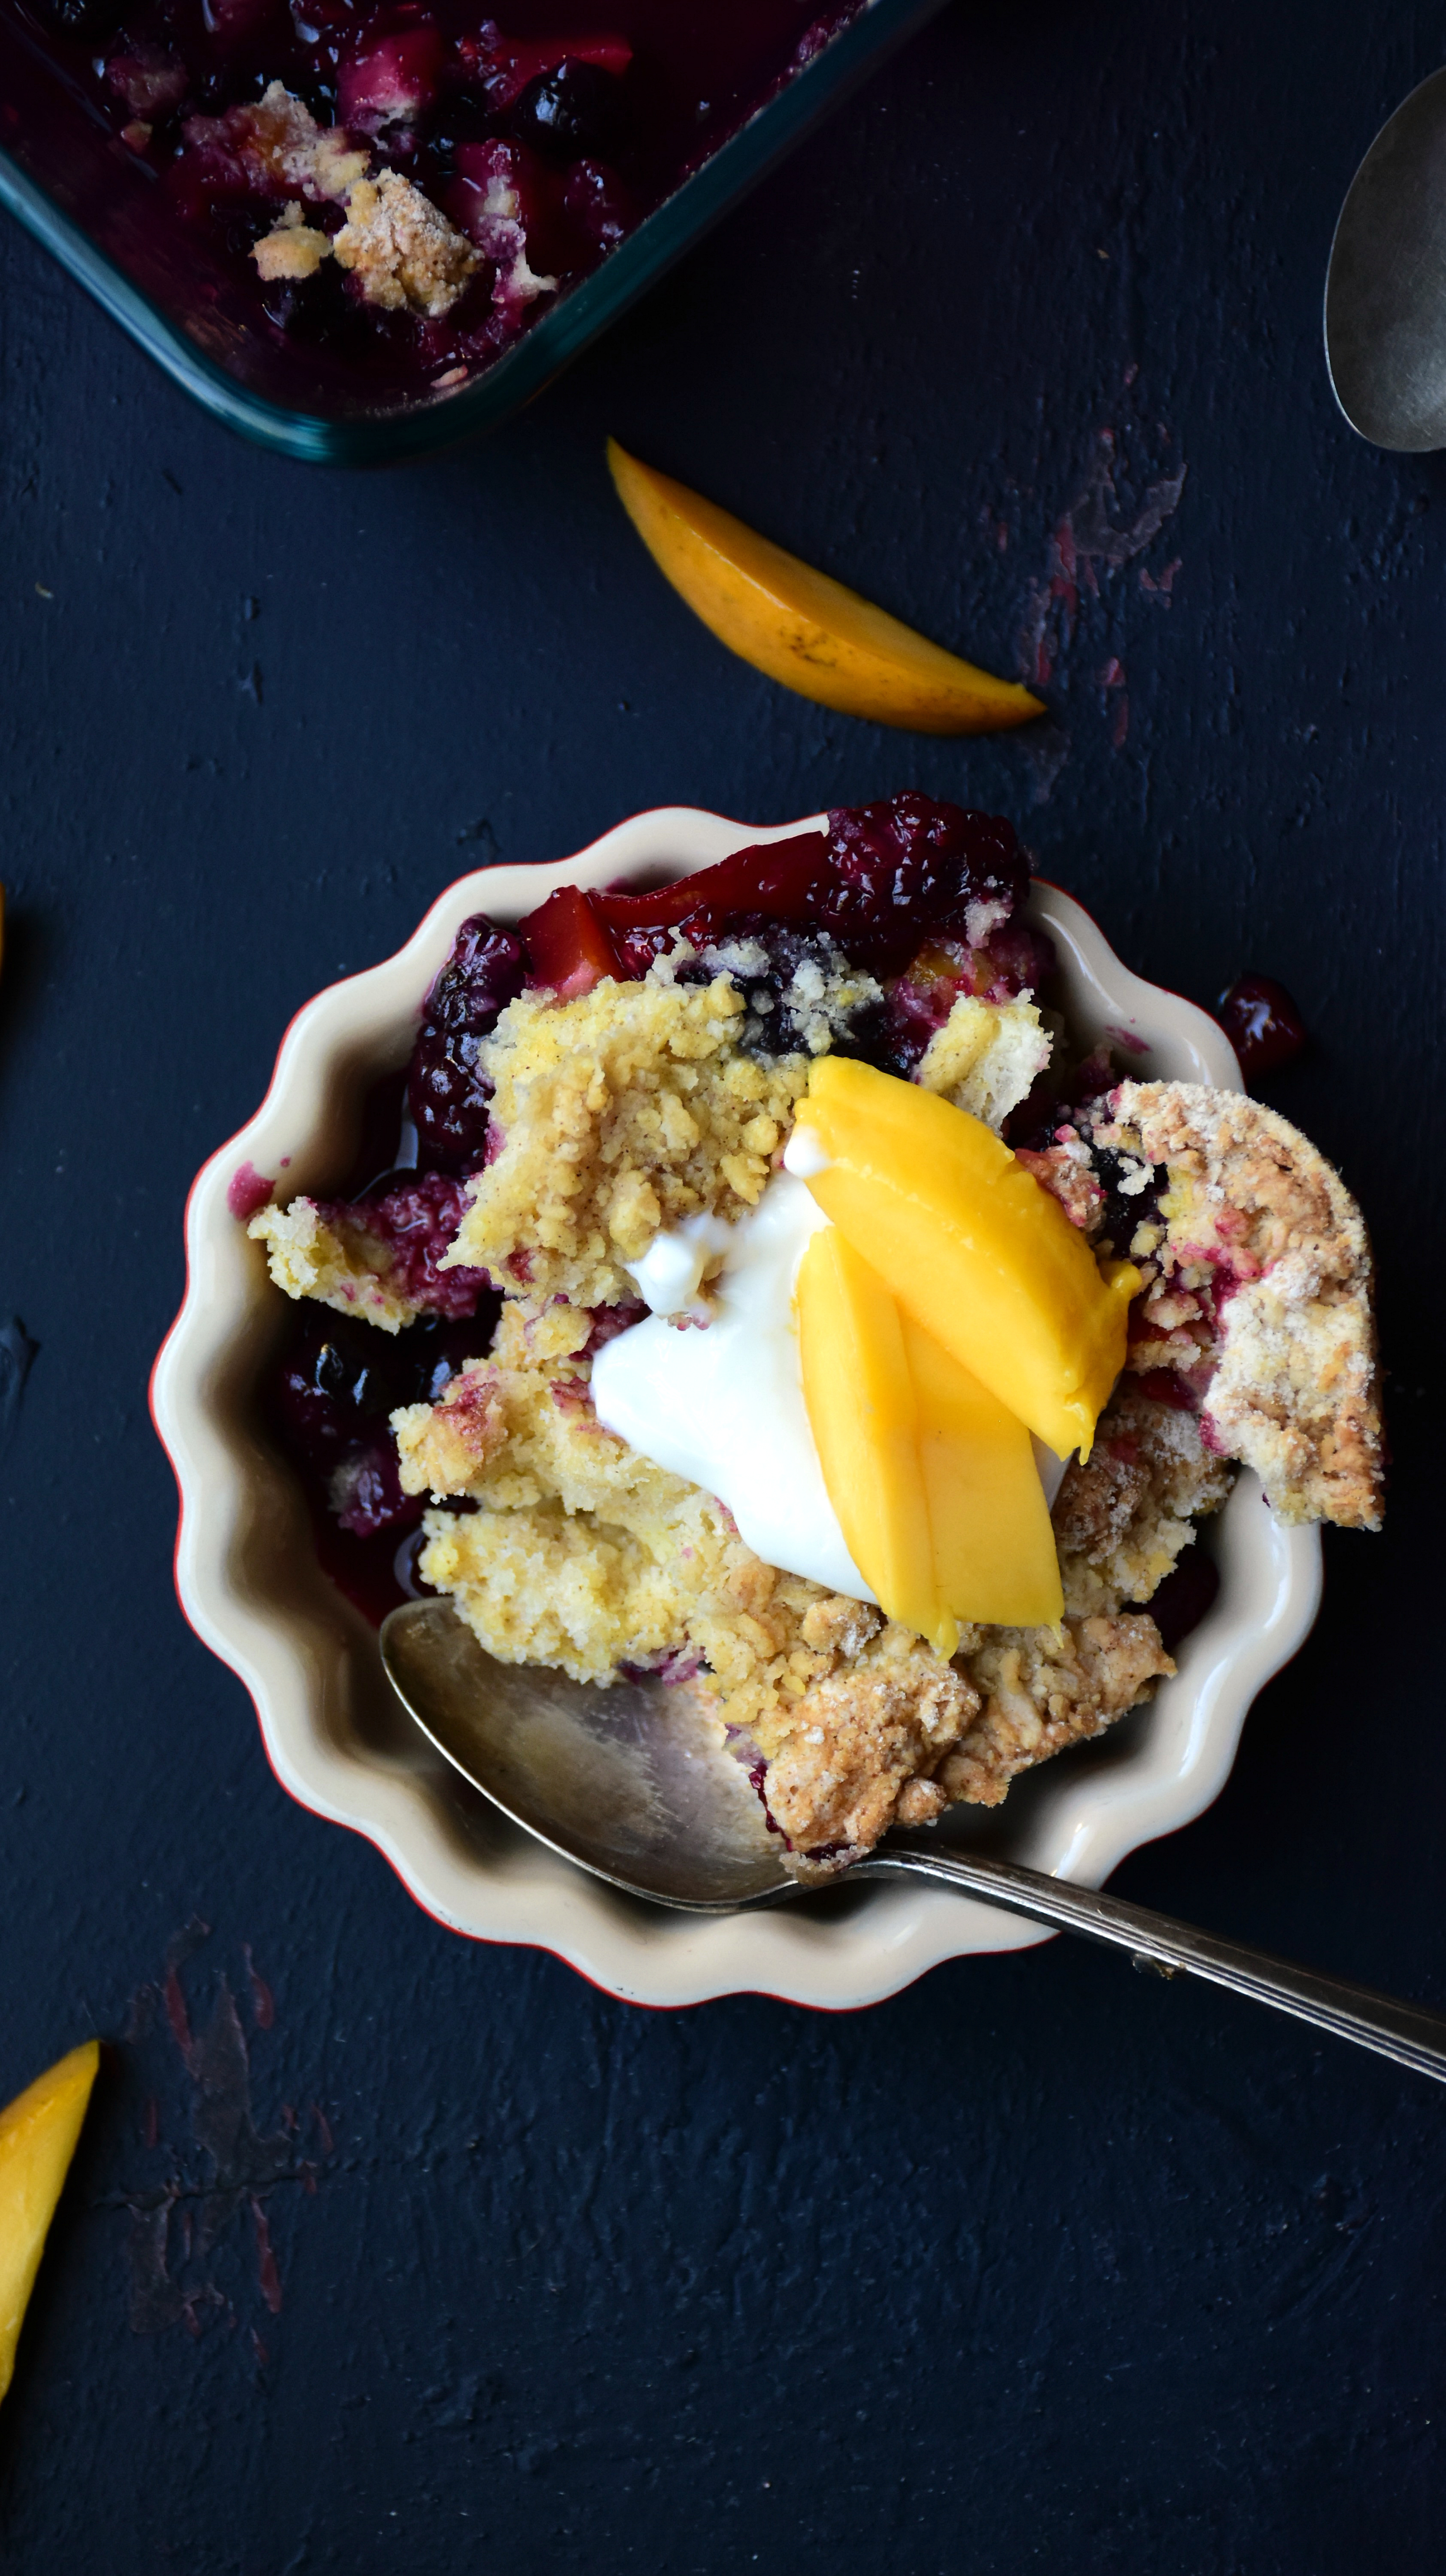
Mango & Mixed Berry Cobbler
Celebrate the [unofficial] start of summer with this delicious mango & mixed berry cobbler – the perfect dessert for your Memorial Day table!

This month blew by my face faster than a tornado. True, I was out of the country for most of it, but still. I’m still soaking up springtime, y’all, I’m not ready for summer, both in body and in mind. But, such is life, and I’m kind of excited to embrace the heat, the longer days, the beach weekends, the evening hammock and wine nights and the long walks under the oaks that come with my first summer as an transplant Southerner.
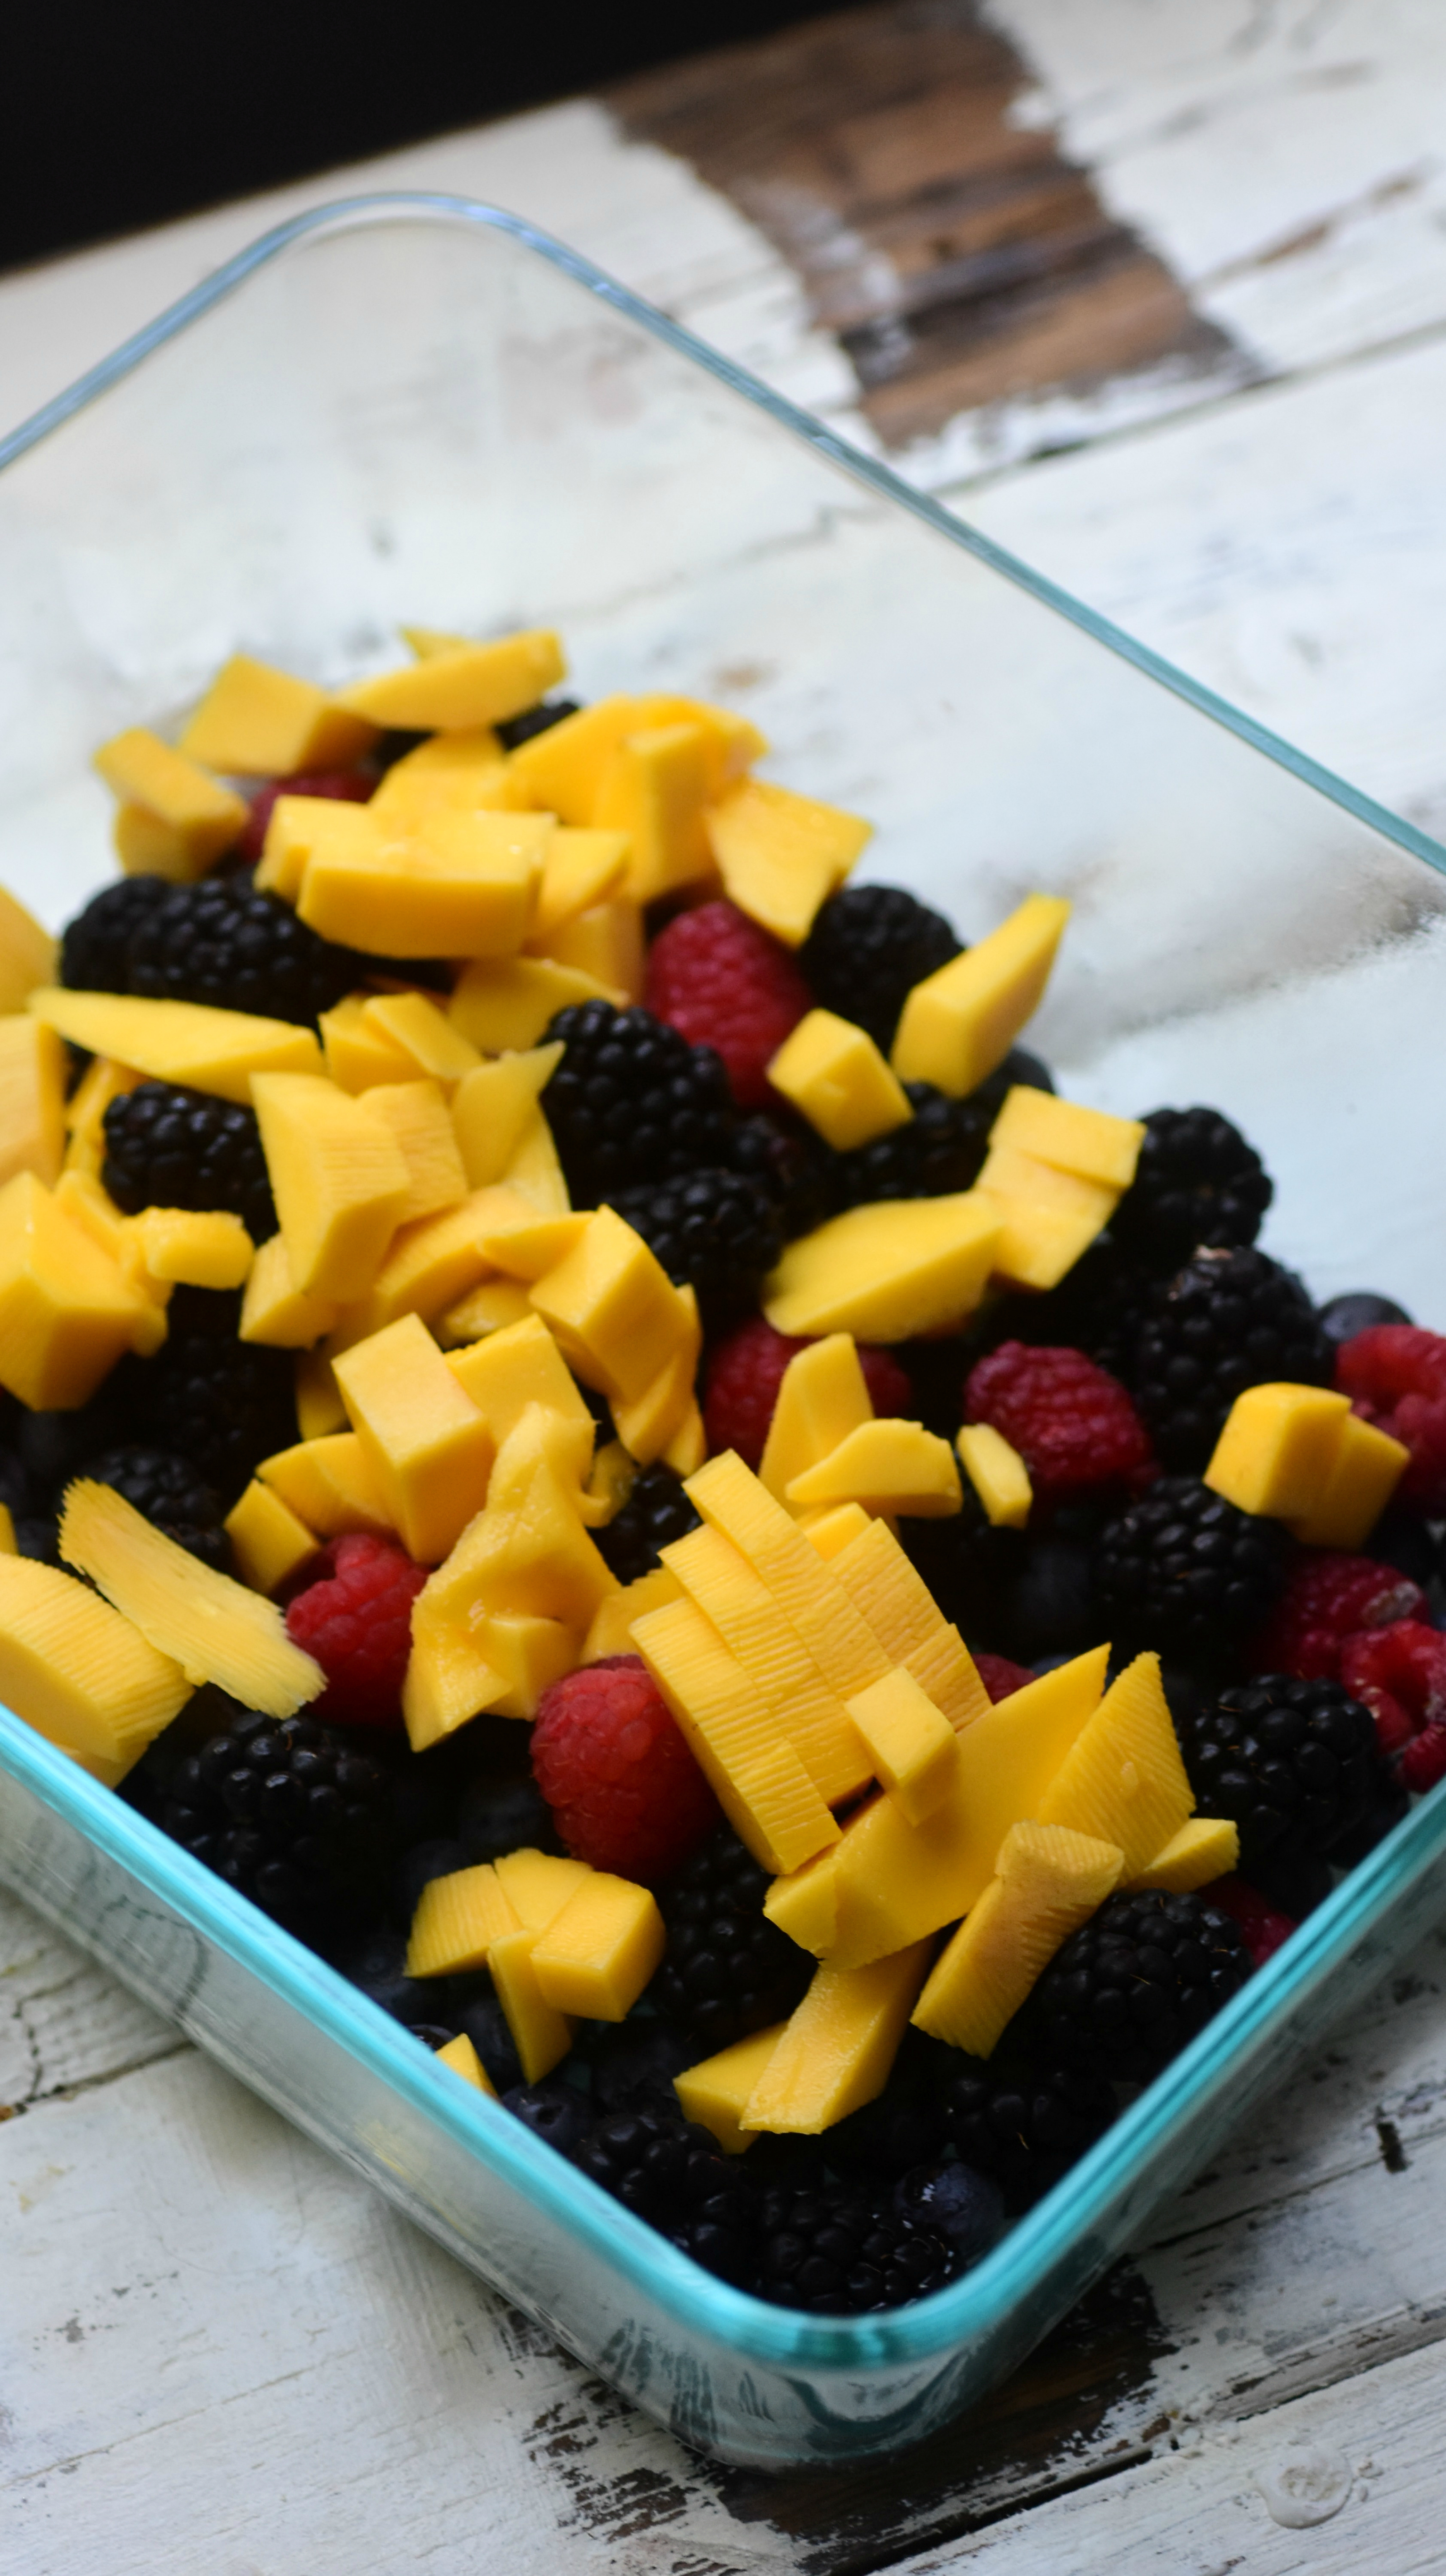
Although I’ve just been here a few months, I know one thing is for sure – southerners love their desserts, and celebrate any day, week, month, season change, birthday, Tuesday or season finale with one. To pay homage to my new roots, I decided to honor the change of the seasons with the most suitable of sweets – a mango & mixed berry cobbler.

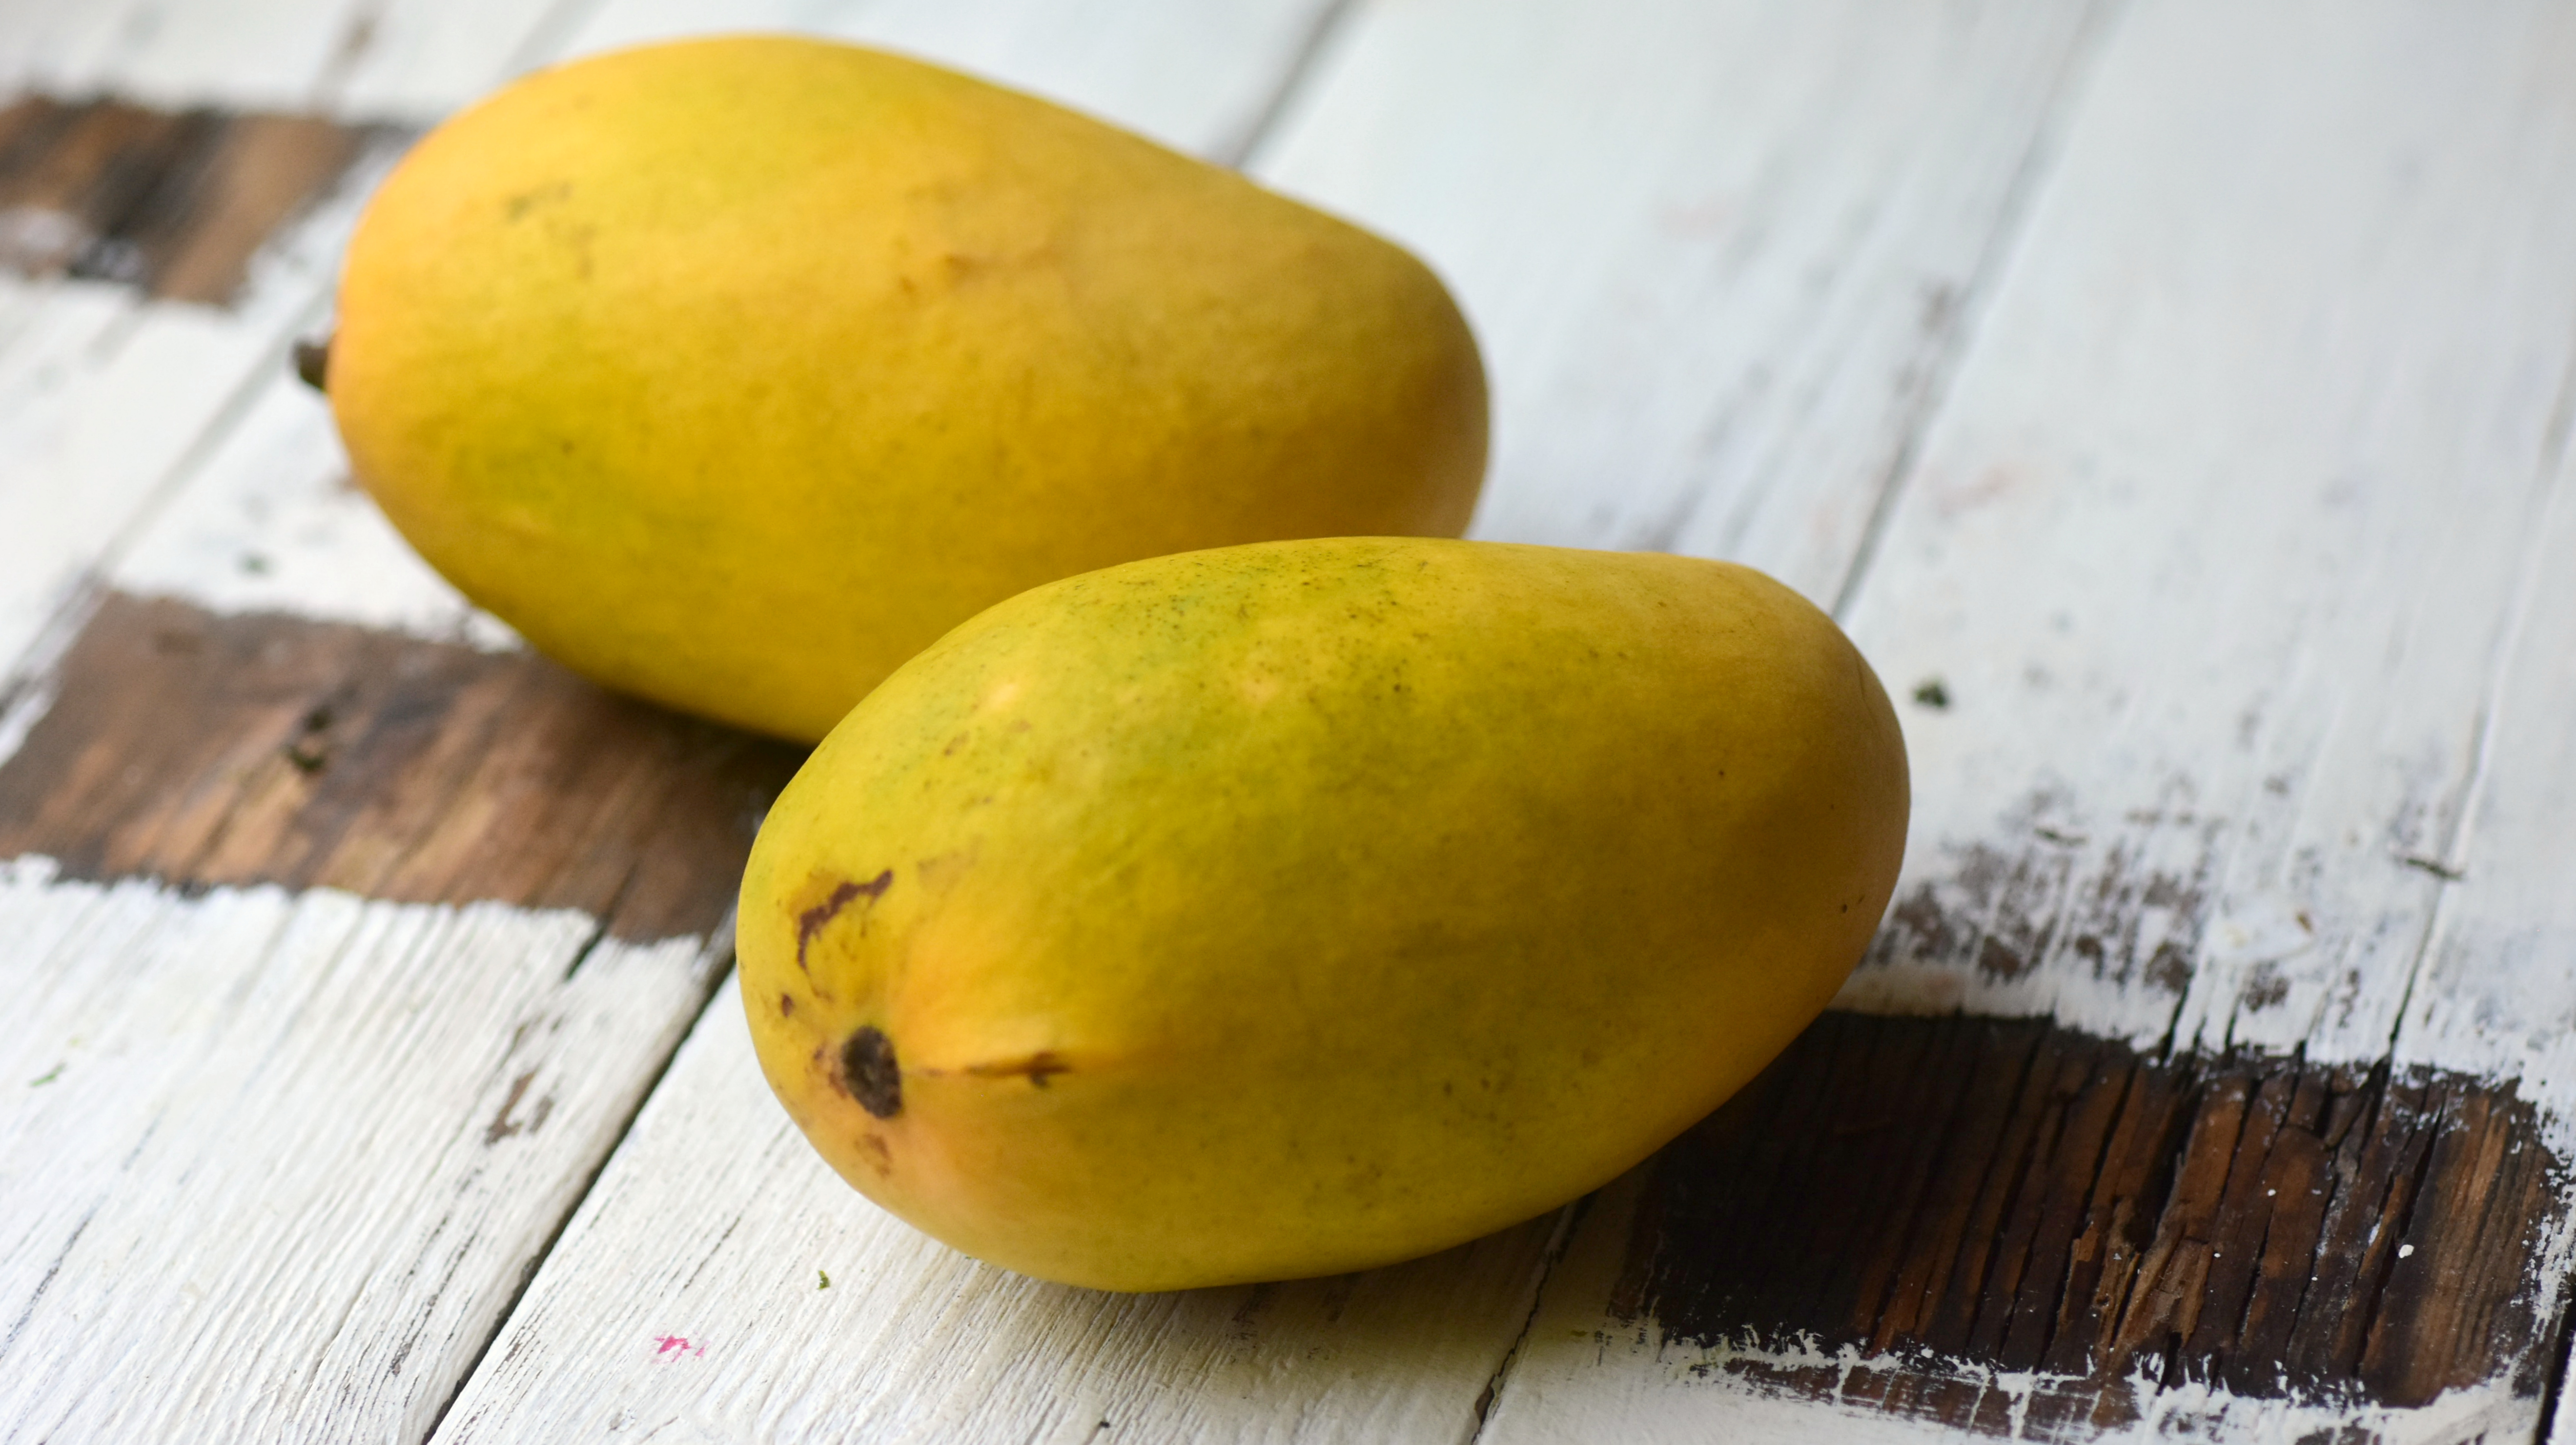
To me, you can’t have summer without mango. It’s fleshy, perfectly sweet and oh-so-juicy, not to mention amazingly versatile. You can use them in smoothies, muffins, ice creams, pies or even savory dishes like chicken salad or guacamole. I’ve tried it every which way and can’t decided which my favorite is – because they’re all so good, refreshing, light and, well, summery.
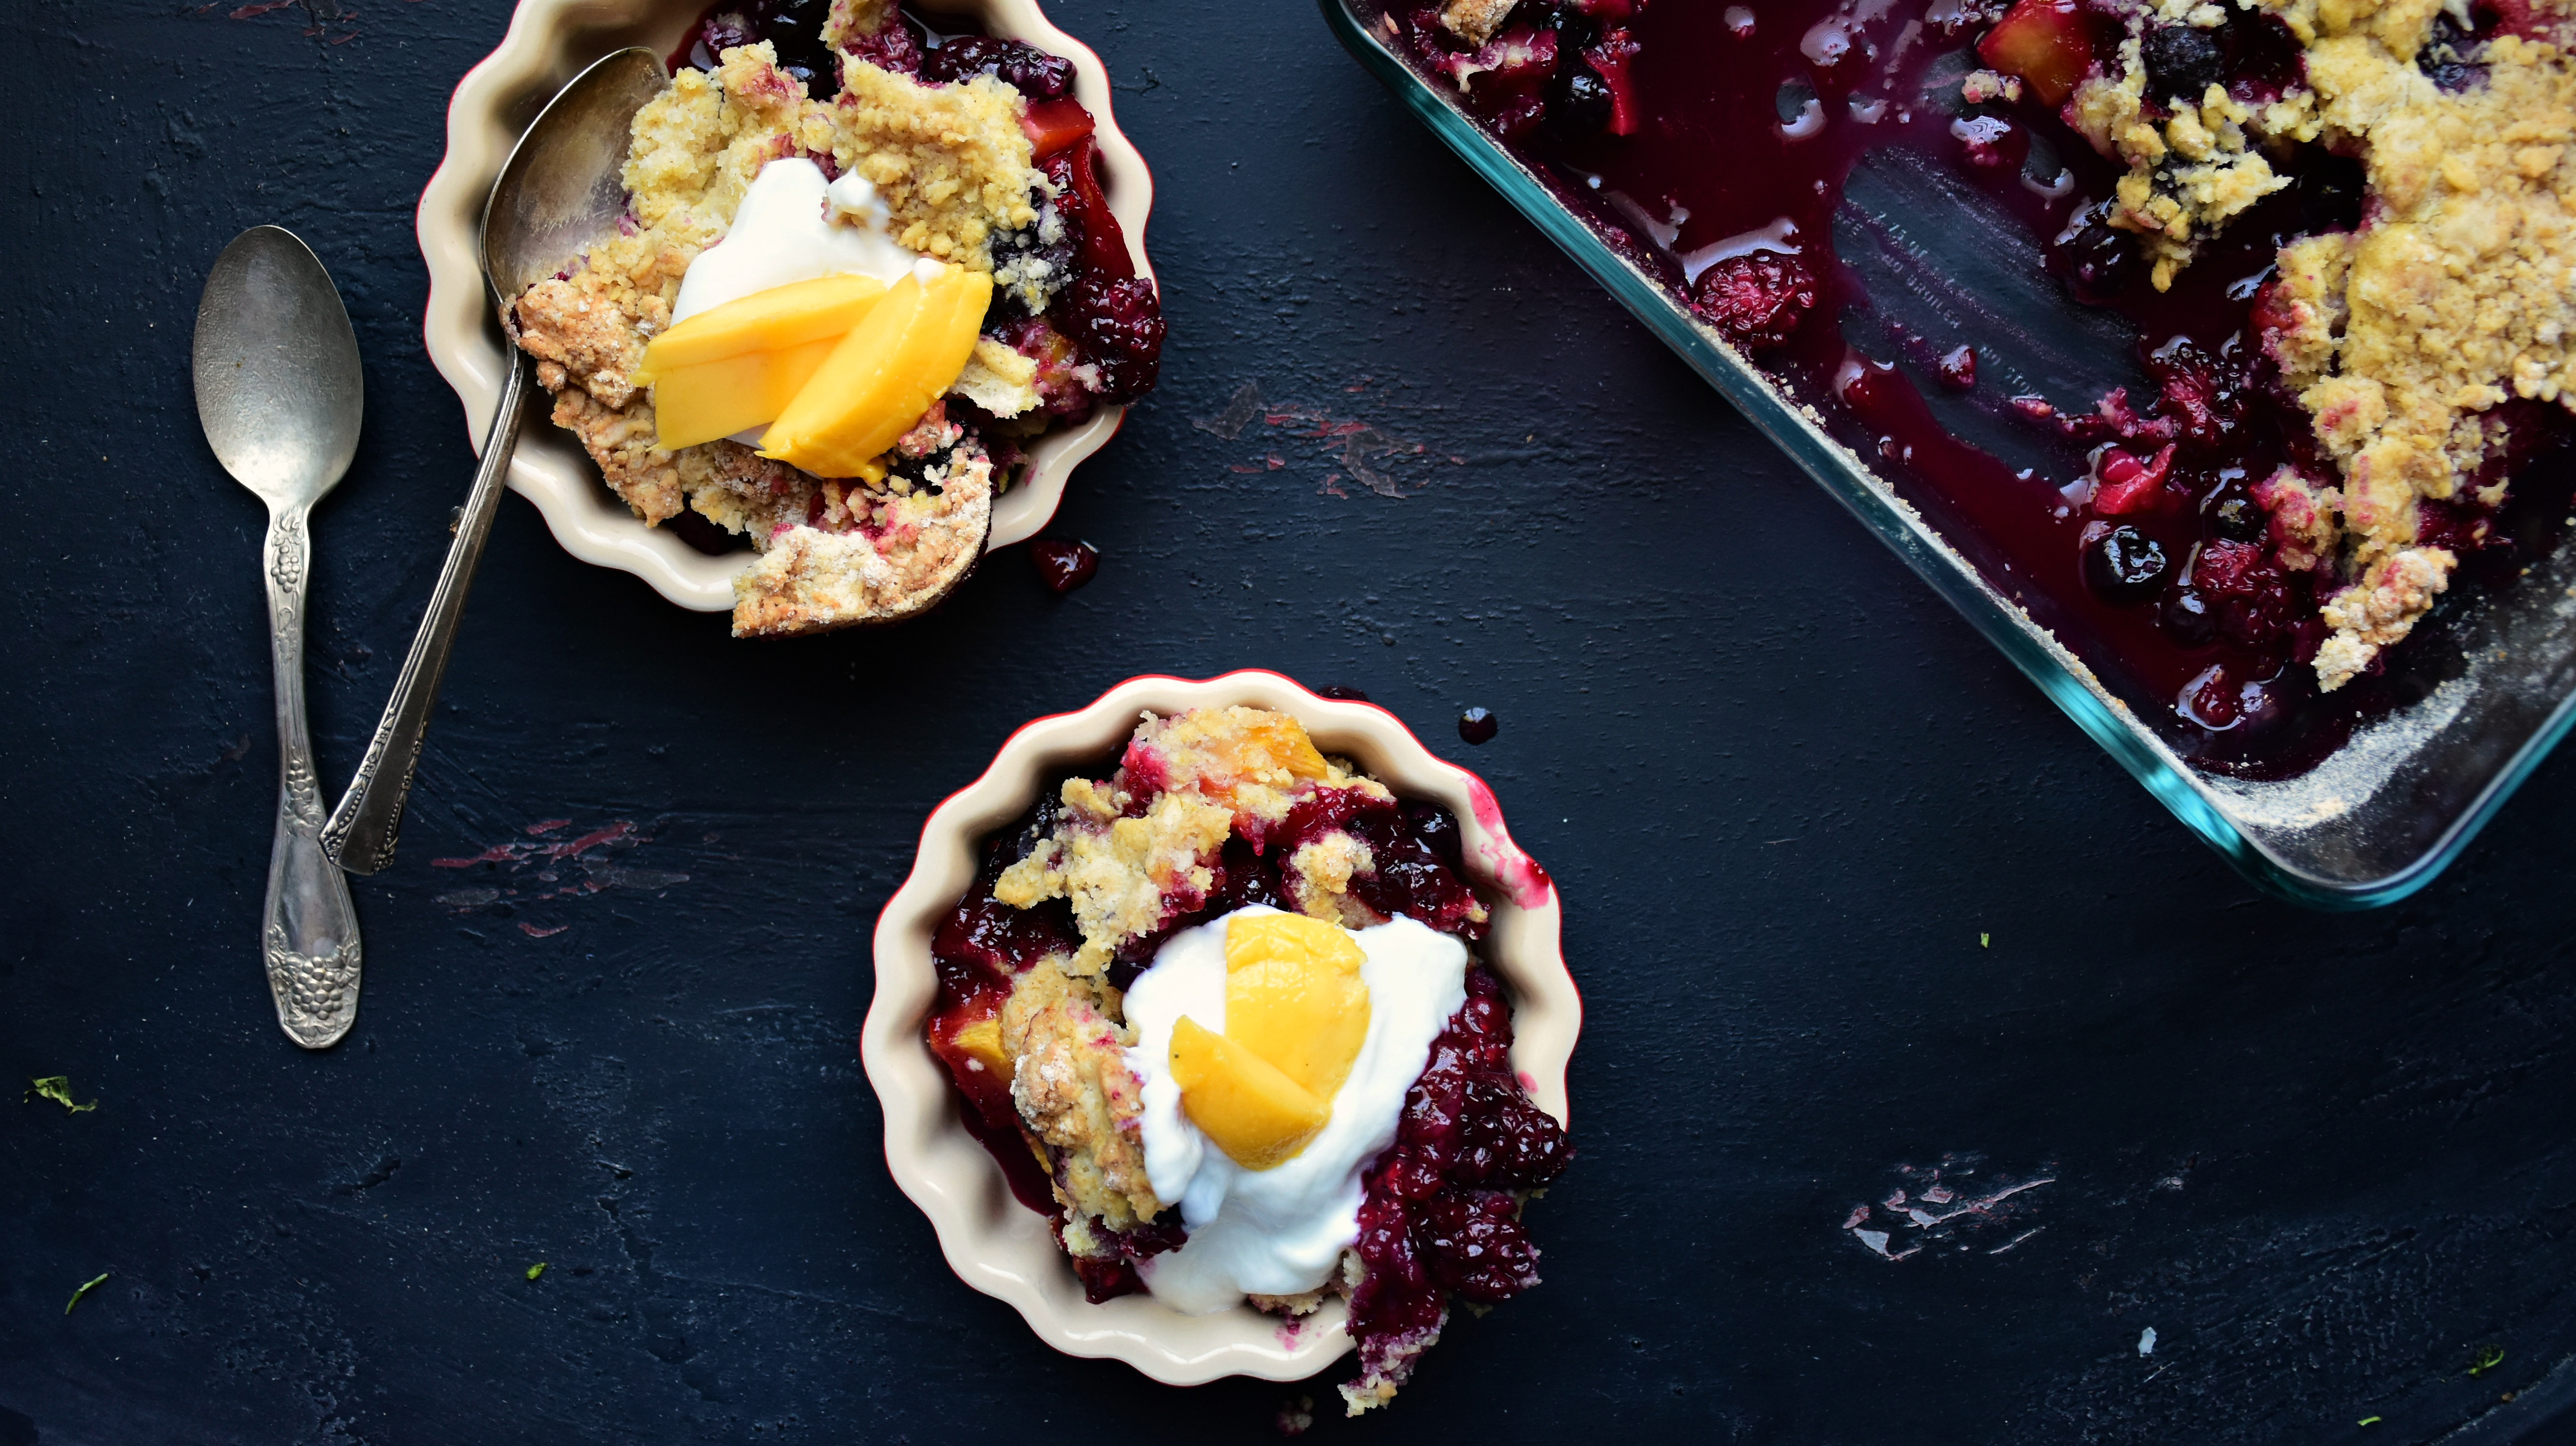
My love for this fruit knows no bounds, so when the Mango Board asked me to partner with them to feature a recipe using the succulent Ataulofus mango, I *literally* jumped at the chance. This variety of mango is one of my favorite, since the seed is smaller than an average mango resulting in more juicy, delicious flesh. Because of this, I knew almost immediately I wanted to marry this beautiful fruit with other fresh ingredients, like blackberries and raspberries, and bake it all into a deliciously fragrant cobbler.
Because I live in the south and cobbler is a religion, y’all (along with spiked sweet tea, but that’s for another post entirely). Truly though, summertime is nota time to be spent sweating over the stove, which is why this dessert is a favorite. It’s mixed, baked and enjoyed in less than 60 minutes. As someone who likes to host parties and entertain, 60 minutes or less is all I want to spend away from my guests (and the wine bottle). That’s why this little number is gracing my Memorial Day shindig menu.
Whether you’re ready or not, it’ summertime – so let’s cheers with this fresh, delicious and amazing mango & mixed berry cobbler!
Mango & Mixed Berry Cobbler
CLICK HERE FOR THE PRINTABLE VERSION OF THIS RECIPE!
Serves about 8.
Prep time: 15 minutes
Cook time: About 40 minutes
Total time: 55 minutes
Ingredients:
For the filling:
- 3 cups peeled and chopped mangos (I used the Ataulofus variety)
- 1 1/2 cup blackberries
- 11/2 cup raspberries
- 1 tablespoon lemon zest
- 1 tablespoon lemon juice
- 1/2 cup sugar
- 3 tablespoons honey
- 3 tablespoons all purpose flour
For the topping:
- 1 cup all purpose flour
- 1/3 cup almond meal
- 1/3 cup + 1 tablespoon sugar
- 1 1/2 teaspoons baking powder
- 6 tablespoons butter, chilled
- 1 egg
- 1/2 teaspoon cinnamon
- 1 teaspoon vanilla bean extract
Directions:
- Preheat oven to 350 degrees F. Liberally grease a baking dish (9 x 13, 8 x 8 or 11 x 7) with nonstick cooking spray. Sprinkle with flour.
- In a mixing bowl, carefully toss the fruit with the lemon juice, lemon zest, sugar, honey and flour. Sprinkle in the apple pie spice and toss to combine. Cover and let rest for about 10 minutes.
- In another bowl, carefully whisk the flour, almond meal, sugar, and baking powder together. Using a pastry knife, cut in the butter until mixture resembles sand. Mix in the egg, cinnamon and vanilla and stir until fully combined.
- Spread the fruit over the bottom of the pan. Sprinkle the topping over the fruit filling.
- Bake for about 40 – 42 minutes, or until topping is golden brown and fruit is bubbly. Serve with whipped cream or ice cream and enjoy!
Nutritional information per serving:
Calories: 385
Fat: 12.5 grams
Carbohydrates: 62.5 grams
Fiber: 1.2 grams
Protein: 4.6 grams
Weight Watchers Points: 10
NOTE: THIS POST WAS SPONSORED BY THE MANGO BOARD. HOWEVER, ALL OPINIONS AND STATEMENTS ARE MY OWN.
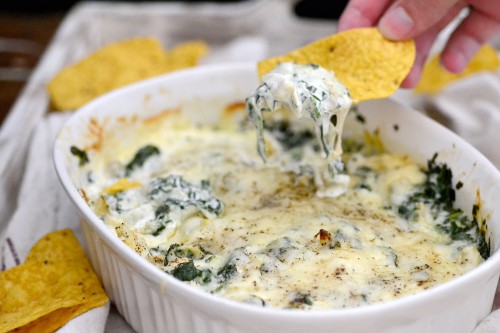
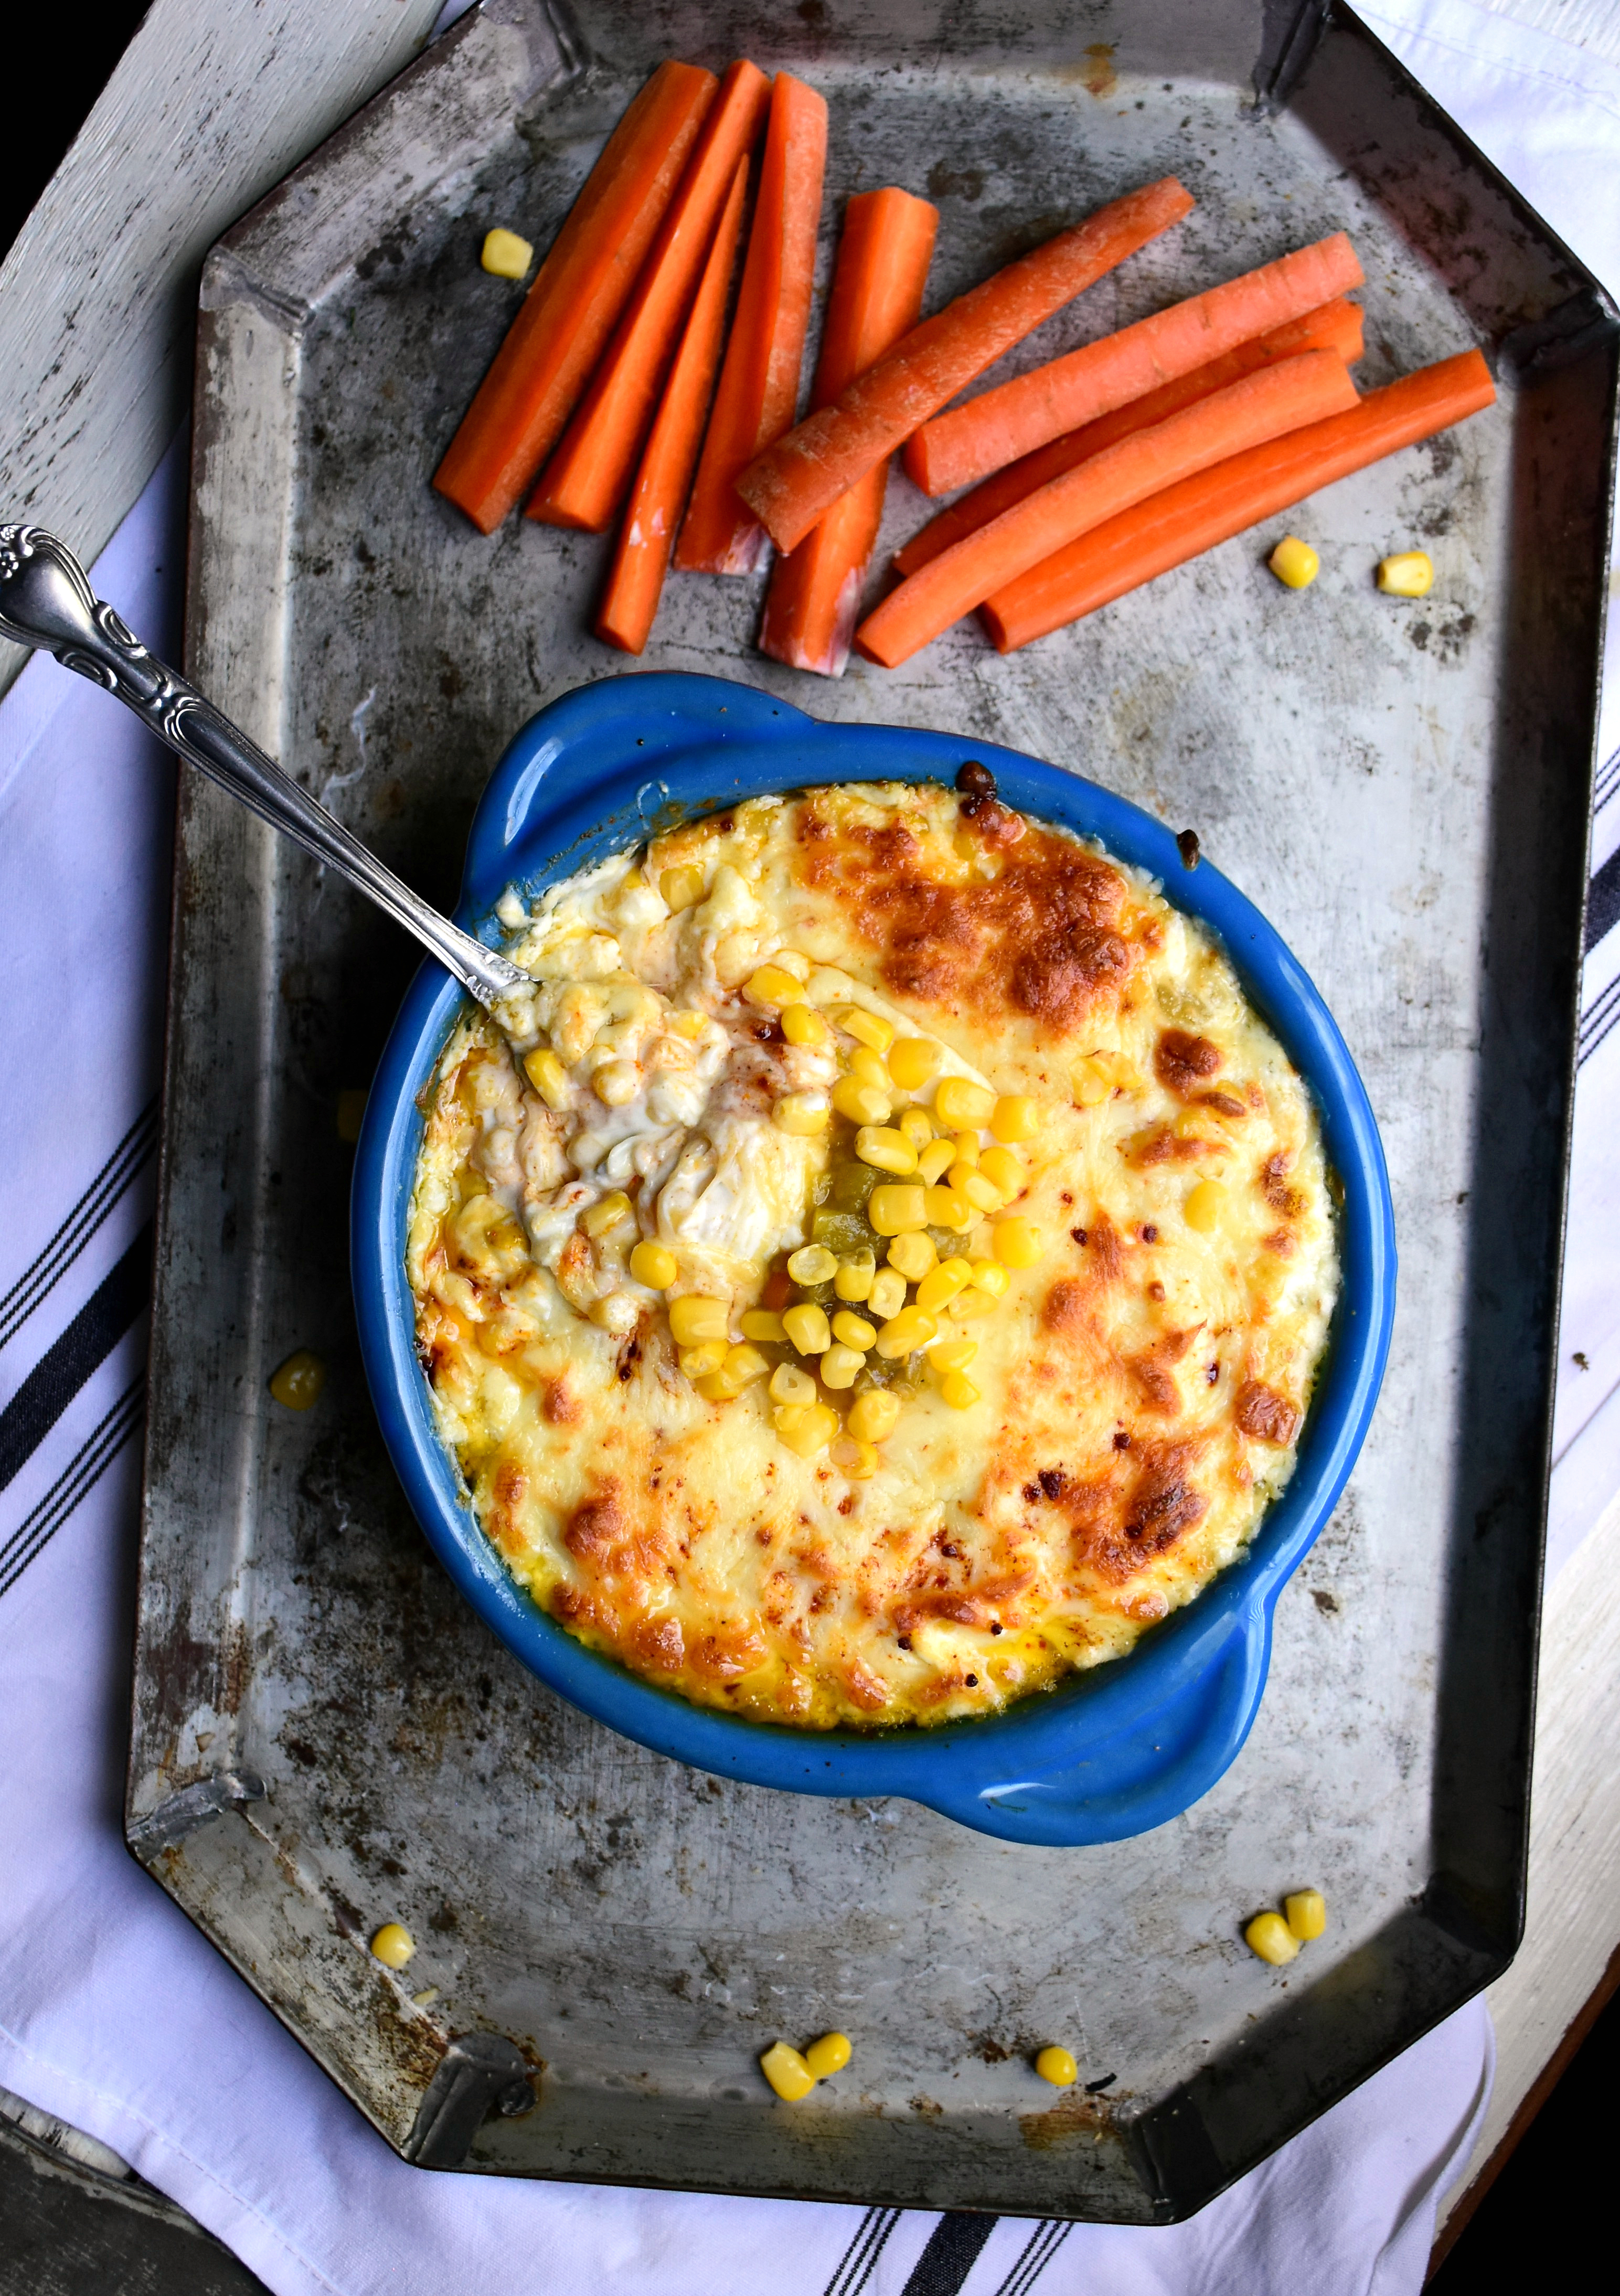
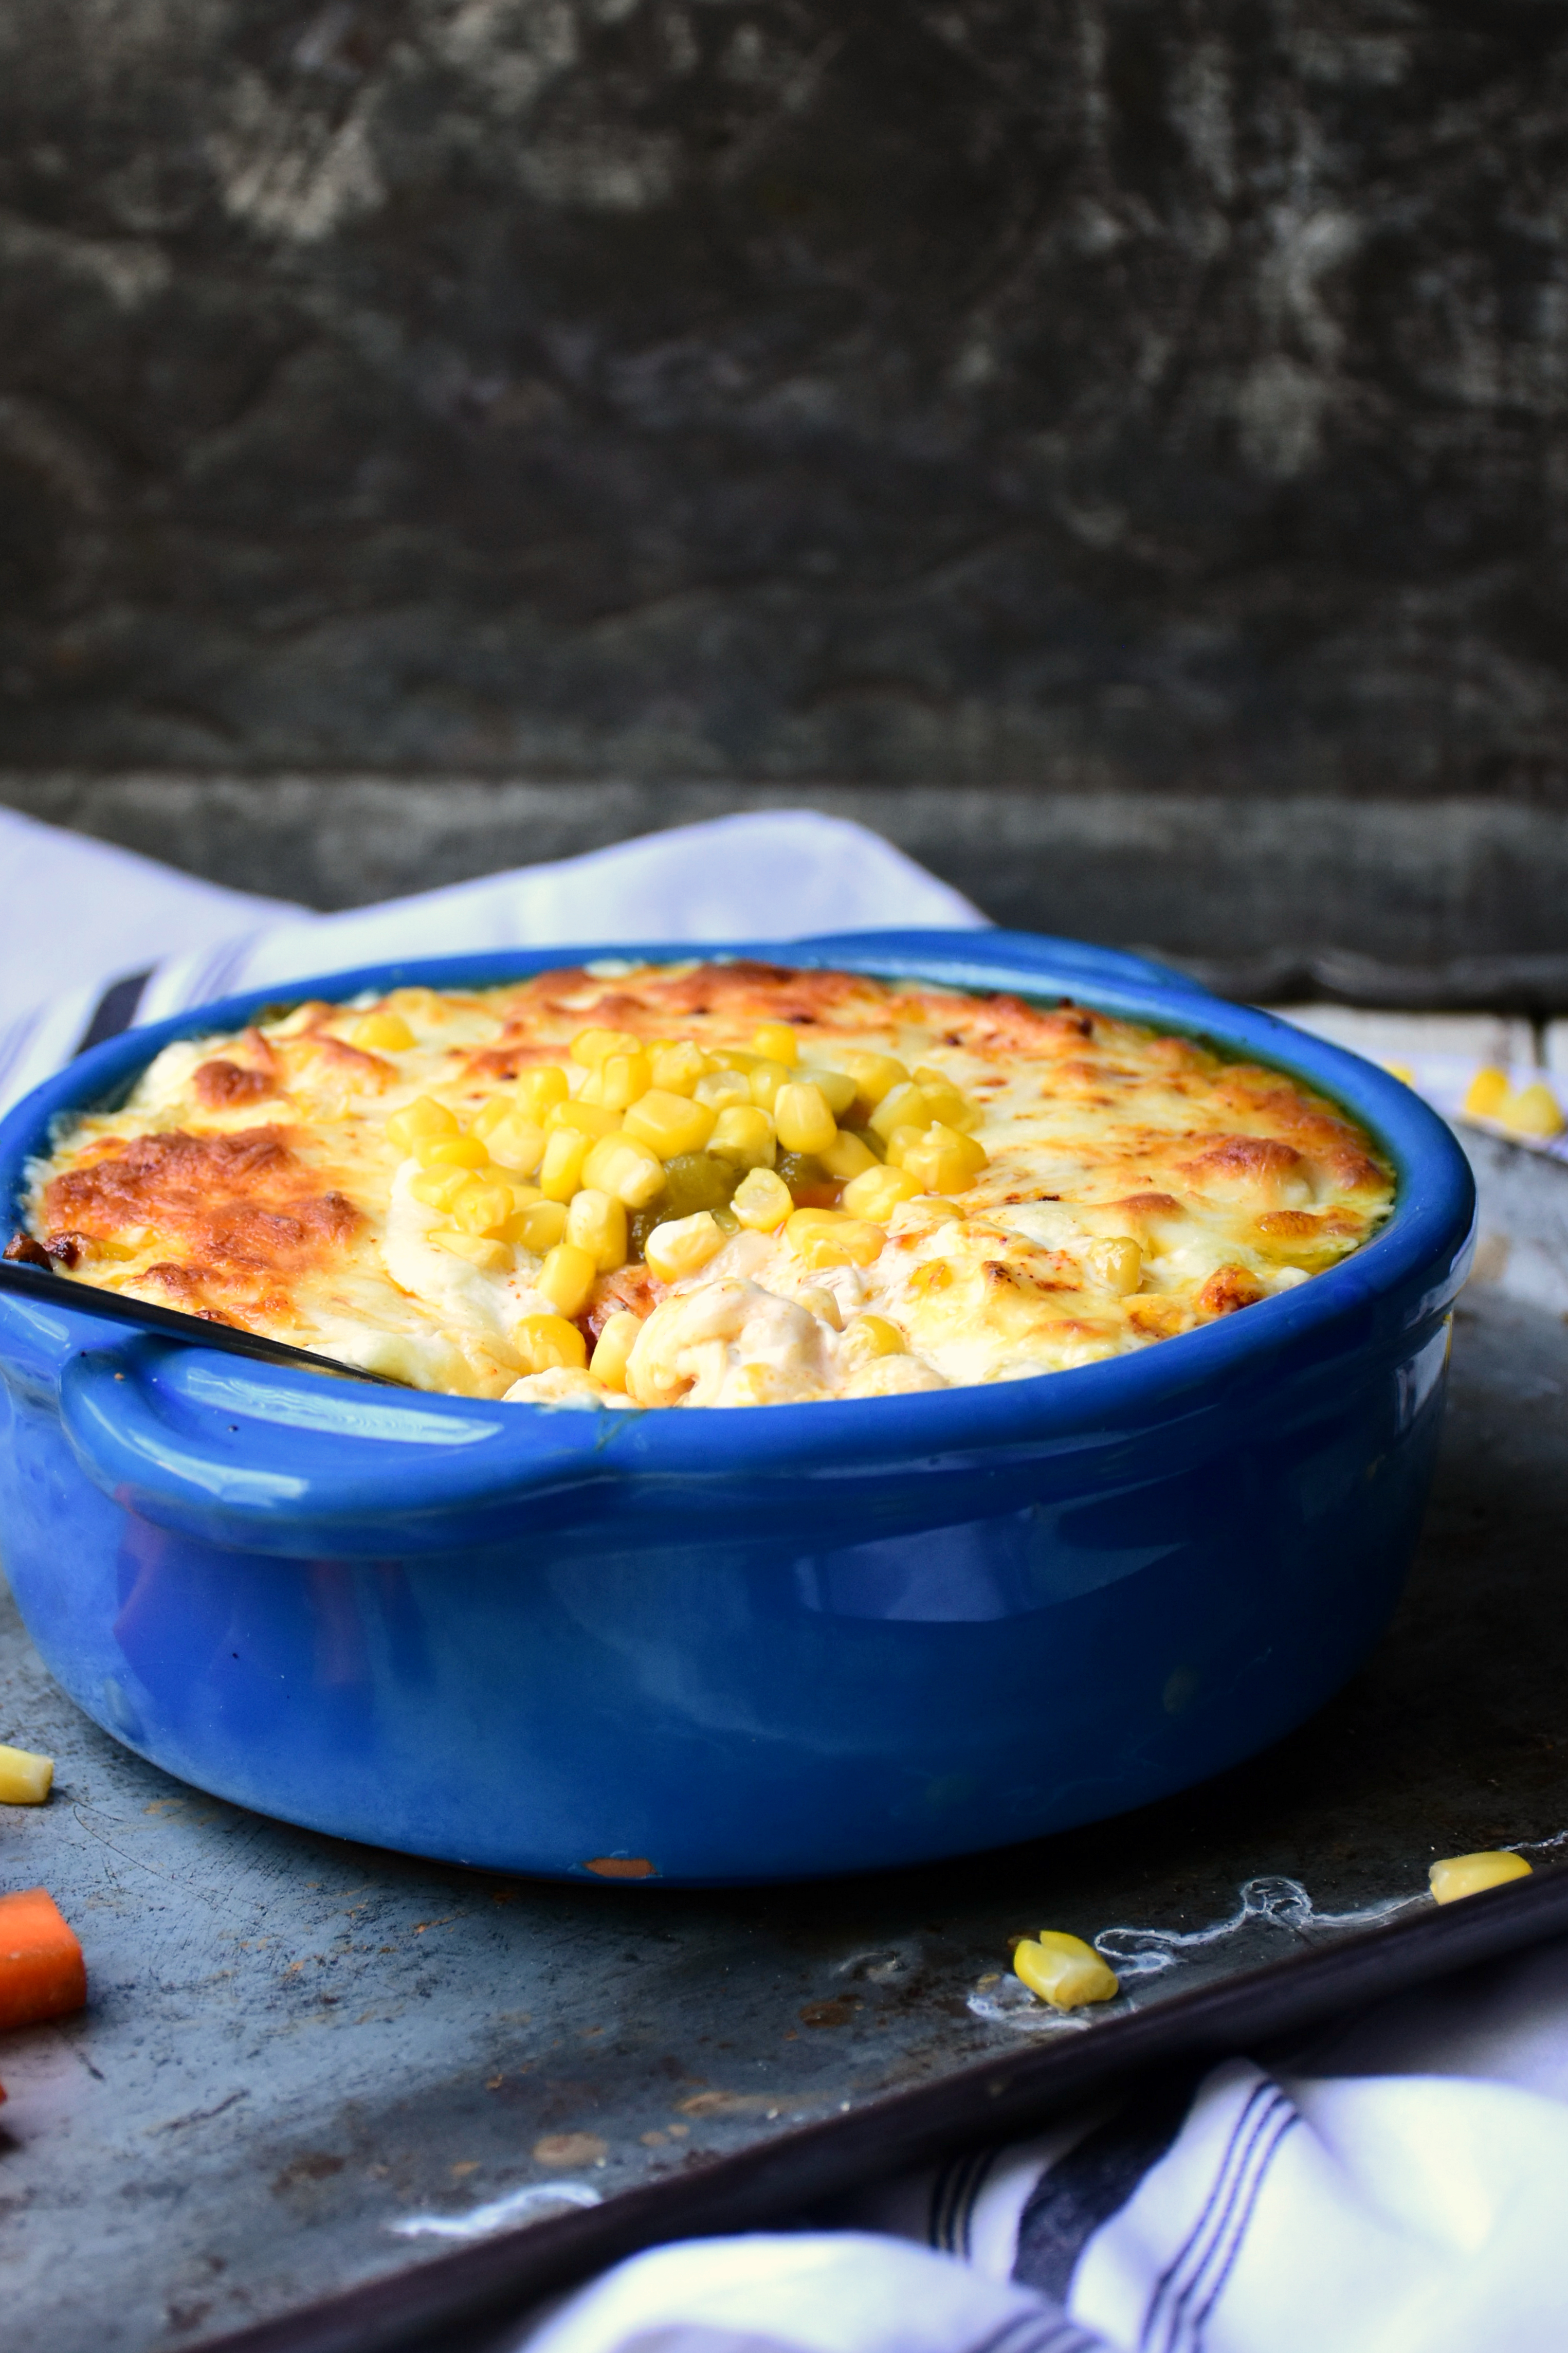
Cheesy Baked Corn Dip
We’re switching gears today from Mothers Day to Cinco de Mayo – because after the horribly stressful week I’ve had, I need a day focused around cheesy baked corn dips, margaritas a plenty and more salty chips than I can muster.
I won’t go into details -to be honest, I’m just too wiped out to. Instead, we’re going to do something I never do (due to my verbose, never ending desire to blab), we’re just going to talk brass tacks. Or in this case, this dip.
Mexican food in the US is a far cry from Mexican food in Mexico – but anyone could tell you that. Their dishes are fresher, more reliant on zesty spices and herbs and are rarely, if ever, fried. That’s exactly why I truly love visiting that part of the world. The people are unique and hilarious, the settings are as diverse as they are beautiful and the food – it’s just like nothing I’ve ever had before. I’ve only been to Mexico twice (and to the same place, of all odds) but I’m always counting down until I can get my feet back into that sand, my eyes staring off into the breathtaking sunsets and my mouth firmly sunk into a tray of tacos.

Until then, I’m going to enjoy Mexican food as I’ve come to love it here in the states – laden with cheese. Luckily the rest of the dip has healthier ingredients, like lower fat cream cheese, olive oil mayo and Greek yogurt. I did that for one reason – there would be no skimping on cheese.
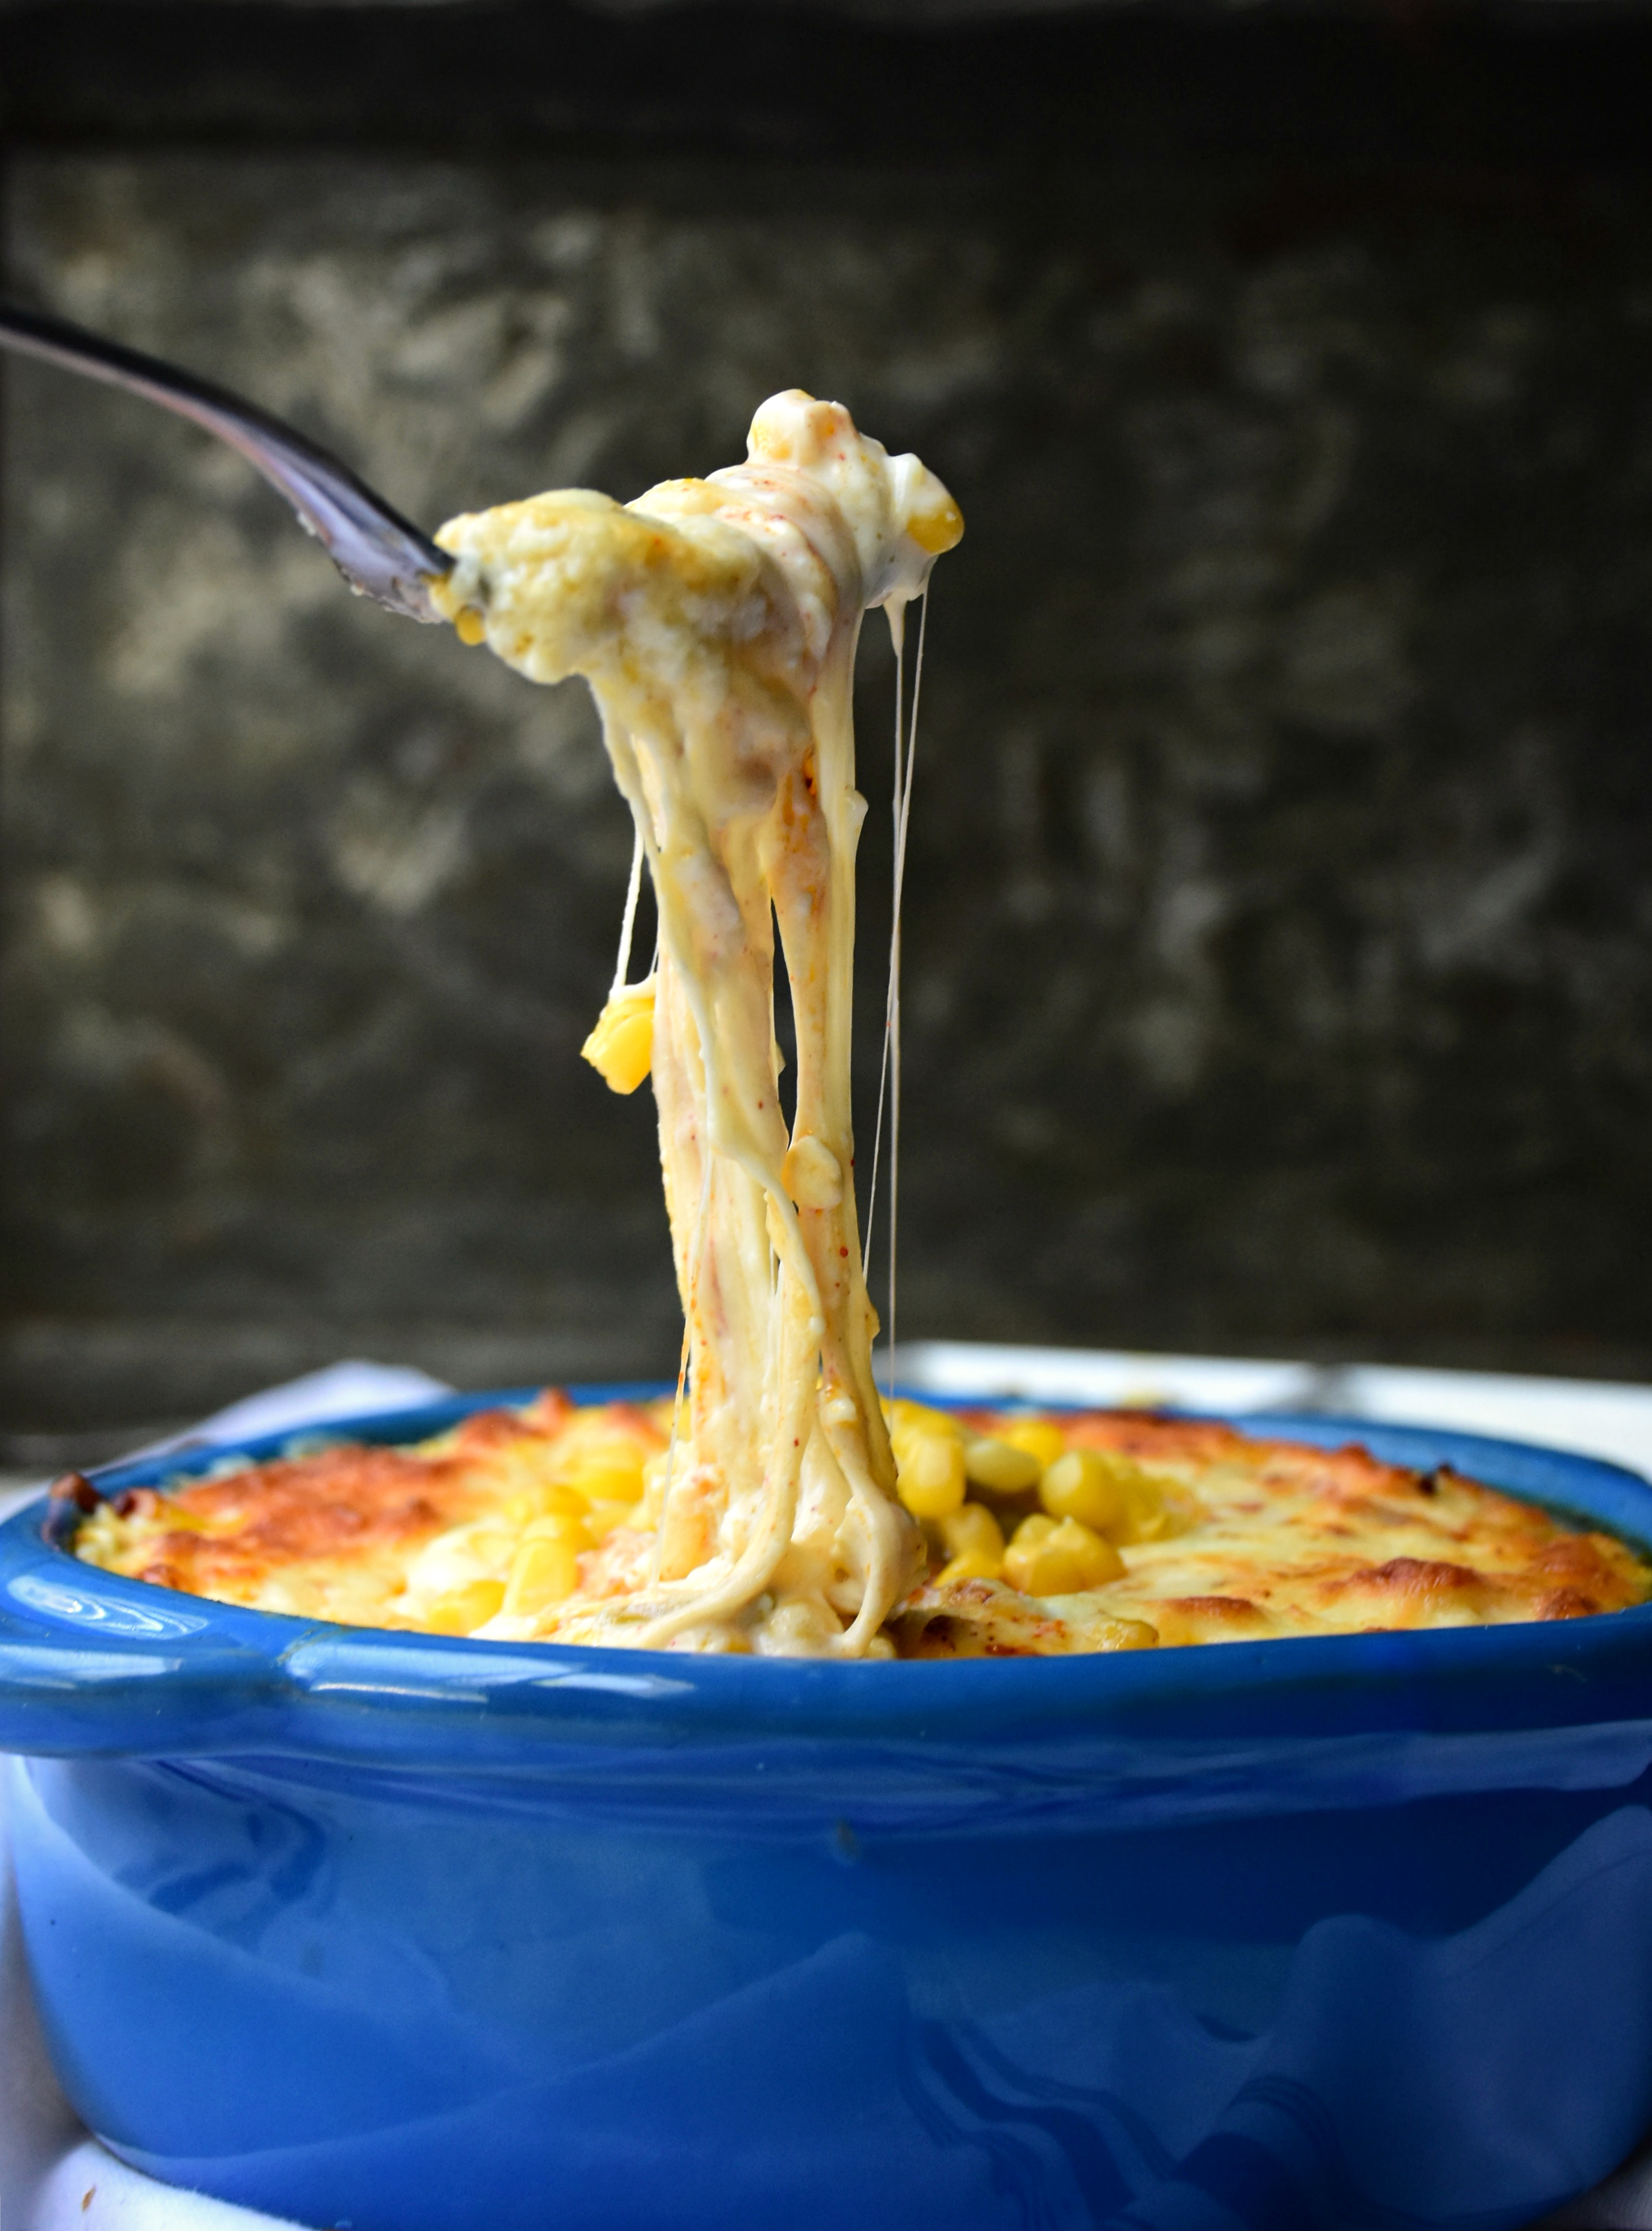
We need it today, loaded with chiles, corn, zesty spices, cilantro and everything that tastes good in this world. But, you know, to be somewhat healthy (and because I fed all of our tortilla chips to the turtles), it’s served with a side of fresh carrots. You can use whatever you want – chips, pita, a spoon, a fork, your face. However you eat it, one thing will remain the same – you won’t be able to stop.
So just plan to wear yoga pants.
Cheesy Baked Corn Dip

CLICK HERE FOR THE PRINTABLE VERSION OF THIS RECIPE!
Yields about 2 cups. Adapted from Crunchy Creamy Sweet.
Prep time: About 10 minutes
Cook time: About 12 – 14 minutes
Total time: About 24 minutes
Ingredients:
- 1 cup Greek yogurt (I used 2%)
- 1/4 cup olive oil mayo (or regular mayo)
- 4 ounces low-fat cream cheese
- 2 cups shredded mozzarella cheese
- 1 can (4 ounces) green chiles
- 1 can (14 ounces) corn, drained
- 1 tablespoons crushed red pepper
- 1/3 cup finely chopped cilantro
- Salt and pepper to taste
Directions:
- Preheat oven to 425 degrees. Liberally coat a skillet or baking dish with nonstick cooking spray.
- In a mixer or bowl, beat the Greek yogurt, mayo, cream cheese and 1 1/2 cup of mozzarella cheese. Gently stir in the corn, chiles, crushed red pepper, cilantro and salt and pepper.
- Pour the mixture into the baking dish. Top with remaining 1/2 cup cheese.
- Bake for about 12 – 14 minutes, or until cheese is melted and golden brown. Serve with additional corn and chiles as garnish with carrots, pita or tortilla chips.
Nutritional information per serving (about 2 tablespoons):
Calories: 175
Fat: 13.25 grams
Carbohydrates: 5.6 grams
Fiber: 0.8 grams
Protein: 4.2 grams
Weight Watchers Points: 4
More recipes like this one!