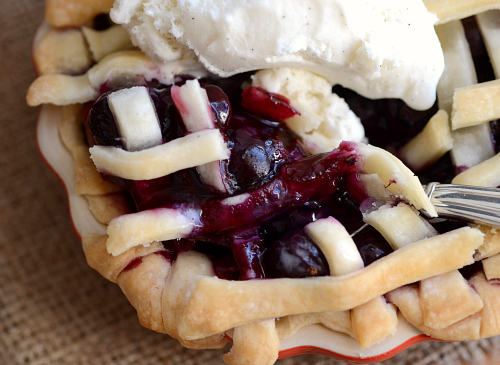
Easy Mini Blueberry Pies
 PIN IT!
It’s the middle of January and I’m making summer pies. Of course I am. In the dead of summer I was roasting butternut squash so clearly I don’t play by any culinary rules. Which makes me feel a bit rebellious, a little “rebel with a culinary cause.” (Justin, Food Network star, anyone?) Although my reasons for making these absolutely delicious, and adorable, easy mini blueberry pies weren’t to be rebellious, it was to use up my blueberries in the fridge that were starting to look a little…sketch.
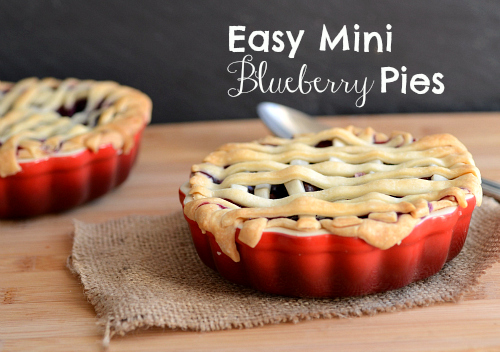
Let me explain the state of the blueberries the best way I can. You remember those kids in high school who would skip history to go and smoke behing the gym? Or the kids who would toilet paper the principals house? Bring flasks to drink with their lunch? Well, the blueberries I had in my crisper were starting to feel neglected. They’d been in there for 2 days and were feeling a little resentful. So, a few of them decided to go smoke behind the gym, if you catch my drift. They were getting rough around the edges. Their juices were showing and the top of their heads were looking a bit…weathered. After promptly throwing away said bad influence berries, the rest of my pint were more than ready to be used (and rather apologetic for starting to get fresh with the mini carrots).
Moving on from troublesome berries, I do have to make a small confession. I love making pie crusts. I’m probably the only person in the entire world who actually enjoys mixing, kneading and rolling. It’s so therapeutic, rolling out all the days worries and frustrations into a flakey dough. The crust you see in front of you was made yesterday morning after I looked at my bank statement. Instead of freaking out, I took my anxiety to the crust and it turned out BEAUTIFULLY! However, I ran out of homemade crust and was INTENT on making a lattice top. So, I used store-bought Pillsbury. Just call me Sandra Lee.
I really hate using store bought crust (it tastes weird) but you do what you have to. It was my first attempt at a lattice topping and I was GOING TO DO IT. I’m really pleasantly surprised by how well it came out (minus one small part where the rebellious berries took over the delicate lattice). To hide the problem area, I did what any food blogger would do. Topped it with a big, heaping spoonful of low-fat vanilla bean ice cream.
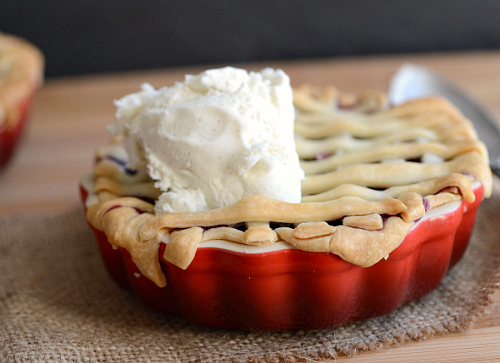
That reminds me of a line from one of my favorite movies, “You can’t see the lines, can you Rusty?” NOTE: These pies aren’t low-calorie or super low-fat, so they are meant for weekend indulgences!
Easy Mini Blueberry Pies
CLICK HERE FOR THE PRINTABLE VERSION OF THIS RECIPE!
Yields 3 mini pies (serves about 6). Crust recipe slightly adapted from Cooking Light.
Prep time: About 30 minutes
Cook time: About 45 minutes
Ingredients:
For the crust:
- 1 3/4 cups all purpose flour
- 2/3 – 3/4 cup ice water
- About 6 tablespoons butter (or vegetable shortening)
- Dash of salt
- 1 2/3 teaspoons brown sugar
For the filling:
- About 4 cups blueberries
- 1/4 cup white sugar
- 1/3 cup brown sugar
- 1 1/2 tablespoons corn starch
- 1 1/4 tablespoon butter, cut into pieces
- 3 tablespoons lemon juice
- Zest from 1/2 lemon
- 1 teaspoons cinnamon
- 1/3 teaspoon vanilla extract
Directions:
- Preheat oven to 350 degrees.
- To make the crust: Spoon flour into measuring cups and level with a knife (you need the precise amount of flour). Mix 2/3 cup of the flour with the ice water and set aside. In another large mixing bowl, mix the remaining flour, salt and sugar. Cut the butter mixture into the flour/sugar mixture until it resembles coarse sand. Slowly add the water/flour mix to the butter mixture, stirring with a fork until the rest of the flour is moistened. Add additional water if dough is too dry. Shape dough into a disc and wrap in plastic wrap. Chill for about 20 minutes. Once chilled, remove from plastic wrap and roll (on a heavily floured surface with a floured rolling pin) to about 1/4 – 1/3 inch thickness.
- Place three mini tart pans (I used these Le Creuset ones) face down on top of the dough to measure how much you’ll need. Using a knife, cut the dough around the indented pan with about 1/4 inch extra to fold over. Using your fingers, press the dough down into the pans. Use your fingers to situate dough around the edges of the pan until they reach the top of the ridges. Repeat with the second and third pie pan. Set aside. If you run out of dough, supplement the missing part of the pan with store bought crust.
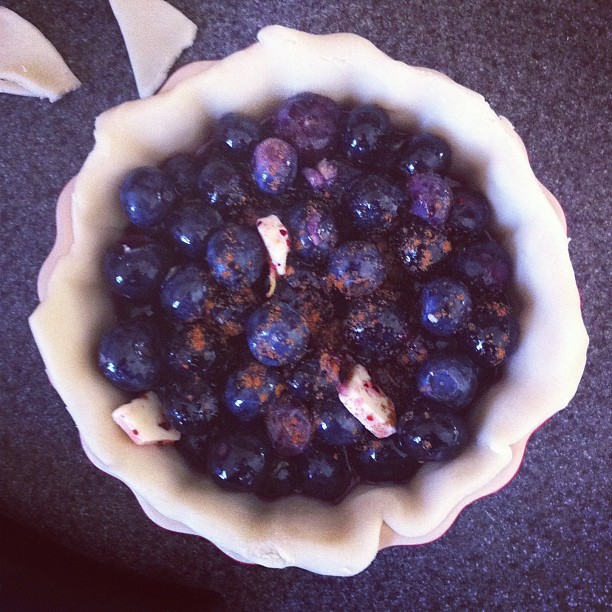
- To make the filling, mix the blueberries, sugars, corn starch, lemon juice, lemon zest, cinnamon and vanilla. Add cut up chunks of butter into the mixture and stir.
- Scoop the filling into the pie crusts, filling each about 2/3 the way full.
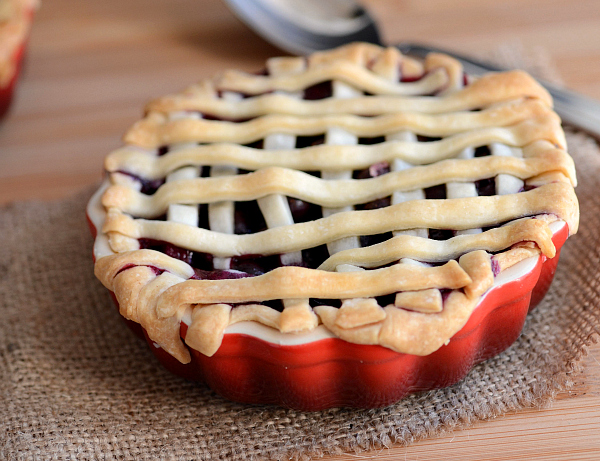
- To make the lattice, roll out remaining dough (or store bought dough) to about 1/3 inch thickness. Using a knife, cut out 12 – 14 one inch strips. Layer the strips on top of each other in a lattice pattern (use this photo as a guide).
- Bake pies for about 45 minutes, or until tops are golden brown. Let cool slightly and serve warm!
Nutritional information per serving (about 1/2 mini pie):
Calories: 387
Fat: 8.9 grams
Carbohydrates: 62 grams
Fiber: 3 grams
Protein: 3.8 grams
Weight Watchers Points: 9
This post contains affiliate links.
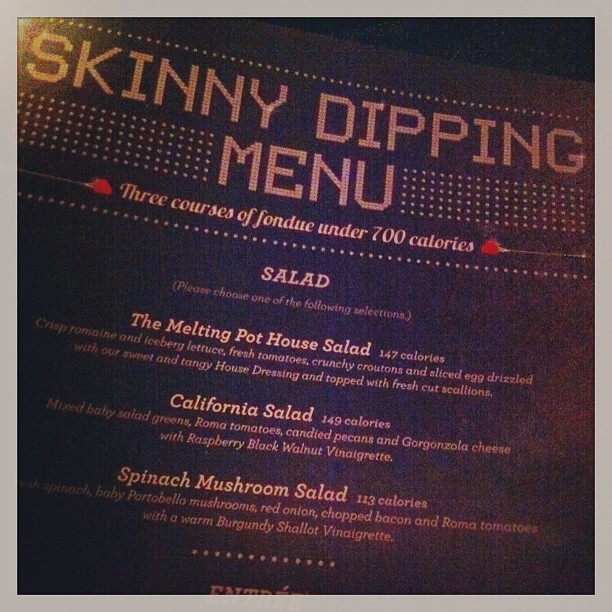
Melting Pot $100 Giveaway – CLOSED
The giveaway is now closed. Thanks to all who entered!
That’s right friends, it’s time for another giveaway around these parts! And what better gift to give than a date night out with your hunny! (or bff, or mom or yourself!) I was contacted by the lovely folks at The Melting Pot a few weeks ago to try their new Skinny Dipping Menu. You get one salad, an entree and a dessert for under 700 calories! As a girl trying to get healthier (but still indulge) this was definitely right up my alley!
I love The Melting Pot, and not just because you can eat vats of cheese and chocolate and it’s totally acceptable. But, it holds a sentimental value to me. The Melting Pot in DC is where Elliot took me for dinner right after he popped the question!
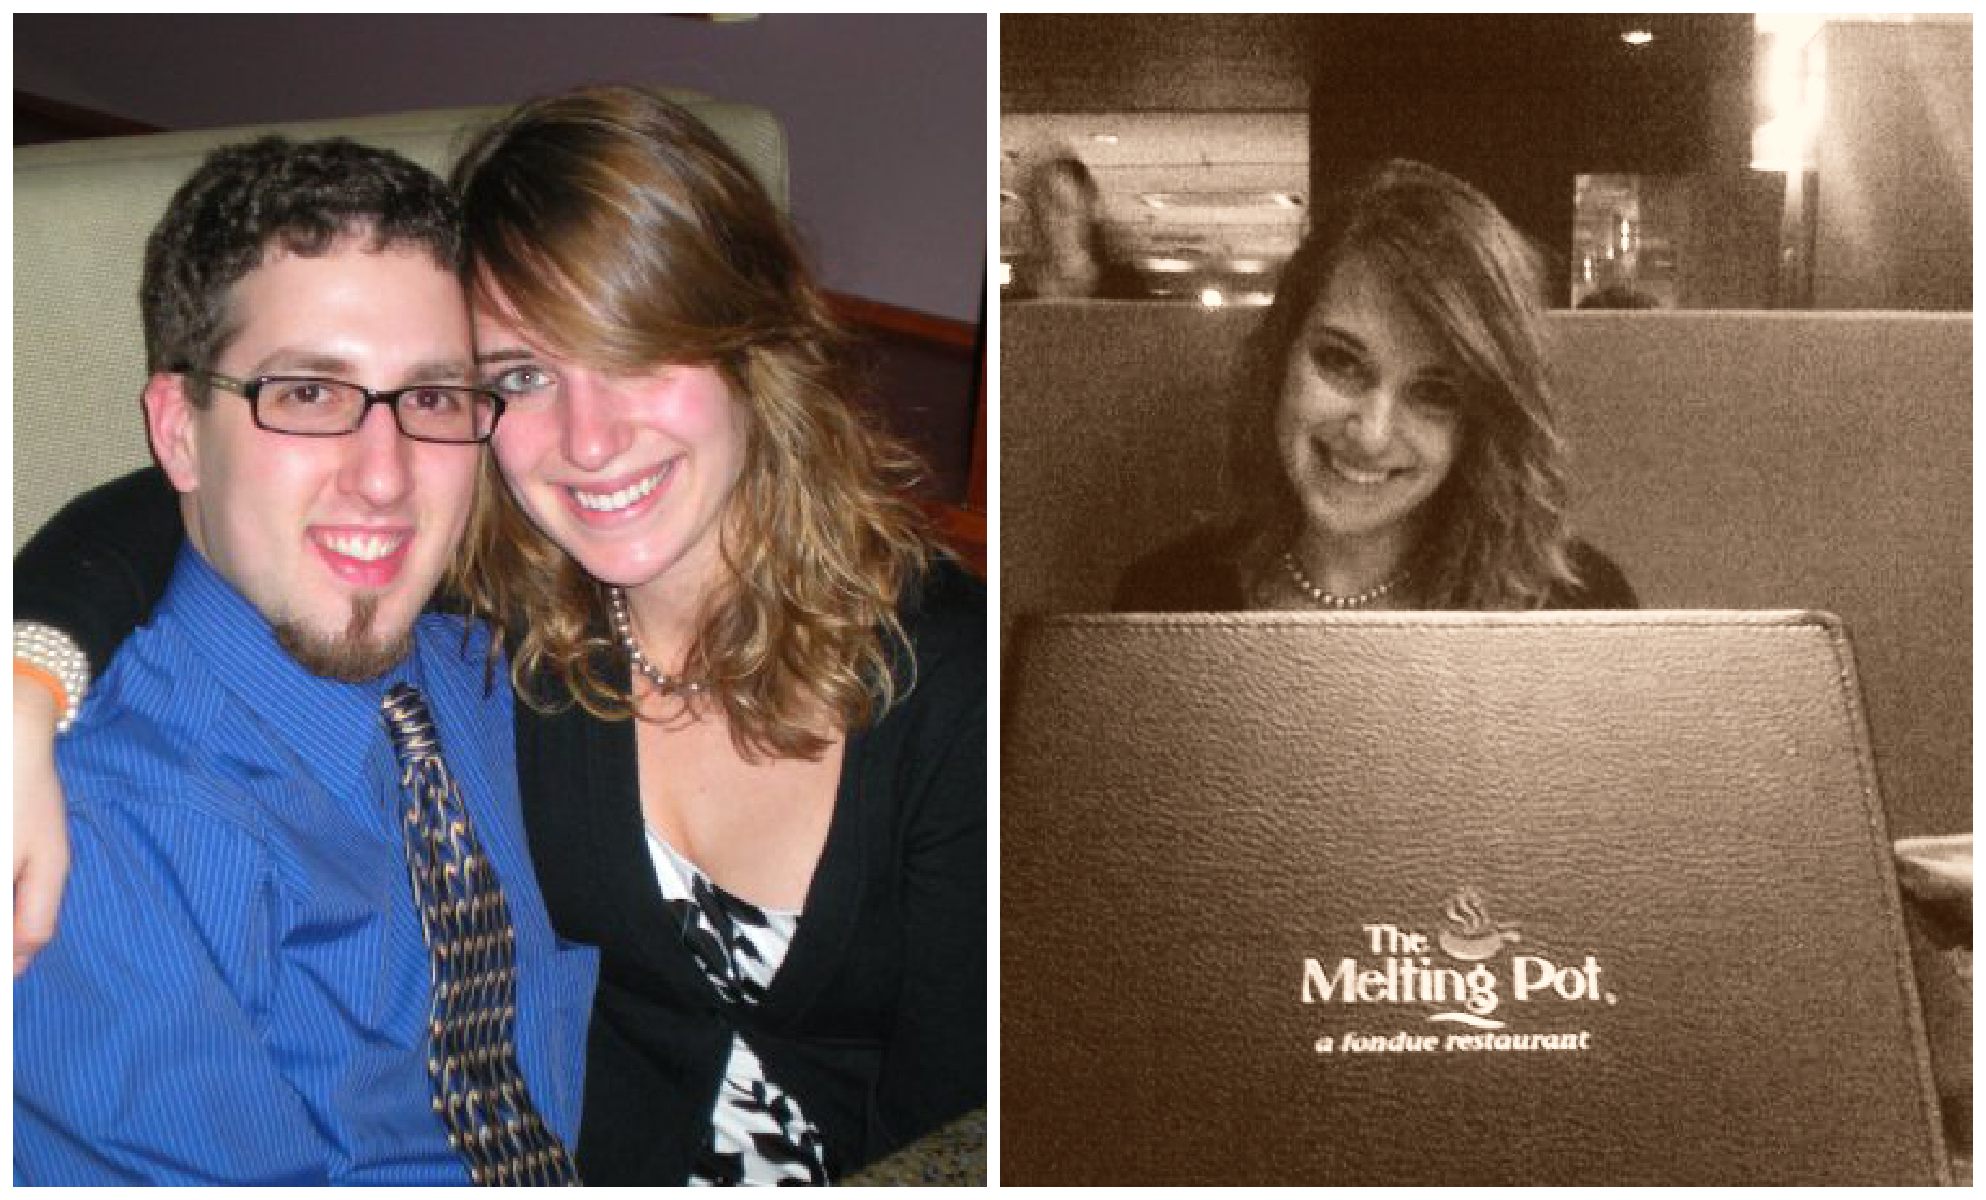
And then it’s where we went for our one-year wedding anniversary dinner last year! Isn’t my hubs such a sentimental hunk?
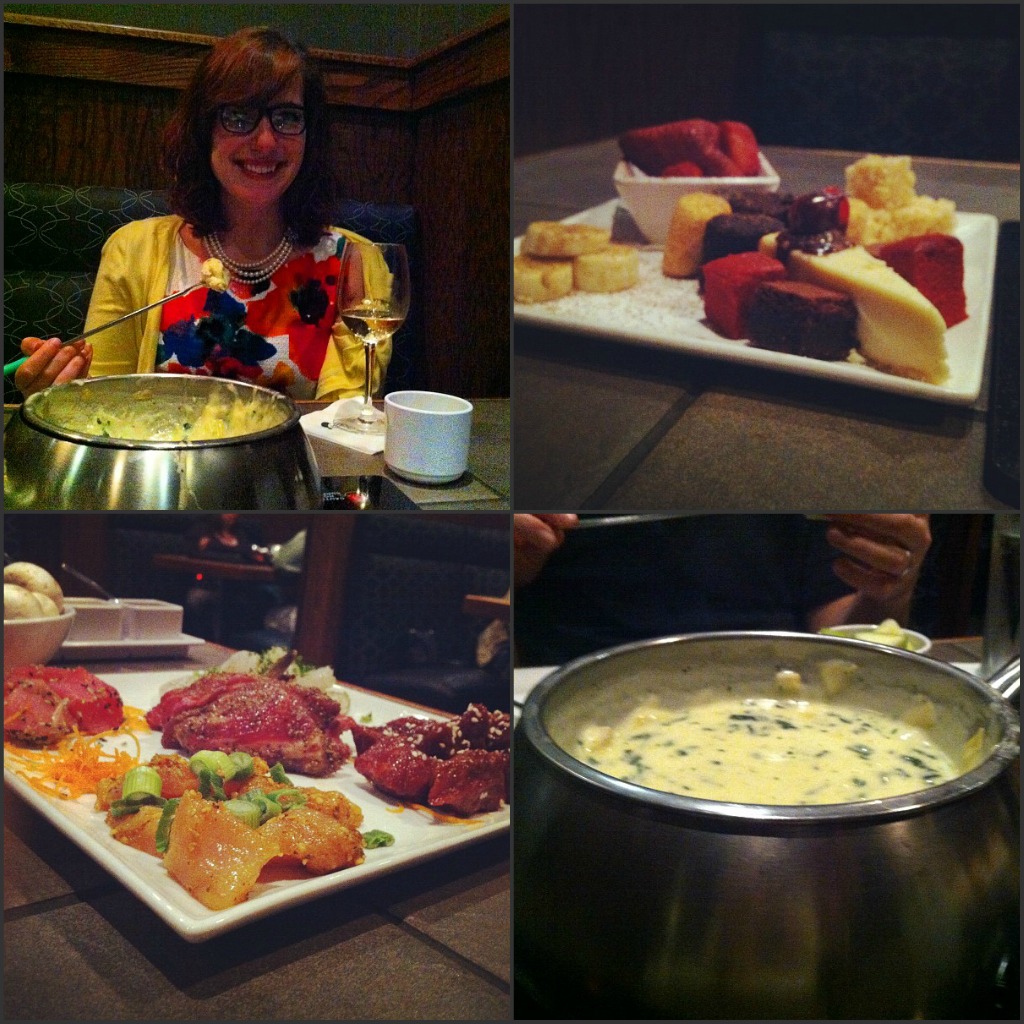
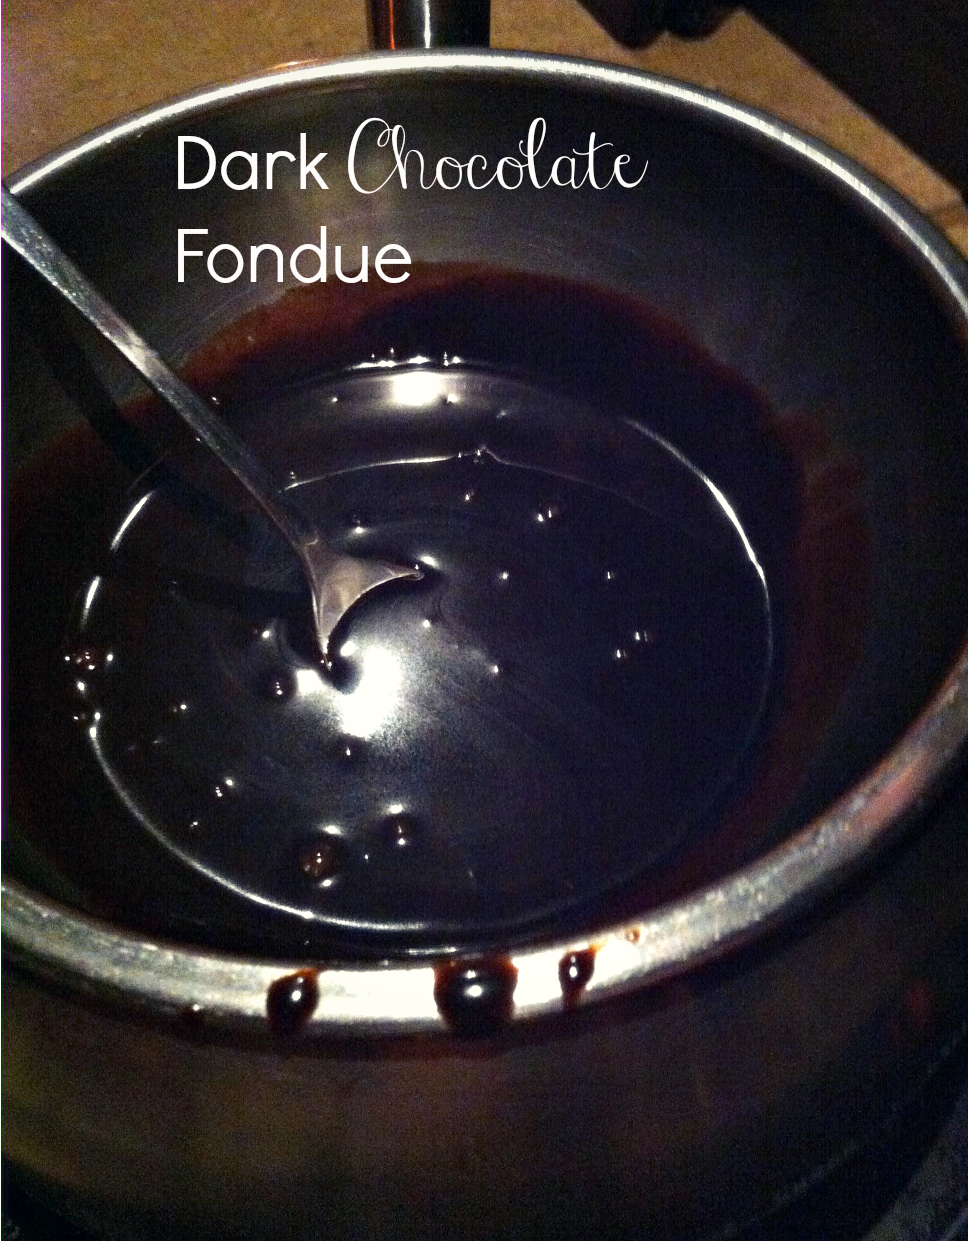
Clearly, both of those events were celebrations so calories weren’t being counted. But this year, my hubby and I are really trying to get into the best shape of our lives so we were stoked to find some of our favorites on the skinny menu! I ordered the spinach salad with bacon shallot dressing (DIVINE) and the steak and shrimp entree. However, my favorite part was the dark chocolate fondue. It’s so simple BUT SO DELICIOUS. And I’m a woman so clearly chocolate is my weakness.
Yum! Overall, I really liked the menu. The portions were smaller, obviously, and you don’t get any of the cakes or cheesecakes to dip at the end. But, I still left satisfied and plenty full. Plus, you can always add the cheese. You won’t be under 700 calories but you don’t have to tell anyone! Another cool thing about the menu is they paired with one of my favorite vodkas, Voli, to create skinny cocktails to go with your meal!

Image via The Melting Pot.
I didn’t have one but they looked SO good. So, now onto the part y’all really care about….THE GIVEAWAY!
The super gracious folks at The Melting Pot have agreed to give one of you lucky people a $100 gift card! Talk about an awesome, stress-free date night right? The skinny menu is less expensive too so you can indulge in cheese or extra cocktails! To enter, simply fill out the prompts below! Giveaway ends Monday at midnight. GOOD LUCK!
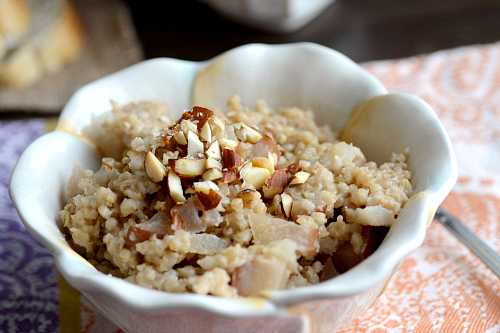
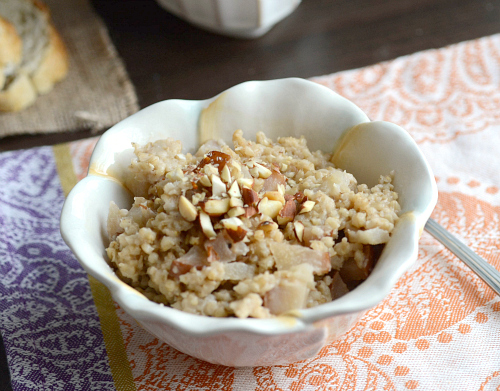
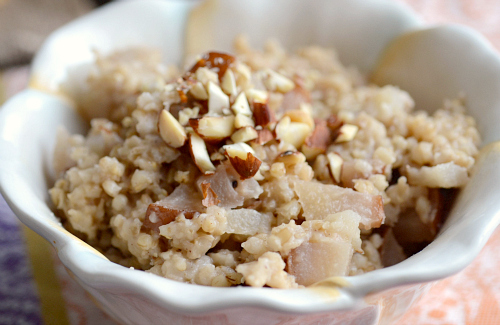
Pear & Honey Steel Cut Oats
Back in August, I had the amazing opportunity to meet Bob of Bob’s Red Mill.

And not sure if you can tell by the photo, but Bob is in his mid-late 70’s. I know, I can’t believe it either. He still works every single day, in the office, in the factory, lifting boxes and grains. He’s still doing it all. I, on the other hand, couldn’t lift a box if you paid me and I’m 27. (I know, pathetic). So, we asked him what his elixir of youth is, how on earth he stays so strong and healthy. His answer? “I eat a bowl of steel cut oats every morning for breakfast.” And he’s been doing that for 20+ years. Fast forward to yesterday when I was cursing myself for eating cupcakes for breakfast. I stumbled upon a photo of Bob and remembered that little nugget of advice. And that, my friends, is how these deliciously healthy pear & honey steel cut oats were born.
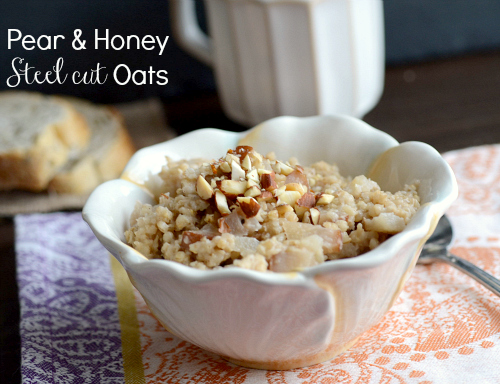
I’m not a breakfast eater ussually and I don’t really LOVE oatmeal. (Quinoa on the other hand? LOVE). I mean, it’s fine. I’ll eat it but it’s never something I crave first thing in the morning. That was, however, before this oatmeal. Holy monkey face, this comforting bowl of healthy is my new favorite dish for any meal. It’s sweet, but not too sweet, crunchy yet soft and full of stick to your bones fiber. Even though it’s one of the healthiest things you can eat, it doesn’t TASTE like it.
I know one of the biggest hurdles I face when eating healthfully is that I don’t love the taste of healthy food. Shocker right? I’d probably eat breakfast every single morning if oatmeal tasted like double cheese pizza or cheese sauce. But, it doesn’t. So, instead of joining the ranks of the rest of obese America, I’ve decided to make healthy food taste better and less like tree bark and dirt. And friends, I think with yesterdays cupcakes and today’s steelcut oats, I’m really making some progress.
I could, easily, eat a bowl of this every morning and never get sick of it. Or, never be hungry again b/c holy crap this stuff is FILLING. No wonder Bob has stayed so healthy and slim, he probably doesn’t eat for the rest of the day! Forget fad diets, I’m on the steel cut diet. In no time at all I predict I’ll be slim and ripped. Better watch the guns, they’ll get ya!
Pear & Honey Overnight Steel cut Oats
CLICK HERE FOR THE PRINTABLE VERSION OF THIS RECIPE!
Serves about 7. Recipe inspired byThe Yummy Life.
Prep time: >5 minutes
Cook time: 6 hours
Ingredients:
- 1 cup Bob’s Red Mill steel cut oats (or any variety)
- 1 1/2 cup skim milk
- 1/4 cup light cream
- 1 1/4 cup water
- 2 tablespoons unsalted butter, chopped up
- 1 large pear, diced
- 2 tablespoons honey
- 2 tablespoons brown sugar
- 1/2 tablespoon cinnamon
- 1 teaspoon vanilla extract
- Chopped almonds* optional
Directions:
- Combine all the ingredients (except for the butter) into a basin of a slow-cooker. Top the oat mixture with the butter pieces. Stir with a spoon to mix them up.
- Set slow cooker to low and cook for 6 – 7 hours. To avoid burning, check the oats at the 5 hour mark and stir to mix up.
- Serve warm with chopped almonds.
Nutritional information per serving (3/4 cup):
Calories: 214
Fat: 6.5 grams
Carbohydrates: 34 grams
Fiber: 4.5 grams
Protein: 6 grams
Weight Watchers Points: 6
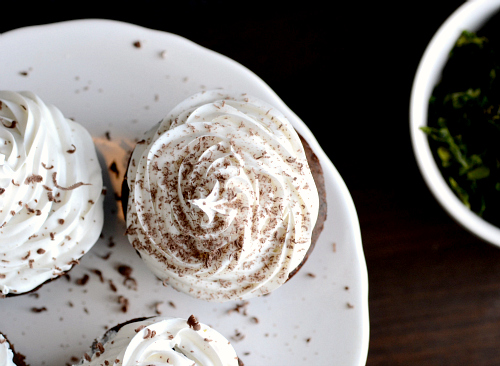
Beet & Kale Chocolate Cupcakes
Yeah, that’s real. I totes (I said it, don’t judge me) put salad in your cupcakes. But don’t worry, they don’t taste like salad. Or healthy! In fact, you don’t taste the veggies in these beet & kale chocolate cupcakes AT ALL!
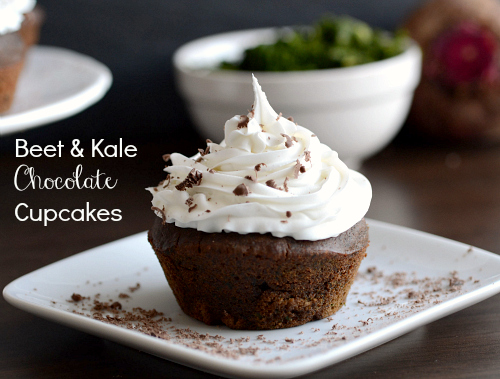
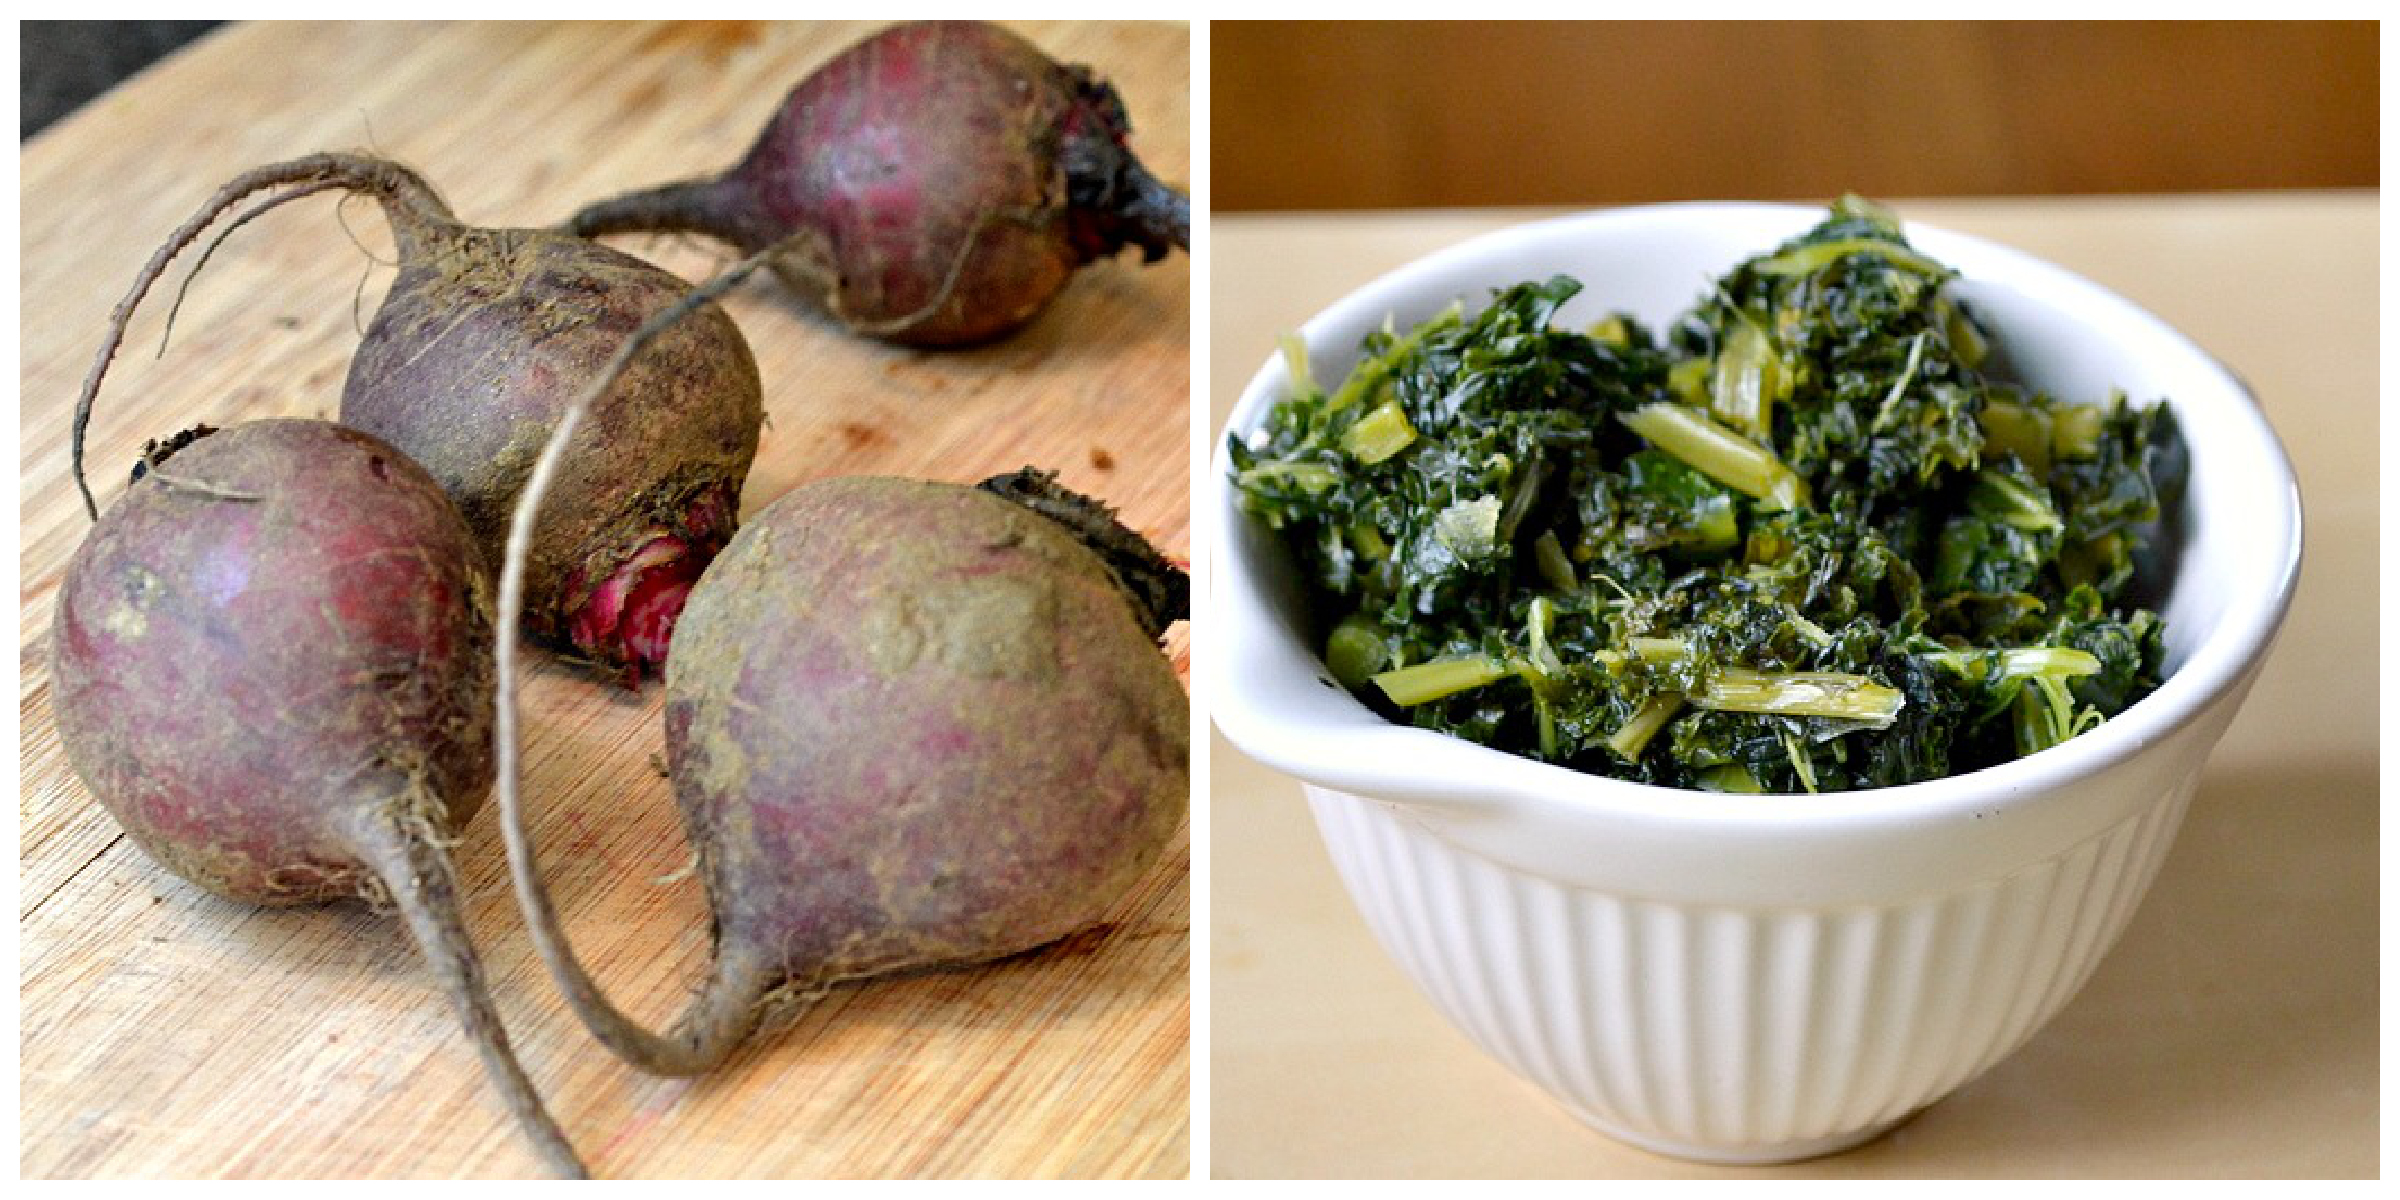
Beets are the prettiest vegetable in the entire world, once they are baked and skinned, of course. (Before that they look like weird lumps with rat tails). The color is SO bright and vibrant, it’s incredible to me that they aren’t modified. Nature really is that pretty. Since they are so beautiful, I’ve wanted to make a beet chocolate dessert forever. I heard about it, really got interested in the idea and then never delivered. The idea came back to me the other day and I was like “claire, you are finally making a chocolate beet cake!” Then, after staring in my freezer for dinner inspiration, I saw a box of kale. And thought, well, why not add kale to this beet cake? Because I’m not well.
Guess what, I’m SO HAPPY I DID THAT. Each cupcake is filled with veggie goodness without the actual veggie taste. And since I know some of y’all don’t like vegetables (which I’ve chosen to gloss over for the sake of our friendships), a cupcake filled with vegetables without the taste is probably a dream come true.
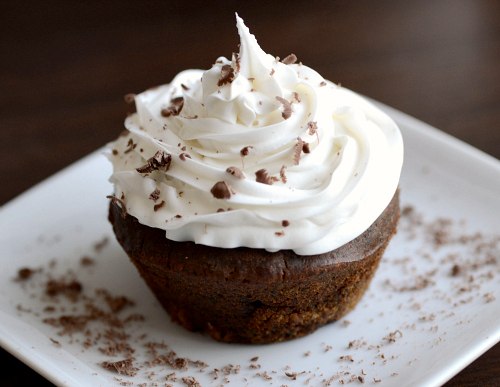
So, if they don’t taste like a salad, what do they taste like then? Good question. They taste like a chocolate cupcake! Really, that’s what they taste like. You’ll notice a slight earthy sweetness from the beets, but nothing that would make you question “hmm, something’s a little off here.” And the kale? Just a VERY VERY subtle hint. Paired with a simple buttercream, these very low-fat (less than 2 grams of fat per serving) healthy cupcakes are perfect for new years resolutions and tricking your kids (and picky husbands) to eat more vegetables.
Just, word to the wise. If you plan on making these the day of an event or school function, wear gloves. Otherwise it’ll look like you got intimate with and/or brutally murdered a purple telletubby.
Beet & Kale Chocolate Cupcakes

CLICK HERE FOR THE PRINTABLE VERSION OF THIS RECIPE!
Prep time: About an hour
Cook time: About 18 minutes
Yields 16 cupcakes. Recipe inspired by Joy the Baker.
Ingredients:
- 2 medium beets, greens and stems removed
- 1/4 cup water
- 1 cup cooked kale
- 3/4 cup unsweetened applesauce
- About 1 cup brown sugar
- 1/2 cup honey
- 1 teaspoon vanilla extract
- 2 eggs, room temperature
- 1 1/2 cups skim milk
- 2 cups all-purpose flour
- 2/3 cup unsweetened cocoa powder
- 1 teaspoon baking soda
- 1/2 teaspoon baking powder
- Dash of salt
- Your choice of frosting (I used vanilla buttercream)
- Chocolate shavings
Directions:
- Preheat oven to 375 degrees F. Place beets in a baking dish and roast for an hour, or until you can pierce with a knife of fork. Reduce heat in oven to 350. Line a muffin tin with liners or grease with nonstick cooking spray.
- Once beets have slightly cooled, peel the skins off. Cut into chunks and place in a blender or food processor. Add water and kale and blend until fully pureed. Set aside.
- In a large mixing bowl, beat the applesauce, sugar and honey together until mixed. Add eggs and vanilla and beat. Once mixed, add the beet and kale puree, stir with a wooden spoon to combine.
- In a smaller bowl, whisk the flour, cocoa powder, baking soda, baking powder and salt. Add 1/2 of the dry mixture to the beet mixture and stir to mix. Add 1 cup of milk and mix. Add 1/4 more dry mixture and stir. Add remaining milk and mix. Add the remaining dry mixture and stir to combine, careful not to overmix.
- Fill the muffin cavities about 2/3 – 3/4 the way full with batter. Bake for about 18 minutes, or until a toothpick inserted comes out clean. Let cool completely. Once cooled, frost with your favorite frosting and garnish with chocolate shavings.
Nutritional information per cupcake (with 3 tablespoons buttercream frosting):
Calories: 191
Fat: 1.7 grams
Carbohydrates: 38 grams
Fiber: 2.4 grams
Protein: 4 grams
Weight Watchers Points: 5
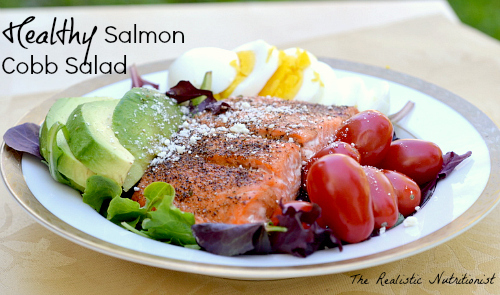
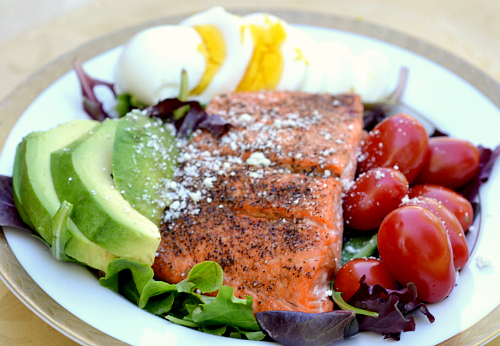
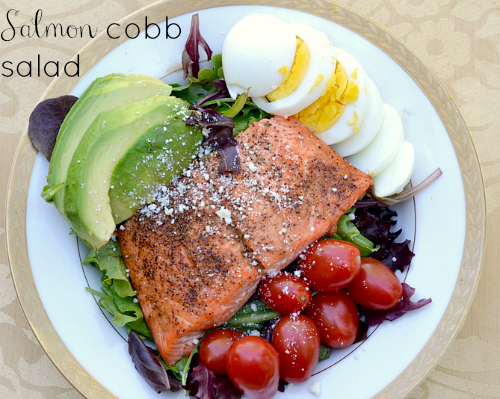
Salmon Cobb Salad
So, something sort of hilarious happened yesterday. When I got home from the winery, I sat down to do my menu planning for the week. So, I took inventory of what I had in my freezer, then wrote down what I needed to buy and then surfed the web for some recipe inspiration. One of the items I was going to make was a salmon cobb salad. Super healthy, full of good-for-you fats, the perfect dinner for my new weight loss efforts. Plus, a new recipe I’ve never made! Well, I googled it and guess what popped up. A recipe I made for She Knows. In April. Yup, I’m officially suffering from dementia.
Food bloggers and recipe developers, has this ever happened to you? You just forgot you made something? Well, lucky for you guys, I also realized I never shared this amazing recipe! Which is absurd because it was amazing. In fact, I remade it last night for dinner and it was ever better than I remembered. Sadly, it was also 10pm so I couldn’t retake the photos. But, given it’s resolution month and weight loss is on everyone’s minds, I knew it was too good not to share.

I don’t know what part is my favorite. The slightly seared, baked salmon, the hard boiled egg, the juicy avocados or the plump cherry tomatoes. I just can’t pick. Seperate they are amazing ingredients but together? They just SING!
It’s so funny because looking back, I can already see how much my styling and photography has changed. (Thank God I realized you can take photos INSIDE with proper lighting so not everything is blue tinted now.) But, that’s either here nor there. I just HAD to share this recipe with y’all so you could make it. It’s just one of those gems that deserves another shout-out in the food interwebs. Oh and don’t fret when you see the fat, it’s mostly monounsaturated which is a good, healthy fat that fights off LDL (or bad cholesterol!) To lower the fat content, leave off the avocado or eat 1/2 the salmon serving.
Be sure to check out SHE KNOWS for the amazing, amazing recipe here!!
Nutritional information per salad*:
Calories: 425
Fat: 23.5 grams
Carbohydrates: 12 grams
Fiber: 12 grams
Protein: 29 grams
Weight Watchers Points: 9
*One salad includes one 4 ounce salmon filet, 2 slices avocado, 5 cherry tomatoes, 1 hard boiled egg & 2 tablespoons dressing.
 Claire
Tags:cobb recipes, cobb salad recipes, healthy recipes, low fat cobb salad recipes, salmon recipes


