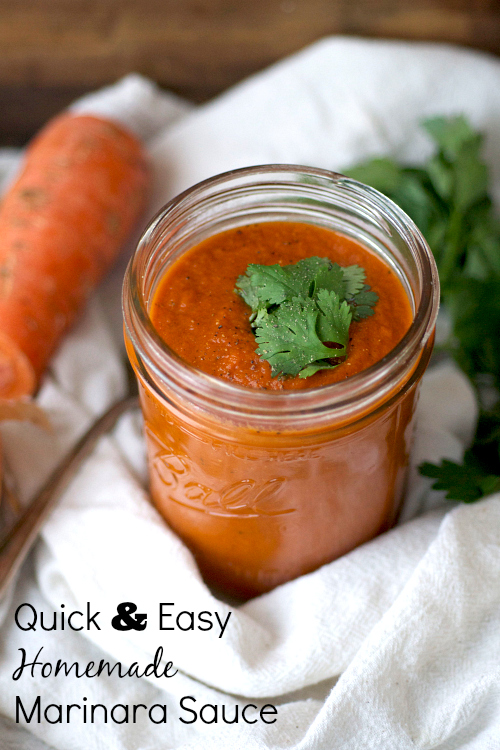
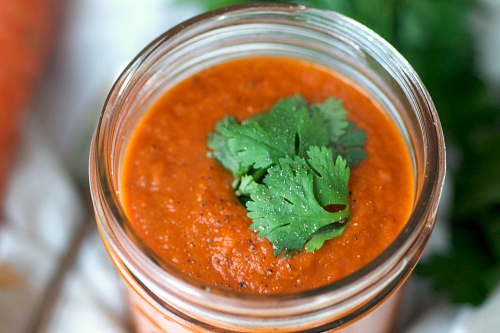
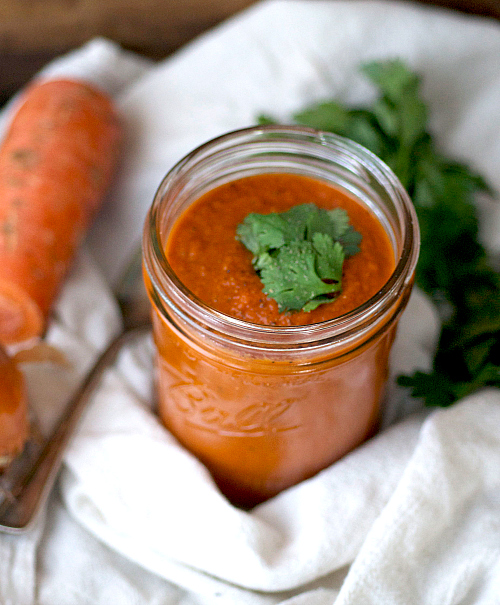
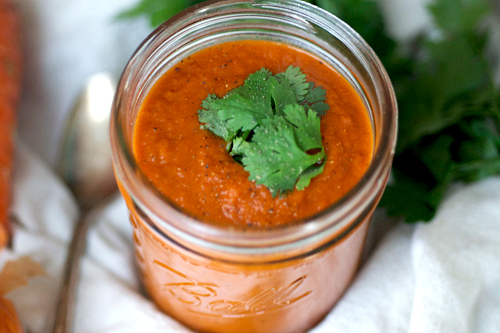
Quick and Easy Homemade Marinara Sauce
 PIN IT!
After one taste of this quick and easy homemade marinara sauce, you’ll never buy another jar of it again, I promise you!
The spring of 2005 wasn’t an easy time for me. I was 20 years old and was pursuing a major I wasn’t passionate about. I thought I wanted to be a dietician, despite my anguish over chemistry and biology, and was knee-deep in 16 credits worth of geometry and molecular biology. I was partying far too frequently with the too many friends I had on campus, had a new boyfriend every other week and was completely and utterly lost. I truly felt sad, lonely and scared for the first time in my life. I knew if I kept going down the path I was on, I wouldn’t graduate and I’d be a drop-out with a drinking problem. So, after doing some research online, I had an epiphany.
I called my parents, sobbing hysterically, and told them that I needed to move and attend a different college. I hated who I was and where I was going, and to really succeed, I needed to leave. After a few scares earlier that year involving my reckless ways, they happily obliged. My dad forked over the money for the applications and I applied to 2 schools, each of them over 750 miles away from where I currently sat. After just a few short weeks, I found out I was accepted to one of them, Georgia Southern University in Statesboro, Georgia. Neither of my parents had heard of it, but both were equally excited to get me out of the hole I dug myself into.
Fast forward 3 months into my fall semester in Georgia and I’m completely homesick. I went from having hundreds of friends at my side to having two, both of which had a life outside of me. One very homesick weekend, both of my roommates had left, and I was completely alone. Instead of going out to the bars, where the girls looked like country stars and the boys only noticed them, I stayed in. Instead of ordering yet another Hungry Howie’s pizza, I decided to make spaghetti and meatballs. A simple dinner that always made me feel like I was at home with my mom as she tossed the pasta into the boiling water and mixed the meatballs together with her hands. So the next hour and a half, I sat by the stove watching as the sauce simmered, tossing in herbs, salt and pepper as the bubbles gently popped when they reached the surface. I mixed pork and beef with diced onions and garlic to create perfectly little meatballs to sit on top of my pasta.
My first bite tasted like home. It wasn’t as good as my mothers, but it brought me that much closer to her anyway. Instead of feeling sad and lonely, I felt happy. It was the first time in my life that I actually felt how powerful food can be. How it can ignite memories of happiness and security with just one bite. Now, I know this wasn’t my best sauce (by far), but in that moment, I had never tasted anything so good.
I have always, always loved food, but it was that plate of spaghetti and meatballs that really showed me how much food can also love you back in the moments where you feel like nothing else does.
Quick and Easy Homemade Marinara Sauce
CLICK HERE FOR THE PRINTABLE VERSION OF THIS RECIPE!
Serves about 8. (1/2 cup serving size)
Prep time: 10 minutes
Cook time: About 35 minutes
Ingredients:
- 5 tablespoons extra virgin olive oil, divided
- 14.5 ounce can stewed tomatoes
- 14.5 ounce can fire roasted tomatoes
- 6 ounce can of tomato paste
- 2 tablespoons chopped fresh basil
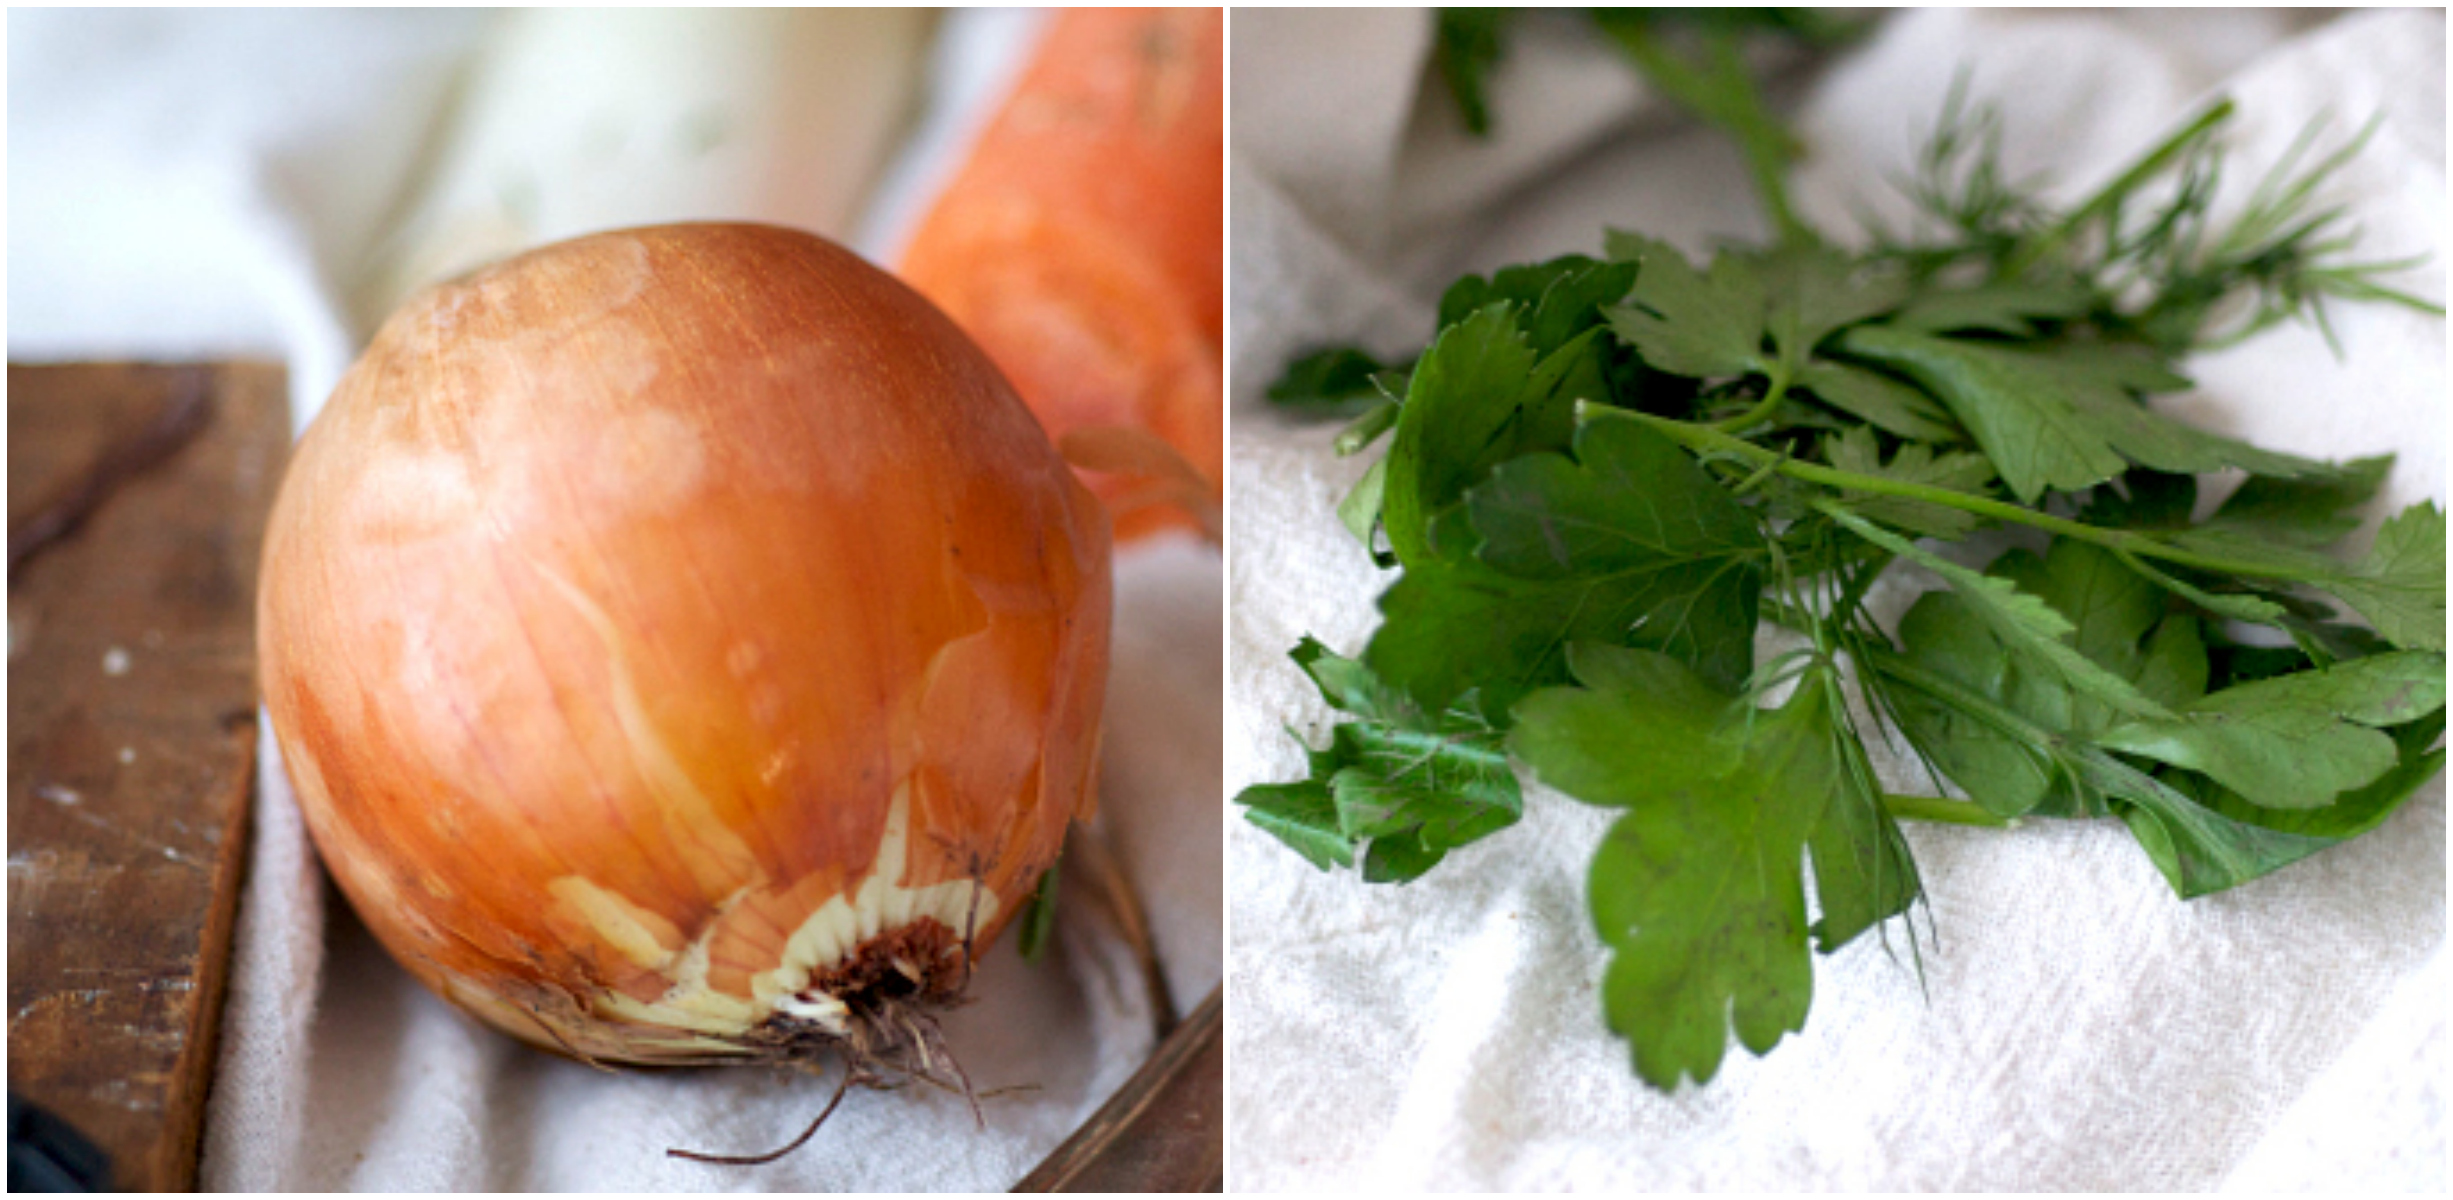
- 2 tablespoons chopped fresh parsley
- 1 teaspoon oregano
- 1/3 cup diced yellow onion
- 3 tablespoons chopped leeks
- 1/2 cup + 2 tablespoons chopped carrots
- 2 cloves garlic, minced
- 1/3 cup dry red wine
- Salt and pepper to taste
Directions:
- In a large dutch oven over medium heat, warm up the 4 tablespoons of olive oil. Add the onions and leeks, cook about 2 minutes, or until they start to soften. Add garlic and carrots. Heat vegetables for about 5 – 6 minutes, stirring occasionally, until soft and fragrant. Stir in the canned tomatoes, tomato paste, basil, parsley, oregano and salt and pepper. Mix to combine. Add in the red wine.
- Reduce heat to low and cover. Pour in remaining olive oil. Let sauce simmer, stirring occasionally, for about 20 – 30 minutes. Working in batches, carefully pour the sauce into a blender (or use a hand blender) and puree until smooth.
- Serve immediately or store in sterilized jars for up to a month.
Nutritional information per serving (about 1/2 cup):
Calories: 135
Fat: 6 grams
Carbohydrates: 14 grams
Fiber: >1 gram
Protein: 2.5 grams
Weight Watchers points: 3
 Claire
Tags:easy marinara sauce, homemade marinara, pasta recipes, quick and easy recipes, sauce recipes
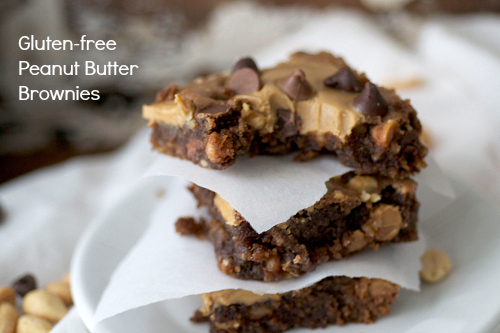
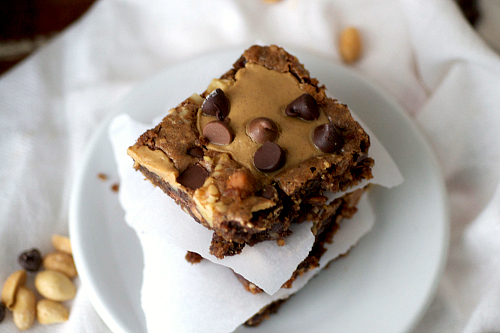
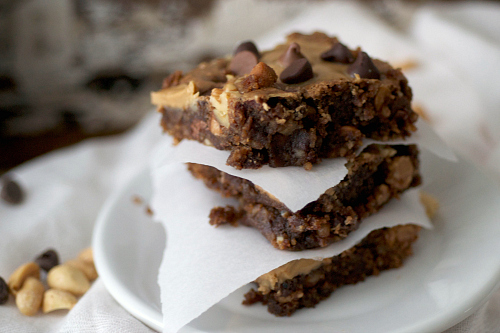
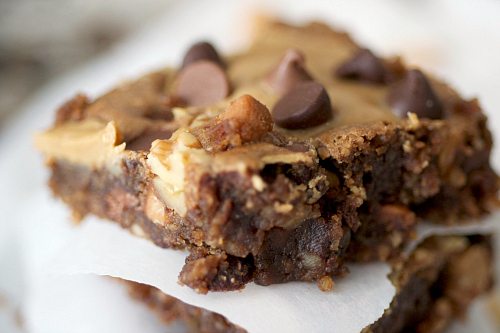
Gluten free Chocolate Peanut Butter Brownies
Looking for the the perfect fudgy brownie that is also GF? Check out these amazing gluten free chocolate peanut butter brownies! So fudgy you’ll need a fork!
What a whirlwind past week it’s been for me. You may have noticed a bit of radio silence on my end these past 7 days, but I promise there’s been good reason for that. In addition to a heavy workload for SK, I’ve also been on a work trip to Vermont! Surprisingly in my 28 years of life, I’ve never been to New England. The farthest Northeast I’ve gone is Ithaca New York, and as a devoted travel writer with a passion for the unknown, this was completely unacceptable. Instead of heading up during the foliage season, I thought it would be awesome to see New England in all of its winter glory, and holycrap am I glad I did. I had such an incredible time in Stowe and Burlington. I’m going to write a whole post about it, but I wanted a tiny snippet into my trip.

Dog-sledding was, hands down, one of my favorite parts of the trip. These dogs are not only so incredibly beautiful, they are so happy to be running. They are probably some of the happiest dogs I’ve ever seen. Plus, Siberian huskies are just such beautiful creatures to begin with, and so gentle. It was such an incredible moment getting to spend some quality time with these gorgeous dogs and learn all about them while I rode on the back of the sleigh.

Now, enough about that for now (blog post to come next week), let’s talk brownies and a new direction for this little blog. But first? Brownies. Decadent little squares that are so fudgy, you have to eat them with a fork and about a gallon of milk. Which to me, is the only way to really eat a brownie.
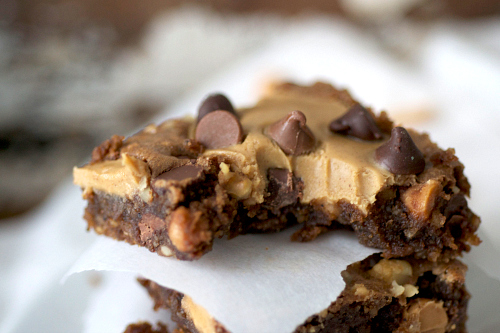
As you know, I’m a peanut butter addict so instead of swirling each brownie (which arguably would have made a prettier end product), I just dolloped big ol’ spoonfuls of Jif creamy right on top. That way I was ensured each bite would contain the proper 85% peanut butter 15% chocolate ratio. And, for good measure, I tossed in some peanut butter chips. Really so I would stop eating them like grapes, but that’s besides the point.
In all honesty, this is probably the 3rd gluten-free brownie recipe I’ve tried. As many of you know, one of my good friends has a gluten allergy, so I’ve been trying to perfect the fudgy gluten-free brownie. The other two recipes I tried had a weird, grainy texture or turned out spongey with a cake like texture. I wanted brownies that looked and tasted like my favorite salted chocolate ones, and doing that gluten-free can be tricky. But friends, I think I finally did it.
Now, I promised we’d talk about a change coming to this blog, but I’m only going to share a small tidbit of information. Like, the fact that there are going to be some pretty major changes around these parts in the next few months! I’m going to put more focus on travel and real life and less focus on recipes. Before you flip, don’t worry, I’ll still share a new recipe 1 – 2 x a week, but I plan on sharing more about my adventures abroad and the experiences I have while traveling. Because right now, that’s where most of my passion lies.
But don’t you worry your pretty little heads off, new healthy and delicious recipes will still be found here! If you want to know more, just email, tweet or FB me! I’d love to answer any questions. Now go make brownies to combat your worry.
Gluten free Chocolate Peanut Butter Brownies
CLICK HERE FOR THE PRINTABLE VERSION OF THIS RECIPE!
Serves about 14. Recipe adapted from Eat Good 4 Life.
Prep time: 10 minutes
Cook time: About 22 minutes
Ingredients:
- 2/3 cup unsalted butter, softened
- 2 large eggs, room temperature
- 1/3 cup + 1 tablespoon brown sugar
- 1/2 teaspoon baking powder
- 6 ounces chocolate chips
- 1/2 teaspoon Green Mountain flavored coffee (I used gingerbread)
- 1/2 cup almond flour
- 1/4 cup gluten free all-purpose flour
- 1 teaspoon gluten-free vanilla extract
- 1 tablespoon milk chocolate chips
- 3 tablespoons peanut butter chips
- 1/4 cup smooth peanut butter*
*You can use less peanut butter or omit completely if you’d like. This was simply added as a preference.
Directions:
- Preheat oven to 350 degrees F. Liberally grease an 8 x 8 glass baking dish with nonstick cooking spray and set aside.
- In a large bowl, beat the butter, sugar, vanilla, eggs and coffee together until fluffy. Set aside.
- In a double boiler, melt the chocolate over medium low heat. Whisk the melted chocolate into the egg mixture to thoroughly combine. *If you want, you can also melt the chocolate in the microwave. Simply mix in the same way.
- In a small bowl, whisk the flours and baking powder together. Add the flour mixture to the egg and chocolate mixture and stir to combine. Fold in the peanut butter chips and chopped walnuts.
- Pour the mixture into the prepared glass pan and spread with a spatula. Using a tablespoon, scoop peanut butter on top of the brownie mixture. You can swirl it in if you’d like, but I just plopped it on. Sprinkle the top with the chocolate chips.
- Bake for about 22 – 25 minutes. Let the brownies cool on a wire rack for about 10 – 15 minutes and then dig in!
Nutritional information per serving:
Calories: 228.5
Fat:14 grams
Carbohydrates: 18 grams
Fiber: >1 gram
Protein: 4.2 grams
Weight Watchers Points: 6
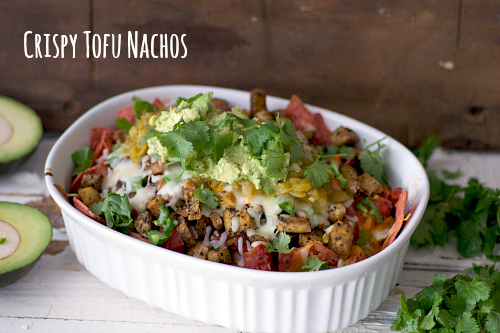
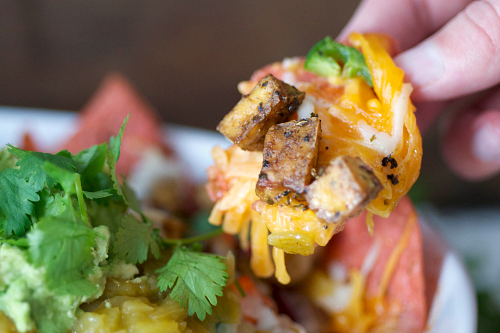
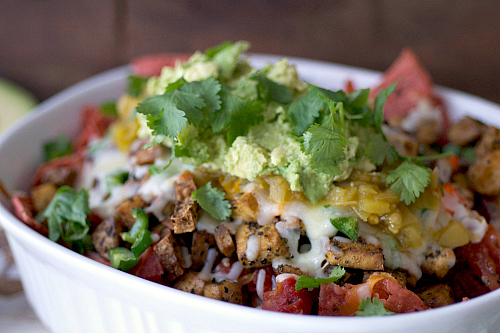
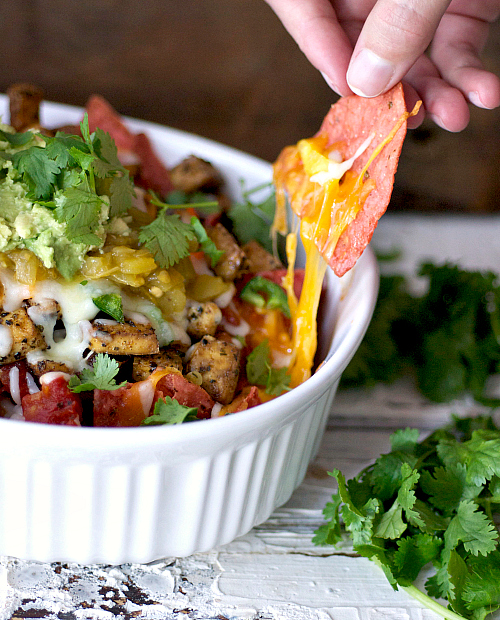
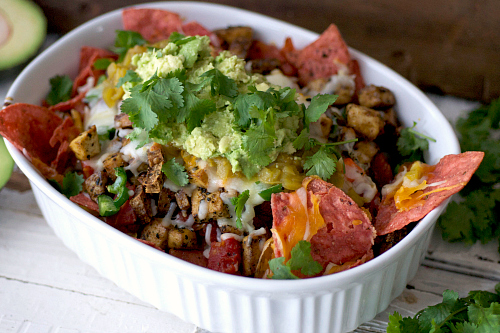
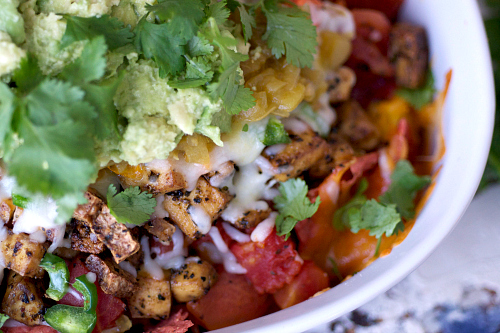
Crispy Tofu Nachos
Looking for a cheesy, decadent and healthy recipe for the Super Bowl? Try these delicious crispy tofu nachos!
I have a confession to make.
And it’s a shameful one.
And funny enough, it actually has nothing to do with these incredible crispy tofu nachos. Friends? Fans? I’m a Netflix tv-show binge watcher.
It all started harmlessly enough. I saw that they had season 5 of Mad Men and I thought “hey, I should reacquaint myself with this season since the new one is starting this spring.” And then, after that, I noticed that they had all 9 seasons of The Office, and it had really been a long time since I watched those. 3 weeks later and 9 seasons down, I was rabid. I needed more. I needed something else to sink my teeth into. Now, as a full-blown addict, I’m on season 3 of Desperate Housewives and I don’t see quitting anywhere in my future.
My issue is that I work from home, so when I’m cooking, photographing and editing, I like to have something on in the background. And Netflix knows this, so they suggest “hey, since you blacked out and watched 9 seasons of the office, maybe you’ll do the same with 8 seasons of Desperate Housewives?” And I’m weak and The Netflix knows that. They prey on me when it’s cold and murky outside, illuminating my couch with a ray of warmth whispering “just one episode, then you’ll go read Ayn Rand or pick up knitting.” But I know and they know one episode turns to 9 and there’s my day.
But I guess an addiction to old TV shows is far better than crystal meth or crack. And at least I don’t have a meth lab like Breaking Bad (which is next on my suggested watch list.) So things could be worse, right? Well, I need to wrap this up because Lynette just got cancer and Gabby kissed Carlos on her wedding day to Victor. So bye!
Crispy Tofu Nachos
CLICK HERE FOR THE PRINTABLE VERSION OF THIS RECIPE!
Serves about 8 – 10.
Prep time: About 10 minutes
Cook time: About 25 minutes
Ingredients:
For the tofu:
- 15-ounce block of extra firm tofu, drained
- 1 tablespoon olive oil
- 1/2 package taco seasoning
For the nachos:
- 1 bag Food Should Taste Good jalapeño tortilla chips
- 1 1/4 cups part-skim cheddar cheese
- 1 cups part-skim mozzarella cheese
- 1 jalapeño, seeded and chopped
- 1 habanero, seeded and chopped
- 1 (14 ounce) can of diced tomatoes, drained
- 1 avocado, mashed
- 1/2 can (about 2 ounces) mild green chiles
- Fresh cilantro for garnish
Directions:
- Preheat oven to 425 degrees F. Grease a baking sheet with nonstick cooking spray. Wrap the tofu in paper towel and stack heavy plates on top to drain the water. Remove wet paper towels and repeat 2 more times.
- Once drained, slice the tofu into 1-inch cubes. Toss with olive oil and taco seasoning. Place in an even layer and bake for about 20 minutes. Use a spatula to break the tofu around and bake another 20 – 25 minutes, or until crispy.
- To make the nachos, reduce the heat to 350 degrees F. Grease an oval baking dish with nonstick cooking spray. Arrange a layer of the tortilla chips along the bottom. Top with tofu and 1 cup of the cheeses (I mixed mine for flavor). Add a few pieces of jalapeños. Top with more chips, more tofu, diced tomatoes and another 1 1/2 cup of cheese. Top cheese with the rest of the jalapeños, habaneros, tofu, green chilies and rest of the cheese.
- Bake for about 15 – 20 minutes, or until cheese is melted. Top with cilantro and avocado. Serve immediately.
Nutritional information per serving:
Calories: 330
Fat: 14 grams
Carbohydrates: 23 grams
Fiber: 3.5 grams
Protein: 18 grams
Weight Watchers Points: 8
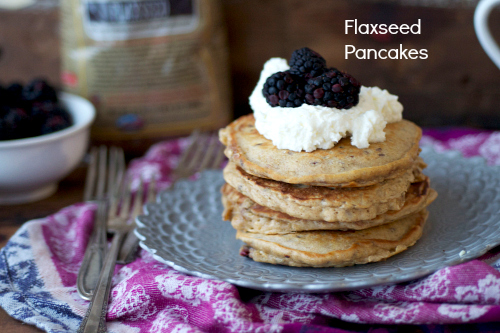
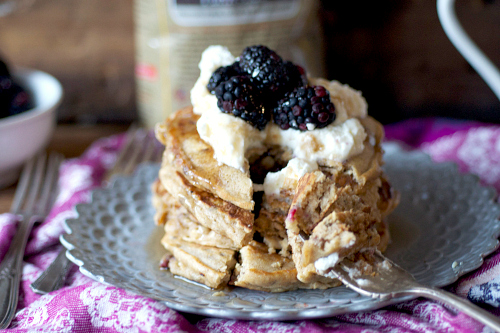
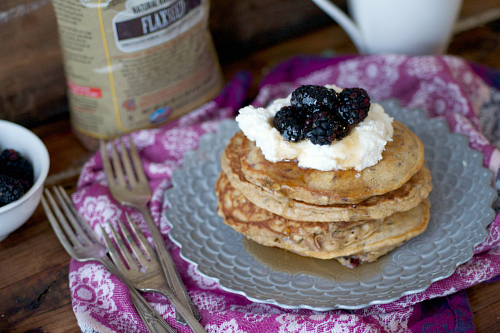
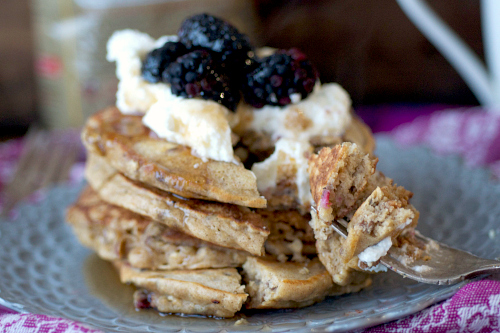
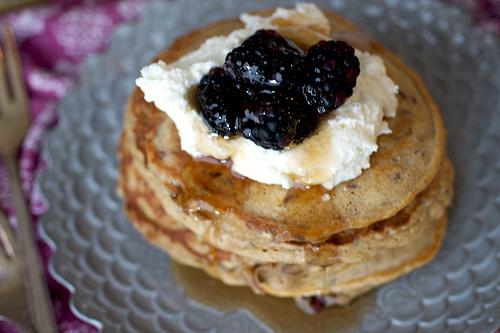
Flaxseed Pancakes
Craving pancakes but can’t bear eating all of those calories first thing in the morning? Make these healthy flaxseed pancakes, made with peanut butter and healthy flax!
When I think pancakes, I think giant stacks of fluffy buttermilk cakes topped with a few tablespoons of butter and about a cup of syrup. Growing up, pancakes were something you ate on the weekends because, well, that’s what they looked like. They were so decadent, the only time you could eat them was a Saturday morning, when a nap was in your very imminent future. I love pancakes though and I’ll be honest, these gorgeous little stacks shouldn’t just see the weekend.
I’m here to bring pancakes back to the weekdays!
Subbing your normal healthy shake or protein cereal with a stack of pancakes on a Wednesday is a little bold, I get that. So you need to be really conscientious when making the sub. That’s why I created these super fluffy and insanely healthy flaxseed pancakes to help you kick that boring bowl of Grape Nuts to the curb.
Flaxseed is a nutritional powerhouse, my friends. A few teaspoons of this wonder seed has been shown to fight breast cancer, heart disease AND diabetes! At first glance, though, it can be a little intimidating. It’s not something you can just eat with a spoon. That’s why if you’re starting out with it, adding a few tablespoons to your favorite foods, like pancakes, to digest them (and soak up all of their healthy superpowers).
Really though, the reason for these pancakes is simply. It was a Wednesday and I wanted pancakes. That’s reason enough to make them, right?
Flaxseed Pancakes
CLICK HERE FOR THE PRINTABLE VERSION OF THIS RECIPE!
Serves about 4. Recipe inspired by Taste of Home.
Prep time: About 10 minutes
Cook time: About 6 – 8 minutes
Ingredients:
- 1/3 cup whole wheat flour
- 1/3 cup all-purpose flour
- 1/3 cup + 1 tablespoon quick-cooking oats
- 2 tablespoons flaxseed (I used Bob’s Red Mill)
- 1 teaspoon baking powder
- 1/4 teaspoon baking soda
- 1 teaspoon vanilla extract
- 1/2 teaspoon pumpkin pie spice
- 2 eggs
- 1 cup 2% milk
- 2 1/2 tablespoons brown sugar
- 1 tablespoon canola oil
- 1 tablespoon unsweetened applesauce
- Fresh whipped cream and blackberries for garnish
Directions:
- Whisk the egg yolk in small bowl.
- In a large bowl, whisk the flour, oats, baking powder, baking soda, pumpkin pie spice and flaxseed. Make a well into the center of the bowl and add the milk, egg yolk, brown sugar, canola oil and applesauce. Stir to combine. Beat the egg white until fluffy and fold into the pancake batter.
- Preheat a griddle over medium-high heat. Pour about 1/4 cup of batter onto the griddle and cook until golden brown and bubbles appear on the top, about 3 minutes on each side.
Nutritional information per 2 pancakes:
Calories: 237
Fat: 9 grams
Carbohydrates: 31 grams
Fiber: 3 grams
Protein: 10 grams
Weight Watchers Points: 6
Claire
Tags:breakfast recipes, brunch recipes, flaxseed pancakes, healthy recipes, pancake recipes
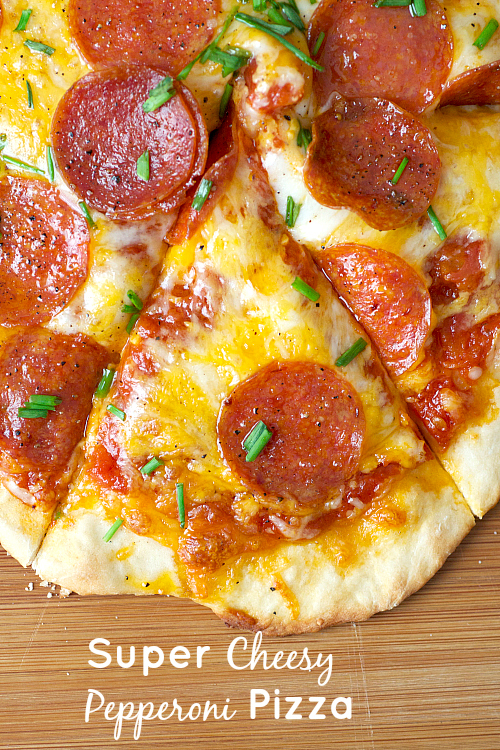
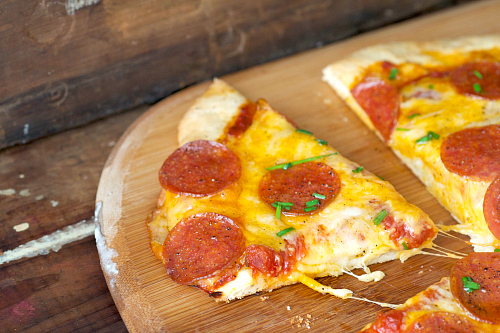
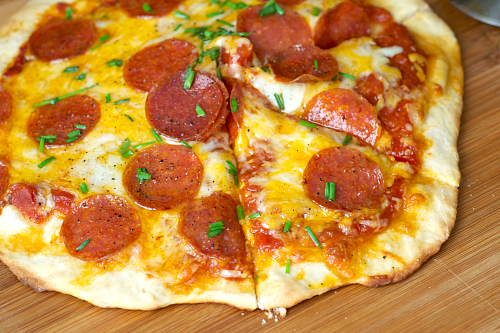
Super Cheesy Pepperoni Pizza
Oh I love snow days! My husband and I have been talking lately about moving to a warm, sunny place when our lease is up (in September) and as alluring as a quick trip to the beach or 70 degree winters is, I’ll admit, I would really miss the snow.
I grew up in the Midwest (with lake effect snow winters) so I’m sort of used to winter. And not only that, it reminds me of home. I grew up getting over 2 feet of snow each January and February, with snow days leaving me home to play in it all day until my face was rosy and frozen. My mom would make big batches of homemade chicken noodle soup or goulash and we’d eat by the fire. I always wanted my kids (future ones, of course) to have snow days and winter like I did.
But you know what? Giving my kids the chance to grow up next to a beach is pretty enticing too. Actually, who am I kidding, kids are a long ways off for us, I just want to grow up next to a beach. I have friends in LA and San Diego and they are always posting photos of their rollerblading weekends or afternoons on the soft, white sandy beaches. Just the thought alone makes my heart ache.
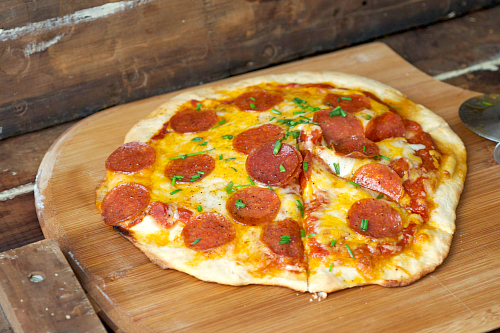
But we have a few months to figure out our next steps, and let’s get serious, I’m not beach ready. But unlike past attempts to weight loss, I’m not beating myself about that. In fact, I even hosted pizza night in our cozy little abode last week. The key to successful weight loss is letting yourself indulge every now and then, and I’ll be honest, pizza is my favorite indulgence. Especially super cheesy pepperoni pizza.

Because life is too damn short not to eat the things you love. It’s all about moderation, am I right?
Super Cheesy Pepperoni Pizza
CLICK HERE FOR THE PRINTABLE VERSION OF THIS RECIPE!
Serves about 8. Recipe inspired by Table for Two Blog.
Prep time: About 15 minutes
Cook time: About 12 – 15 minutes
Ingredients:
For the crust:
- 1 package active dry yeast
- 1 teaspoon white sugar
- 1 cup warm water, about 110 degrees F
- 2 1/2 cups bread flour
- 2 tablespoons extra virgin olive oil
- Dash of salt
For the toppings:
- 1 cup pizza sauce
- 1 cup mozzarella cheese
- 1 cup shredded cheddar cheese
- 1/4 cup shredded parmesan cheese
- About 1 1/2 cups turkey pepperoni
- 2 tablespoons chopped chives
- Cracked black pepper
Directions:
- To make the dough, mix the yeast, sugar and water in a large bowl. Let sit until foamy, about 10 – 15 minutes. Mix in the bread flour, olive oil and salt. Place the dough on a lightly floured surface and knead until smooth, soft and elastic. Place the dough in a lightly oiled bowl and cover with nonstick saran wrap. Chill for at least 12 – 24 hours.
- Once chilled, remove from the bowl. Lightly knead and then let rise for about an hour. Gently punch the dough down. Place it onto a floured surface and roll out to a 12 inch circle. Dust with cornmeal.
- Preheat oven to 450 degrees F. Grease a pizza pan or stone and place the dough onto the pan. Spread the top evenly with sauce, leaving a 1-inch border for the crust. Top with the mozzarella, cheddar and parmesan cheese. Arrange the pepperoni around the edges and in the center of the pizza. Top with chives and cracked black pepper.
- Bake for about 15 – 16 minutes, or until cheese is melted and crust is golden brown.
Nutritional information per slice:
Calories: 288
Fat: 12.1 grams
Carbohydrates: 32 grams
Fiber: 1.75 grams
Protein: 17 grams
Weight Watchers Points: 8
Claire
Tags:best cheese pizza recipe, italian recipes, pepperoni recipes, pizza recipes, super cheesy pizza recipes


