Whole Wheat Mango Muffins Recipe
 PIN IT!
I’m having a pretty hard withdrawal from paradise. I keep awakening, hoping to step out to see THIS; the mint colored ocean, bright sunshine, majestic mountains, palm trees, tranquil blue lagoons and schools of brightly colored fish.

So, you can imagine my disappointment then when I wake up to a loud screeching alarm, a puppy whining and 37 degree temperatures. It’s a little disheartening to say the least. To curb my post paradise blues, I’m sharing a taste of the tropics in the form of a whole wheat mango muffins recipe.
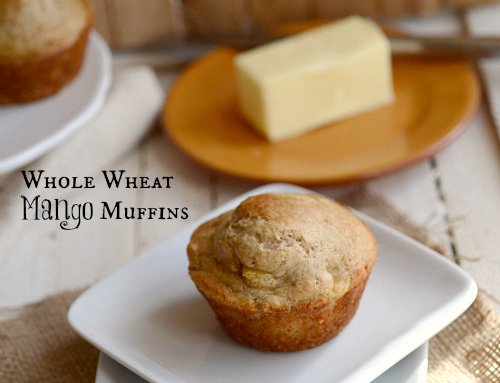
I love mango. (Brick, do you really love the lamp, or are you just saying that because you saw it? I LOVE LAMP!) It’s probably the best fruit in the world. For one, it’s a beach vacation in each muffin. Every soft, fleshy, fruity and sweet bite transports you to a perfect sandy beach, complete with aqua waters, hot salty air and an endless sea of palm trees. It’s hard to eat a mango and not feel anything but serenity and warmth. That’s definitely how i feel after each bite of these moist and fluffy whole wheat mango muffins.
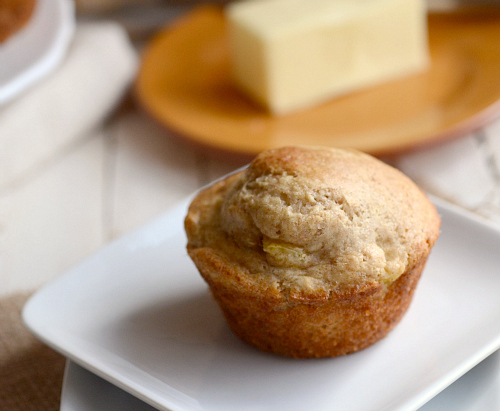
I want to scream my love for this recipe from the rooftops. Broadcast it over the radio and TV. These are the kind of muffins I’d stick in a basket and welcome the new neighbors with. These are the muffins that I’d enter into baking contests and bake sales. These are definitely the muffins I’m making for our Easter brunch.
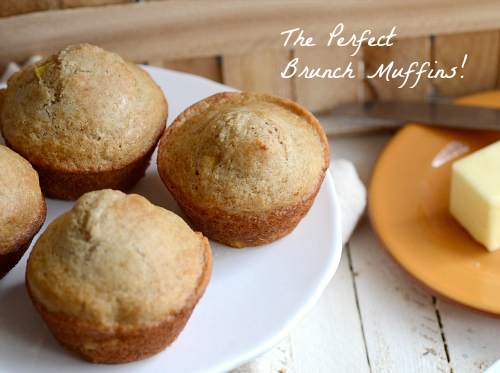
I think what makes these so bleeping amazing is their simplicity. They only have a handful of ingredients, no preservatives or weird enhancements. They are just purely, simply delicious. Which is exactly the kind of food they have in the French Polynesia. No weird ingredients, boxed cake mixes or flours, just fresh, caught from the land food seasoned with limes or coconuts. I think we could all learn some lessons from this muffin here when we are meal planning or blogging, don’t you think? Keep it simple and you know it’ll be good.
CLICK HERE FOR THE AMAZING WHOLE WHEAT MANGO MUFFIN RECIPE!
Nutritional information per muffin:
Calories: 116.67
Fat: 0.8 grams
Carbohydrates: 24.5 grams
Fiber: About 1 gram
Protein: 3.6 grams
Weight Watchers Points: 3
 Claire
Tags:Easter brunch recipes, healthy recipes, low fat recipes, mango recipes, muffin recipes, whole wheat recipes
How to Make Jelly Bean Infused Vodka
This recipe, for those who are wondering, isn’t healthy, low-fat, gluten-free or low-sugar. I mean, it’s vodka made from jelly beans, so. But with Easter just a few days away, I knew I had to share it. Because what’s better than vodka and candy, mixed together? It’s exactly what I’d like to find hiding in my Easter basket.
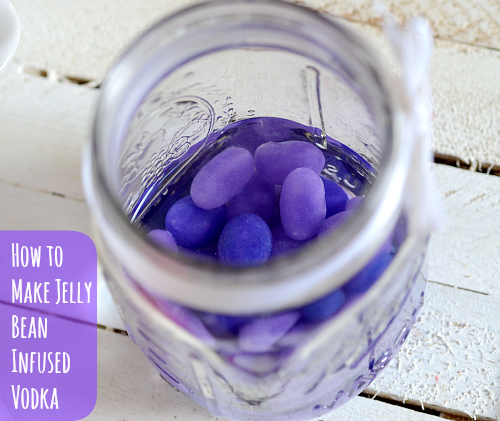
Infusing vodka is actually really easy. It doesn’t require any sort of fancy equipment. In fact, all you need is a mason jar, candy and some vodka. Really, it’s that simple. Then after mixing, you let it sit, fester (that sounds gross, but I’m too tired to think of another word) and infuse for about 2 days. Then you strain and are left with a gorgeous bright liquid that tastes like pure candy heaven.
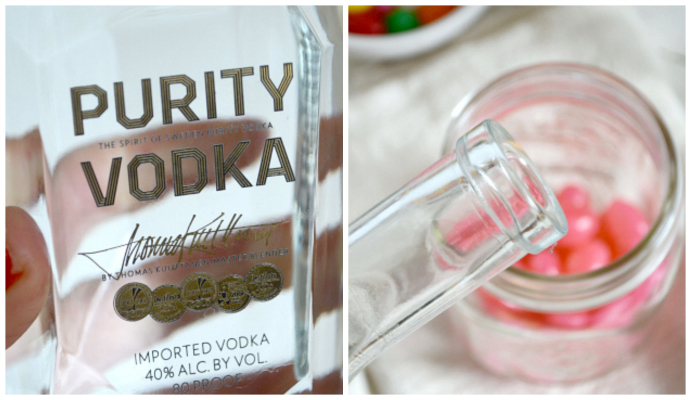
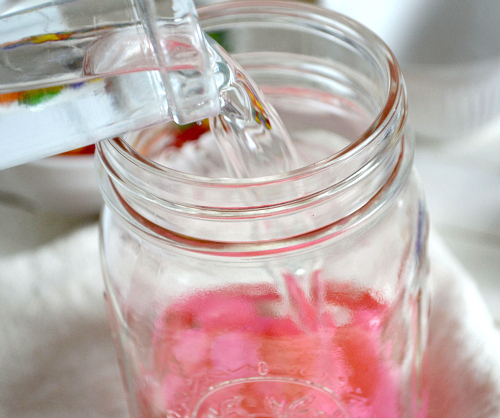
To start with, pour about 1/4 cup of jelly beans into mason jars.
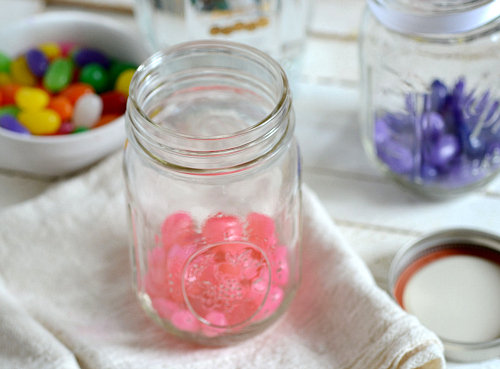
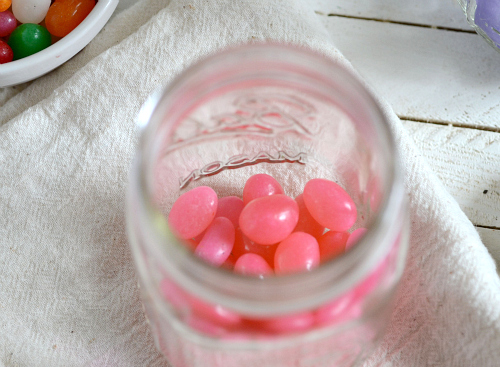
Then pour about 1/2 cup of your favorite vodka over the beans. I used Purity, which is a new favorite of mine. It’s so crystal clear and smooth, it tastes almost better than the very expensive brands.
Then you screw the top on and let it sit for 48 hours to really infuse. You could probably do it in 24 – 36 hours, but it won’t be as sweet and may be really strong still.
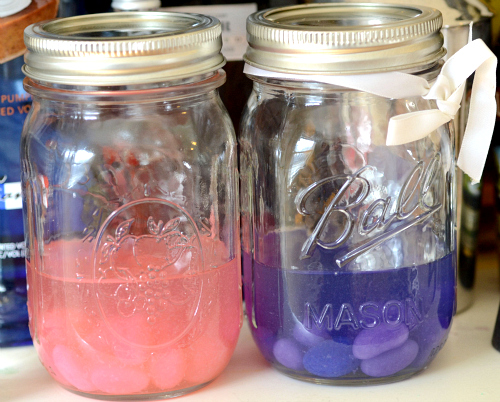
Then pour the vodka through a wire mesh strainer to remove the beans and the extra sugar particles.
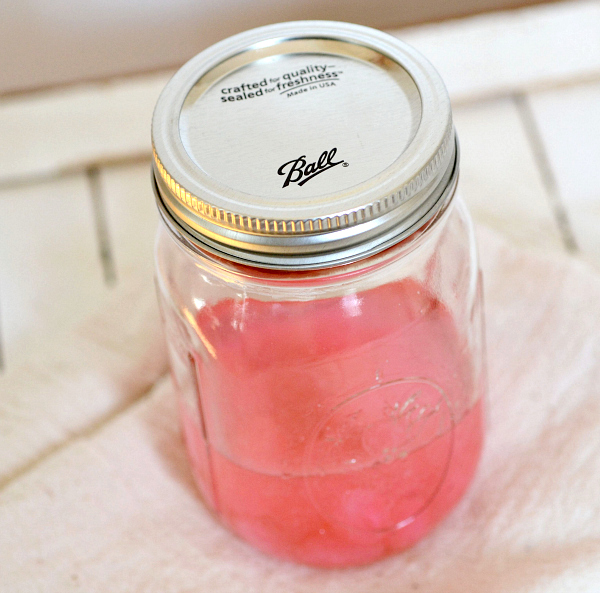
And then you’re done! It’s that easy guys, it really is. In fact, it’s a really fun gift idea for your adult friends and family on Easter. Imagine how happy everyone would be to find jelly bean vodka in their baskets! In mason jars! Now, your next question, how on earth do you drink this? Well, if you’re bold, you can sip it on its own since it is sweet and tastes like candy. If you can’t stomach straight vodka, add a few splashes of champagne to make a fun spritzer. My new favorite cocktail right now is the pink jelly bean vodka, champagne and a twist of lemon, it’s INSANE.

So there you have it, the easiest homemade vodka on the planet. Plus, it’s quite pretty don’t you think? Just make sure the kids don’t think it’s for them!
Jelly Bean Infused Vodka

CLICK HERE FOR A PRINTABLE VERSION OF THIS RECIPE!
Yields about 2/3 cup (two different flavors).
Prep time: >10 minutes
Infusing time: 48 hours
Ingredients:
- 1/2 cup jelly beans (I used two different flavors)
- 1 cup vodka
- 2 mason jars with lids
Directions:
- Pour 1/4 cup of each flavor jelly bean into sterile mason jars. To keep the flavors the best, don’t mix the colored jelly beans.
- Then top the jelly beans with 1/2 cup of vodka. Screw the top back onto the jars and place in room temperature. Let sit for 48 hours.
- Once infused, strain the jelly bean vodka into another jar to remove the jelly beans and the extra sugar. Serve with your favorite champagne or sip on its own!
Nutritional information per shot (about 1.5 ounces):
Calories: 158
Fat: 0 grams
Carbohydrates: 13.6 grams
Fiber: 0 grams
Protein: 0 grams
Weight Watchers Points: 1
Jelly Bean Easter Egg Sugar Cookies
Follow my blog with Bloglovin
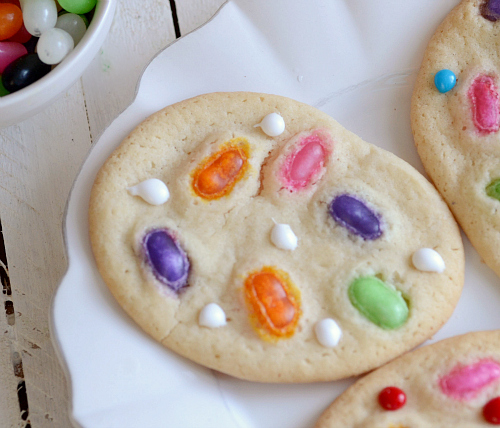
Oh hey there. Remember me? Probably not since I disappeared to the other side of the world for a week. I definitely did not have full intentions of leaving the blog sparse while I was gone, but I certainly did not feel like writing on my computer while in Bora Bora. Do you blame me? If you want some photos of my trip, PLEASE check out my instagram feed! I’ll be doing a huge recap later in April so stay tuned for that 🙂 Now, since Easter is tomorrow (basically) let’s talk sweets. But not just any ol’ sweets (or anything with carrot), let’s talk jelly bean Easter egg sugar cookies, mmk?
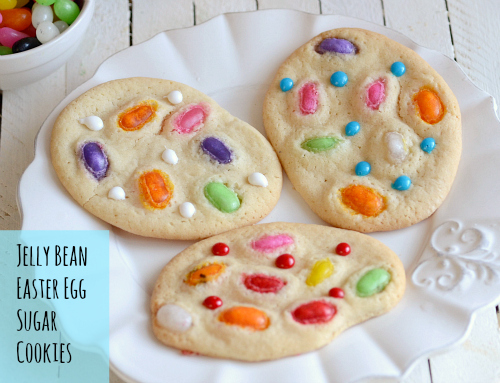
My hubs said they look like little amoebas or like weird plasma things. Which, I can kinda see. But at the same time, I also think they are so freakin’ adorable. Plus, can you really go wrong with cookies made with candy? I think not.
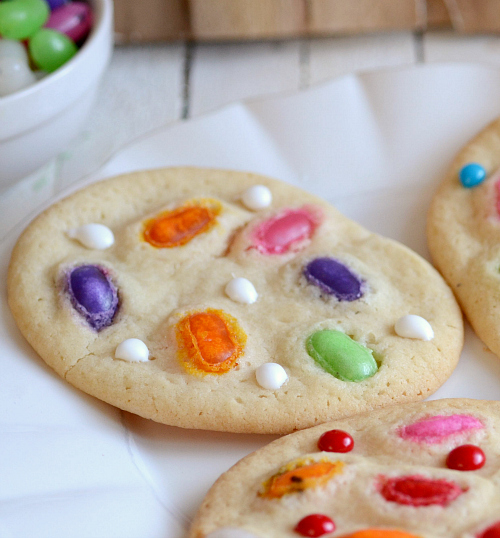
I was worried that baking jelly beans into cookies would turn them into hard little rocks that you can’t bite into. Luckily, that didn’t happen! The jelly beans are still just as chewy as ever, in fact, even a little more so when they are warm. Plus, the use of different flavored beans gives each bite of this cookie a new fabulous flavor component. These are like a much larger, less creative version of the candy from Willy Wonka that tasted like a 5 course meal.
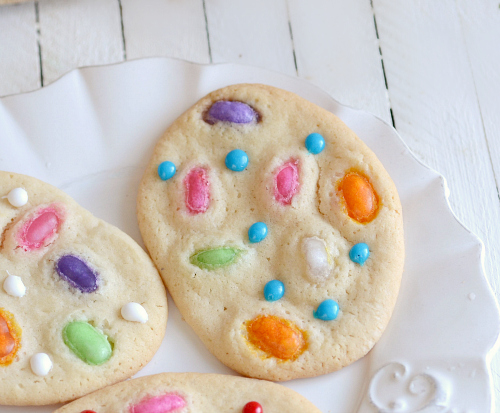
They may not be the most glamorous thing in the world, but they are cute, really easy and don’t require a fancy piping bag, weird cookie cutters or fake grass. Which, after looking at Pinterest for 5 minutes, seems to be all the rage now. What happened to the days of simple food that is easy to make? A 12 step dessert doesn’t seem worth it. But that’s for a different day. These adorable festive jelly bean Easter egg cookies are the perfect after school snack this week or even a fun dessert for the kid’s table after Easter dinner.
Or you could just make them with all of those leftover jelly beans you know you’ll have on Monday. Rather them be in a cookie than stuffed under your couch cushions.
Jelly Bean Easter Egg Sugar Cookies
CLICK HERE FOR THE PRINTABLE VERSION OF THIS RECIPE!
Yields about 12 cookies.
Prep time: >10 minutes
Cook time: 8 – 10 minutes
Ingredients:
- 5 tablespoons soft butter
- 3/4 cup white sugar
- 1 egg
- 1 teaspoon vanilla extract (you can also use almond)
- 1-2/3 cups flour
- 1 teaspoon baking powder
- Dash of salt
- About 80 jelly beans
- Cookie icing gel or sprinkles
Directions:
- Preheat oven to 350 degrees F. Line a baking sheet with parchment paper and set aside.
- Beat the butter and sugar together until creamy. Stir in egg and vanilla. In another bowl, mix the baking powder, salt and flour together. Gradually add to the egg/butter mixture and stir to combine. Form a dough disc with your hands. The mixture will be rather crumbly, but don’t worry, it comes together. If you want, add a bit of water to moisten it. Wrap the dough in plastic wrap and chill for at least an hour.
- Once chilled, place dough on a lightly floured surface. Roll out with a rolling pin to about 1/8 inch thickness. Cut out shapes using an Easter egg cookie cutter. Place cookies on the prepared baking sheet. Carefully press about 7 – 8 jelly beans into the cookies, at least an inch apart.
- Bake for about 8 – 10 minutes, or until golden brown. Let cool on a wire cooling rack. Add a few dots of cookie icing for additional color and enjoy!
Nutritional information per cookie:
Calories: 170
Fat: 5 grams
Carbohydrates: 31 grams
Fiber: >1 gram
Protein: 2.4 grams
Weight Watchers Points: 4
Claire
Tags:easter egg, Easter Recipes, easy easter dessets, fun easter desserts, jelly bean recipes, sugar cookie recipes
Vegetable Lasagna from Hunts
Hey guys! I’m trying to get my life back on track after traveling, so Meredith from Hunts is taking over today with a DELICIOUS recipe for veggie lasagna!
We’ve officially hit that weird time of the year when it comes to seasons. Yes, it’s technically spring , but the temperatures are still quite chilly! And when it comes to the changing seasons, no questions is more important than this one: what do you eat when you’re coming to the end of winter but it’s not quite spring yet? Winter is known for hearty, stick-to-your ribs comfort foods like chili, stews and cheesy casseroles; homey meals that warm you up from the inside out. When you think of spring foods on the other hand, things like fresh produce from the farmers market, lighter salads and ripe tomato recipes probably come to mind. So how do you meet in the middle between heavier comfort foods and springy freshness at this in-between time of year? (more…)
Claire
Tags:healthy recipes, lasagna recipes, low fat recipes, vegetable recipes
Shepherd’s Pie with Horseradish Mashed Parsnips
Hey guys! As we speak I’m currently spending my last day in PARADISE, aka Bora Bora. If i miss my plane, please don’t miss me too much. I go
Hey Everyone! Liz here from The Lemon Bowl and I am thrilled to be guest posting for my girl Claire today! She recently shared her incredible Lemon Blueberry Popover Pancakes with my readers so I’m here to return the favor.

Is there anything more comforting, more cozy or more satisfying than a Shepherd’s Pie hot out of the oven? I vote no. Not only is it a huge crowd pleasure but it is kid-friendly, freezer-friendly and very much husband approved. By making a few simple adjustments, my Shepherd’s Pie with Horseradish Mashed Parsnips is not only waist friendly but it is completely dairy free. Here is what I did to make this dish healthy and delicious.
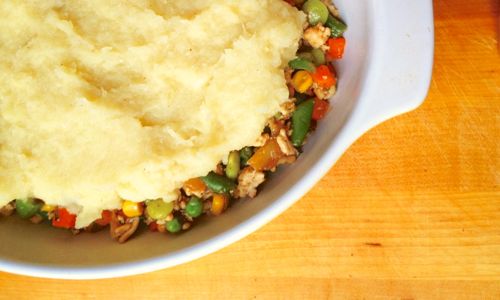
- Parsnips are not only full of vitamins, nutrients and fiber but they are full of flavor and provide a little bite to the mashed potatoes.
- The traditional beef or lamb is swapped for ground turkey to reduce total cholesterol, saturated fat and calories. Less calories = we can eat more. J
- Instead of endless amounts of butter and cream, I simply use chicken broth and a high-speed immersion blender to create a beautifully whipped potato crust.
- For added flavor, two garlic cloves are boil with the potatoes and parsnips to provide a mellow garlic flavor.
- Horseradish is added for a low calorie flavor boost.

In other words, it’s the perfect meal when you’re still craving comfort food but swim suit season is just around the corner. Your fork is waiting.
Shepherd’s Pie with Horseradish Mashed Parsnips {Dairy Free}
Ingredients:
- 2 parsnips – peeled and cut in 2 inch pieces
- 1 large russet potato – peeled and cut in 2 inch pieces
- 2 garlic cloves – peeled
- 16 oz ground turkey breast
- ½ teaspoon salt
- ¼ teaspoon pepper
- 1 teaspoon dried thyme (or 2 teaspoons fresh)
- 1 medium onion – diced
- 2 tablespoons white whole wheat flour (or all purpose)
- 2 cups low sodium chicken broth – divided
- 2 cups frozen mixed vegetables
- 1 tablespoon prepared horseradish
- salt and pepper to taste
Directions:
- Pre-heat oven to 350 degrees and have an 8 x 11 baking dish ready.
- Place peeled parsnips, potato and garlic cloves in a medium pot and cover with cold water. Bring to a boil then simmer until fork-tender, about 15-20 minutes.
- While parsnips and potatoes are cooking, heat a deep sauté pan over medium-high heat and spray with non-stick spray. Add ground turkey breast, salt and pepper. Cook until browned, about 7-9 minutes, using a wooden spoon or potato masher to break up turkey into bite-sized pieces.
- Add thyme, garlic and diced onion to the turkey and continue cooking for 5 minutes until onions soften. Stir in the flour and continue to cook for 2 minutes. Pour in 1 cup of the chicken stock, bring to a boil then reduce to a simmer. Stir until thickened, about 1-2 minutes. (Need more liquid? Add more chicken broth.)
- Stir frozen mixed vegetables into the turkey mixture and cook until vegetables are heated through, about 4-5 minutes. Check for seasoning and adjust with salt and pepper accordingly. Pour mixture into baking dish and set aside.
- Meanwhile, add remaining 1 cup of chicken broth to the cooked parsnips, garlic and potatoes. Using an immersion blender or a potato masher, begin to mash the potatoes and parsnips until smooth. Add horseradish and season with salt and pepper to taste. Once mixture is smooth, carefully spread the potatoes/parsnips over the turkey and vegetable mixture in the baking dish to form a crust.
- Bake for 15-20 minutes or until turkey mixture is bubbling and potatoes begin to lightly brown. Serve warm.
Nutritional Information (per 2 cup serving):
Calories: 300
Fat: 9 grams
Carbohydrates: 40.1 grams
Fiber: 6.4 grams
Protein: 34 grams
Weight Watchers Points: 8


