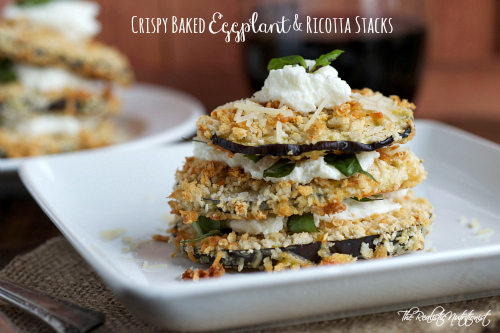
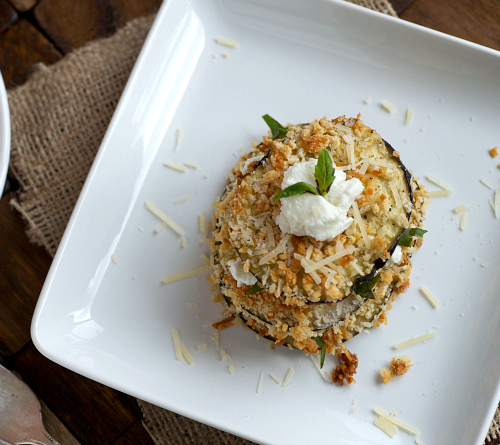
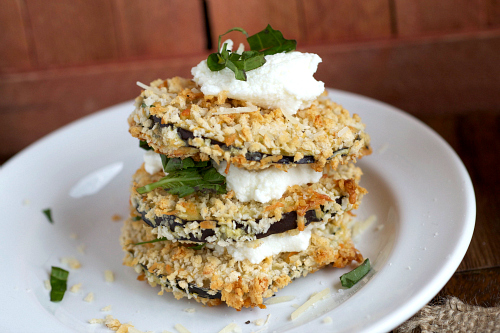
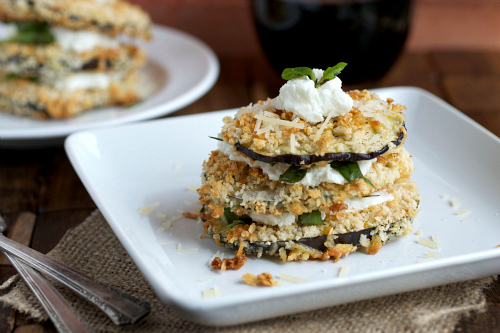
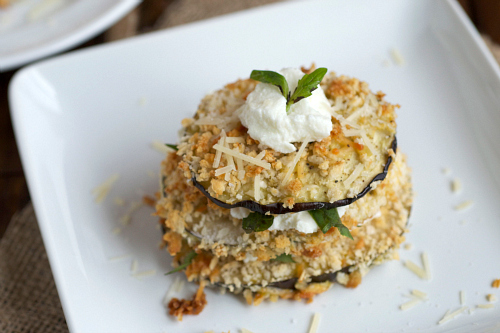
Crispy Baked Eggplant & Ricotta Stacks
 PIN IT!
I had the best intentions of posting this crispy baked eggplant and ricotta stacks recipe yesterday. I promise you, I did. Then I had a little scare with my computer that sort of pushed life back a few hours.
You see, my computer has my life on it. I’m a freelance writer who has every photo, every article, every piece of writing I own on it. Of course, I’m not stupid, it’s all backed up. But it’s still plenty scary seeing your computer shut down in an instant without turning back on.
So, I ran to the apple store and, maybe it was my low-cut dress or the fact that I was sobbing and clutching onto my dead computer with all of the life in me, but I got some pretty immediate attention. One of the “geniuses” stuck some magic flash drive into it and it restarted some power supply? I was far too distraught to know what he did, all I know is my baby is fixed again.
But I did somehow get duped out of $200 for apple care. Yes, I know I need an extended warranty on my computer but did they have to pray on the poor girl sobbing into her purse? Couldn’t they have picked the person next to me who was looking at me like I had 5 heads and a flesh eating virus? But I guess in the grand scheme of life, not having my computer under warranty is like not having renters insurance on your apartment.
And when you least expect it, the whole place can go up in flames. So all in all, it was probably the best $200 I spent in months.
Crispy baked eggplant and ricotta stacks
CLICK HERE FOR THE PRINTABLE VERSION OF THIS RECIPE!
Serves about 4.
Prep time: >10 minutes
Cook time: About 15 minutes
Ingredients:
- 1 medium eggplant, cut into thick slices
- ½ cup all-purpose flour
- 2 eggs, lightly beaten
- ¾ cup panko breadcrumbs
- ¼ cup shredded parmesan cheese
- 1 teaspoon Italian seasoning
- Salt and pepper to taste
- About 1 cup part-skim ricotta cheese
- Marinara sauce for dipping
- Fresh basil chopped
Directions:
- Preheat oven to 425 degrees F. Line a baking sheet with foil and liberally coat with nonstick cooking spray.
- Mix the panko breadcrumbs with the parmesan cheese, Italian seasoning and salt and pepper.
- Dip each slice into the flour and then into the egg. Shake off any excess egg and then dredge in the panko breadcrumbs. Repeat until all of the slices have been coated.
- Place each eggplant slice onto the baking sheet and bake for about 8 minutes, or until golden brown on each side. Let cool slightly.
- To assemble the stacks, place about one tablespoon of ricotta cheese on top of an eggplant slice with chopped basil. Add another slice and top with another tablespoon of ricotta. Top with one smaller slice of eggplant and add ½ teaspoon of ricotta and chopped basil.
- Serve each stack with marinara.
Nutritional information per stack:
Calories: 296
Fat: 8.75 grams
Carbohydrates: 28.25 grams
Fiber: 3.25 grams
Protein: 16 grams
Weight Watchers Points: 6
The Reason
I’m an “everything happens for a reason” believer. And after everything that’s happened this month, I know that’s probably a little hard to believe. But despite the fire, the insurance fights and the trauma, I still found myself searching for the reason behind it. The reason we were chosen to go through it all. And this morning, I figured it out.

The reason it all happened is simple…to save me. To give me perspective on a life I was so close to losing. You see, on the outside, my life was shiny. It was glamorous, filled with first class trips to Cannes and five star stays in over water bungalows. It was free meals in fancy restaurants and swag bags filled with designer goods. But on the inside? It was falling apart. I was losing everything that mattered to me because all of my focus was on the shiny. I was so determined to be successful in my career that I forgot what else mattered to me. I forgot that I had a husband who loved me but was losing hope in us. I had a family I blew off for trips and parties. I had friends who stop trying to see me, knowing I’d always cancel for something better. I was so focused on ME that i forgot to focus on the people who MADE me. Who love me. I pushed them aside for the shiny life I thought was perfect.

And guys, I don’t share everything on here and maybe that should change, but I was so close to losing the thing that matters more to me than anything. Matters more to me than cooking, my job, traveling. I was so close to losing my husband and marriage I could taste it. And maybe that was when God, or whatever being is up there, decided to take things into his own hands. That’s when we had the fire. And in more ways than one, it cleansed us. As we were picking through our things, our possessions, the things we used to hide behind when we didn’t want to talk, we came together. We held each other while we cried. And we knew how close we were to TRULY losing everything. And like that, our marriage and our love came back. Now, we aren’t perfect, by any means, but I can say with a full heart that our love is stronger than it has ever been (even stronger than our wedding day!)
I’ll always be thankful that it opened my eyes to the amazing world around me. Before, I spent nearly all of my time working. The only time I felt truly alive was when I was traveling without wifi, without a computer. When I actually allowed myself to take in what an insanely beautiful world we live in. And you know what? I shouldn’t have to travel 4500 miles away to have those moments. There is so much beauty all around me that deserves discovering. Moments that I need to experience instead of let pass by.

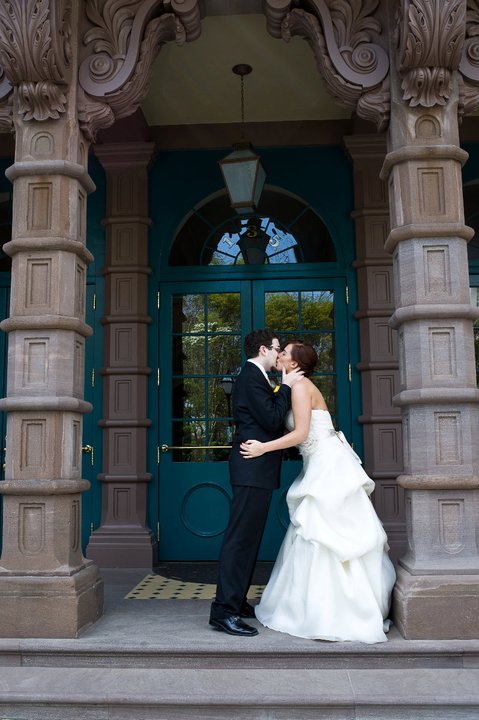
This photo is proof of that. I took this on Saturday when we were having a picnic in the park with friends. This is what I was missing when I was too busy scheduling and trying to live a shiny, “perfect” life. So for opening my eyes to the world, giving me perspective, saving my marriage, for that, I’m always going to be thankful for the fire. For reminding me of what the true reason for my life is. Because of this, you might notice that posts will be a bit more sporadic over here, and that’s not because I don’t still love and cherish this blog. I’ve just spent so much of my time stressing over it and focusing on the wrong things I lost why I began it to begin with. Like I re-discovered the reason for my life, I’m going to re-discover the reason for this blog. Re-discover why I love it so much. And I promise when I do, it’ll be amazing.
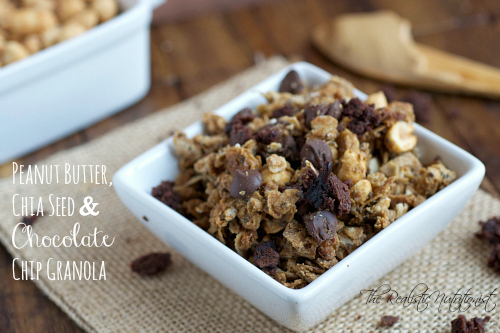
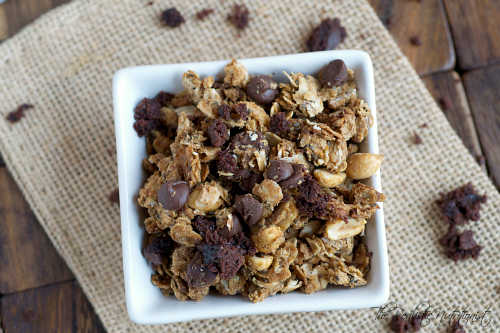
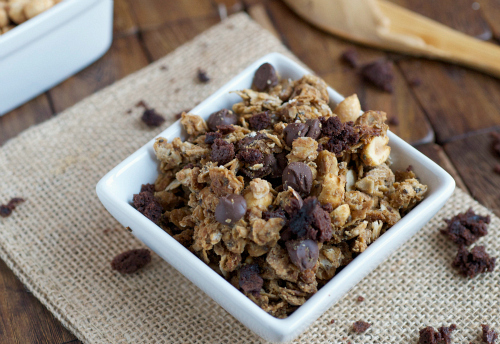
Peanut butter, chia seed and chocolate chip granola
This whole not having Wi-Fi or cable thing is actually not as horrible as I thought it would be. It’s not like I have to live without this salty, sweet, and crunchy peanut butter, chia seed and chocolate chip granola. (Like how I did that?)
Really! Not having it has really made me 45,000 times more productive. I don’t waste time watching stupid shows or surfing the web. I wake up, cook & bake, stage & style and photograph & edit. Then I spend a few hours writing the actual articles. When I’m done (usually around 3 – 4) I head to the public library (just 2 steps from my house!) and upload all of my images and articles. In addition to super-fast Wi-Fi, the library has a ton of DVDs so e and I have been watching some fantastic old classics, like Jaws, Clue and Prom Night. Plus, I’ve spent so much more time thinking about recipes and writing out my cookbook. If this is how life was like pre-internet, I could almost get on board with it. ALMOST. Now, if I didn’t have 3G, shit would get real.
In addition to my productivity level, it’s doing wonders for our marriage. For one, el doesn’t spend hours shooting zombies and beating up hookers (on video games, of course) and I don’t spend my life watching endless episodes of Disappeared. We watch movies together, take long walks with our dogs (have I mentioned how much our new hood rocks?) and … you know… do other things adult married people sometimes partake in. It’s really helping all facets of my life.
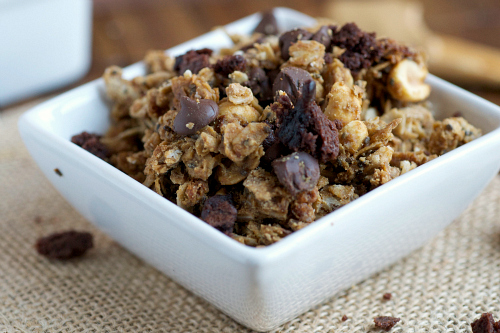
Don’t get me wrong though, we aren’t going to go all hippies and rid ourselves of Wi-Fi and cable forever. In fact, the second we move into our old (new?) place once its repaired, we’re calling Verizon. But for now? It works. Just like this perfectly sweet, salty and delicious peanut butter, chia seed and chocolate chip granola (again, I’m just a whizz at these transitions).
Peanut butter, chia seed and chocolate chip granola
CLICK HERE FOR THE PRINTABLE VERSION OF THIS RECIPE!
Yields 8 cups (serving size ½ cup)
Prep time: >5 minutes
Cook time: 15 minutes
Ingredients:
- 2/3 cup low-fat creamy peanut butter
- ½ cup honey
- 2 tablespoons molasses
- 1 teaspoon pumpkin pie spice
- 1 teaspoon vanilla extract
- 4 cups uncooked oats
- 2 ½ tablespoons chia seeds
- 1 cup peanuts
- 1 cup chocolate chips
Directions:
- Heat oven to 300 degrees F. Line a baking dish with foil.
- In a saucepan over medium heat, heat the peanut butter, honey, molasses and cinnamon. Heat until melted, about 2 – 3 minutes over medium heat.
- In a large bowl, mix the oats, chia seeds and peanuts together. Pour the melted peanut butter mixture over the oats and stir to combine.
- Stir in the chocolate chips, careful not to stir too much (or they will melt).
- Spread mixture evenly in the dish. Bake for about 30 – 40 minutes, or until golden brown. Remove pan from oven. Once oven has cooled, place pan back in to dry (about an hour).
Nutritional information per 1/2 cup:
Calories: 270
Fat: 11.5 grams
Carbohydrates: 37.5 grams
Fiber: 2.5 grams
Protein: 9.3 grams
Weight Watchers Points: 8
 Claire
Tags:chia seed recipes, granola recipes, oats recipes, peanut butter recipes
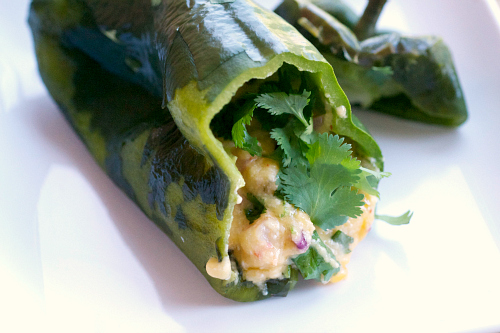
Shrimp & Cheese Stuffed Poblano Peppers
Before we jump into this delicious, summer inspired shrimp and cheese stuffed poblano peppers recipe, I want to give you a brief update on life. I’m happy to report that I’m in much better spirits than I was last week. I don’t spend most of my days crying, my panic attacks have lessened and I’m finally starting to feel like myself again. I still have to obsessively touch each burner to ensure they aren’t on or quadruple check the oven before I leave. I also still have this gut, horrible feeling that something could go horribly wrong when I shut the door. But thanks to the amazing kindness of our friends and family, we have a regular, super comfy bed to sleep on, money to buy a new couch and a new start to my once shattered prop collection. It won’t be fast and I know it’ll take time to heal, but because of all of you guys, I’m sure I’ll get there much quicker.

I just want to say thank you again to everyone who has offered any advice, kind words or encouraging messages. It’s because of you guys I’m able to pick myself up again! To show my appreciate, I’ve made you the perfect entree for these lazy summer days, shrimp stuffed peppers!
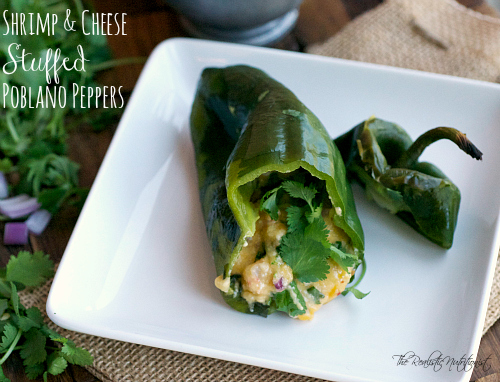
I’ve been obsessed with poblanos since my trip out to New Mexico for a friend’s wedding. And now, I get them every time I can. Surprisingly though, I’ve never made them stuffed. And what better ingredients to stuff into a pepper than shrimp and cheese?
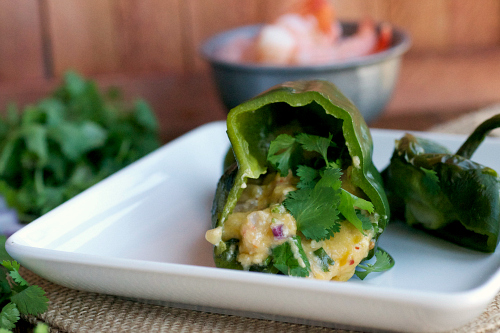
Before you write this off as an “indulgent” meal or one that’s decadent, I have news for you. Each pepper has just 10 grams of fat and less than 200 calories. Oh and heaping 20 grams of protein and 2 grams of fiber. Which means only one thing, you can eat this and still fit into that bathing suit you’ve been working to fit into all spring.
Who knew something so stuffed could still be so skinny?
Shrimp and cheese stuffed poblano peppers
CLICK HERE FOR THE PRINTABLE VERSION OF THIS RECIPE!
Serves 4. Recipe inspired by Cooking Light.
Prep time: 10 – 12 minutes
Cook time: About 15 minutes
Ingredients:
- 4 poblano peppers
- 1 tablespoon olive oil
- Salt and pepper
- 3 garlic cloves, minced
- ½ pound cooked shrimp, chopped
- ¼ cup chopped red onion
- ¾ tablespoon all purpose flour
- ¼ cup nonfat Chobani Greek yogurt
- 1/3 cup fat-free milk
- 1/3 cup + 1 ½ tablespoons part-skim cheddar cheese
- Fresh cilantro for garnish
- 2 tablespoons crushed red pepper
Directions:
- Preheat broiler. Place the poblanos, whole, onto a foil laned baking sheet. Broil for about 10 minutes, or until blackened on all sides. Place in a plastic bag, shut and let sit for about 10 minutes. Once chilled and rested, peel the skin and cut the tops off each pepper.
- Heat the olive oil in a skillet over medium heat. Add garlic and cook until slightly fragrant, about 1 minutes. Add red onion and cook until transluscent. Add chopped shrimp to pan. Add salt, pepper and crushed red pepper. Cook for a bout 3 minutes. Remove from pan.
- Add flour to the pan and cook about a minute. Gradually add the Greek yogurt and milk. Remove from heat and stir in cheese. Add the shrimp and onion mixture to the cheese mixture and mix to combine.
- Spoon about ¼ cup of mixture into each pepper. Garnish with salt and pepper.
Nutritional information per pepper:
Calories: 180
Fat: 10 grams
Carbohydrates: 9 grams
Fiber: 3 grams
Protein: 20.5 grams
Weight Watchers Points: 5
Claire
Tags:cheese recipes, decadent recipes, pepper recipes, shrimp recipes, summer recipes
Pink Lemonade Bars

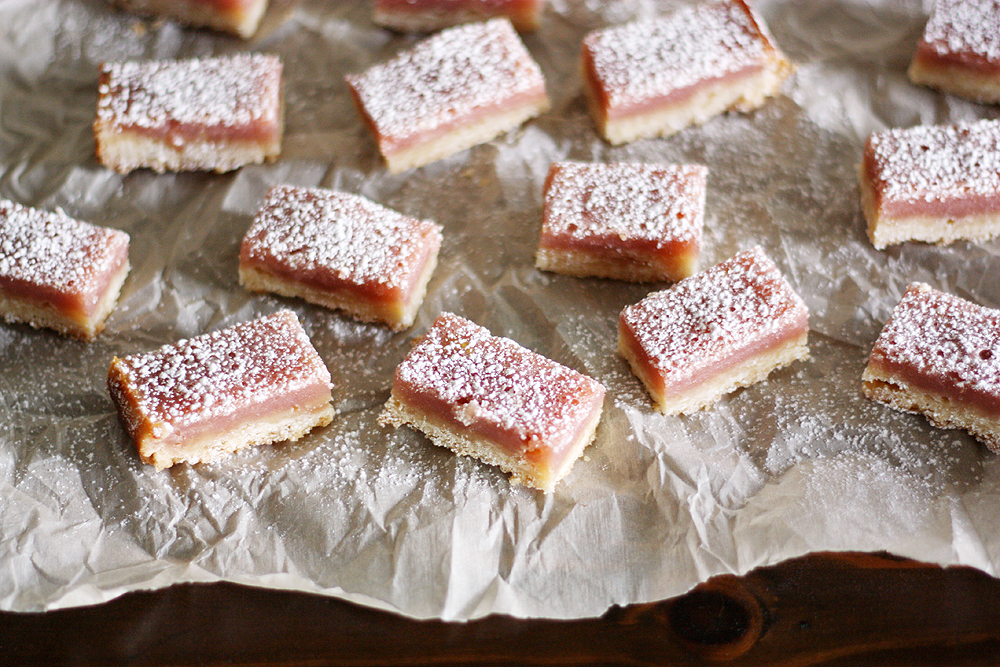
Aaaaanyway, let’s talk about pink lemonade bars, shall we? I love these little bars — they taste just like pink lemonade, one of my favorite drinks to sip on in the summer. Equally a shortbread crust and a tart-sweet raspberry lemonade filling, I can’t get enough of them. Now I’m torn between whether I like drinking or eating pink lemonade better — which is why I usually do both simultaneously. It’s a delicious combo, let me tell you.
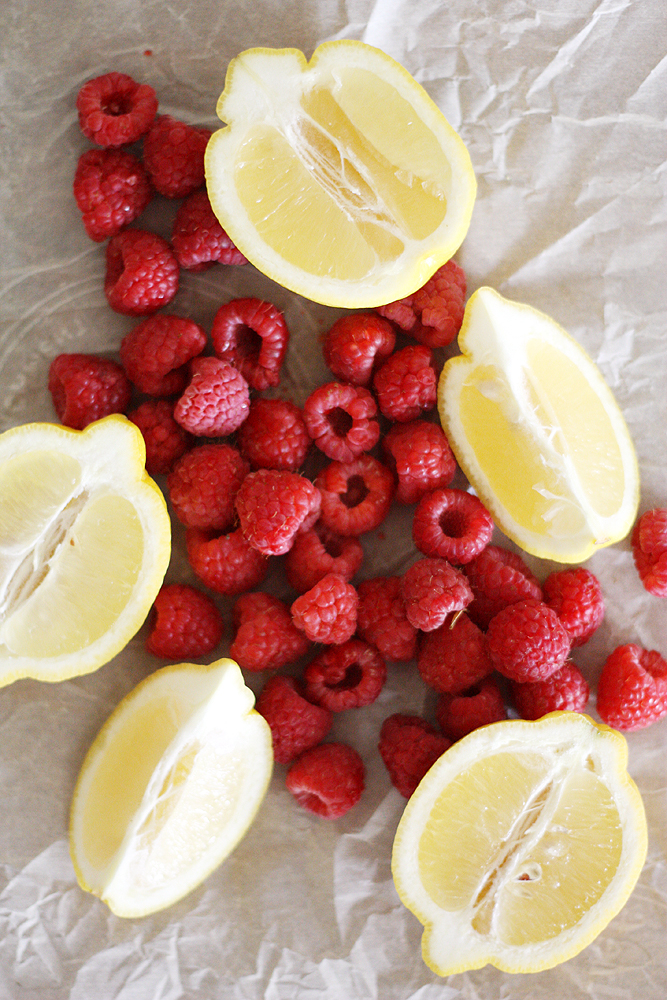
Of course, pink lemonade bars hardly are a new invention — just Google them and you’ll find a million different variations. But I preferred this version from the get-go because 1) the pink in the pink lemonade comes from actual fruit, not red food coloring and 2) it’s based off a Smitten Kitchen recipe, so you know it’s good. Some people prefer to make their bars with strawberries or even cherries, which is cool, too, but I love the color and sweetness that comes from a raspberry. You may disagree — but I urge you to at least try one, which will then lead to trying five more, which will lead to realizing that yes, in fact, raspberries make a dang good pink lemonade bar. That’s been my experience, anyway.
Make them for your family, make them for a friend who needs support, make them so you can eat the whole batch by yourself while watching The Bachelorette — hey, whatever works. It’s summertime; let’s make the best of it!
Pink Lemonade Bars

CLICK HERE FOR THE PRINTABLE VERSION OF THIS RECIPE!
Adapted from Smitten Kitchen
Yields: 28 bars (or 16, depending on how you cut them)
Ingredients:
For the crust:
- 1/4 cup granulated sugar
- 1/4 teaspoon lemon zest
- 1/8 teaspoon salt
- 1/2 cup cold unsalted butter, cut into 1/4-inch pieces
- 1 cup unbleached all-purpose flour
For the filling:
- 1 cup fresh raspberries
- 2 eggs
- 3/4 cup granulated sugar
- 1/4 cup plus 1 tablespoon fresh lemon juice (from 2 lemons)
- 1/3 cup unbleached all-purpose flour
- Powdered sugar, for dusting
Directions:
- Heat oven to 350 degrees F. Line an 8-by-8-inch square baking pan with parchment paper, extending up two sides (for “handles”). Lightly grease bottom and sides of pan with cooking spray.
- In a food processor, combine sugar, lemon zest and salt. Add butter and pulse until crumbly and well combined. Add flour and pulse until a dough forms.
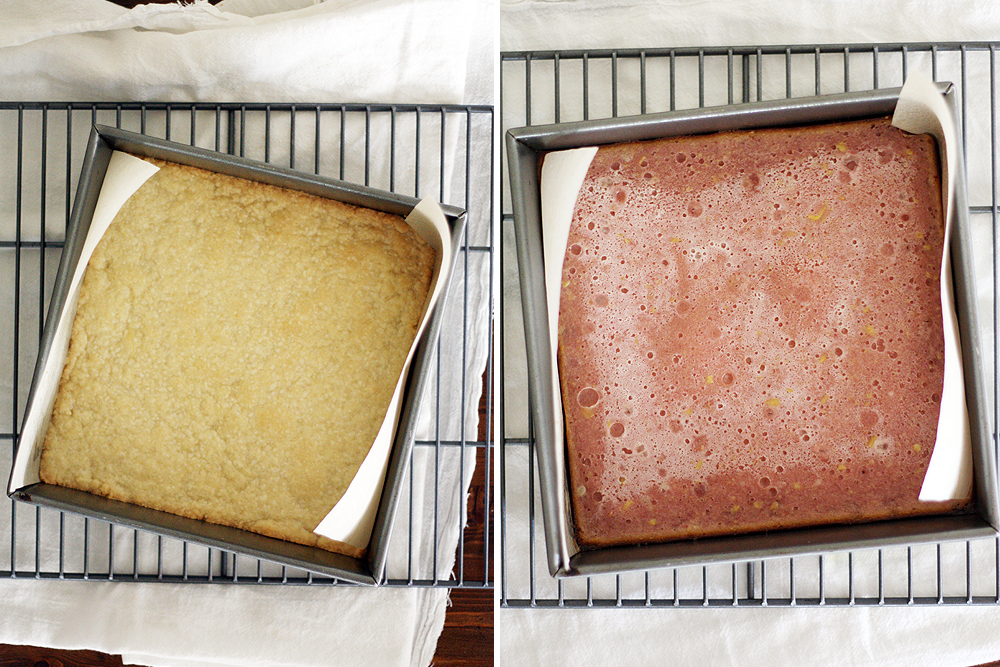
- Press dough evenly into bottom of prepared baking pan. Bake 15 minutes or until set and lightly golden on the edges. Set aside to cool while you make the filling.
- Puree raspberries in food processor (no need to clean) until liquid. Strain mixture to remove seeds and excess pulp. You should be left with about 1/3 cup raspberry puree.
- In a large bowl, whisk together eggs, sugar and lemon juice. Add in about 2 tablespoons raspberry puree and the flour; stir until well combined. Pour filling onto crust and bake until set, about 25 to 30 minutes. Cool completely in pan before dusting with powdered sugar and cutting into bars.


